If you are new to the Pico, and Python development, check out Raspberry Pi’s guide to get you started
Kitronik have also written a First Steps Tutorial to get you started using the Pico with the Thonny Editor.
Getting the Autonomous Robotics Code
Kitronik have written a module to use with the Autonomous Robotics Platform which is available, along with sample programs, in the Kitronik GitHub.
If the words “Clone the repo” mean nothing then check out our guide to git
If you are new to using modules with the Pico, there is a helpful guide providing practical examples and explanations on how to do so.
Clone or download the repository and then copy / save the PicoAutonomousRobotics.py file to your Pico.
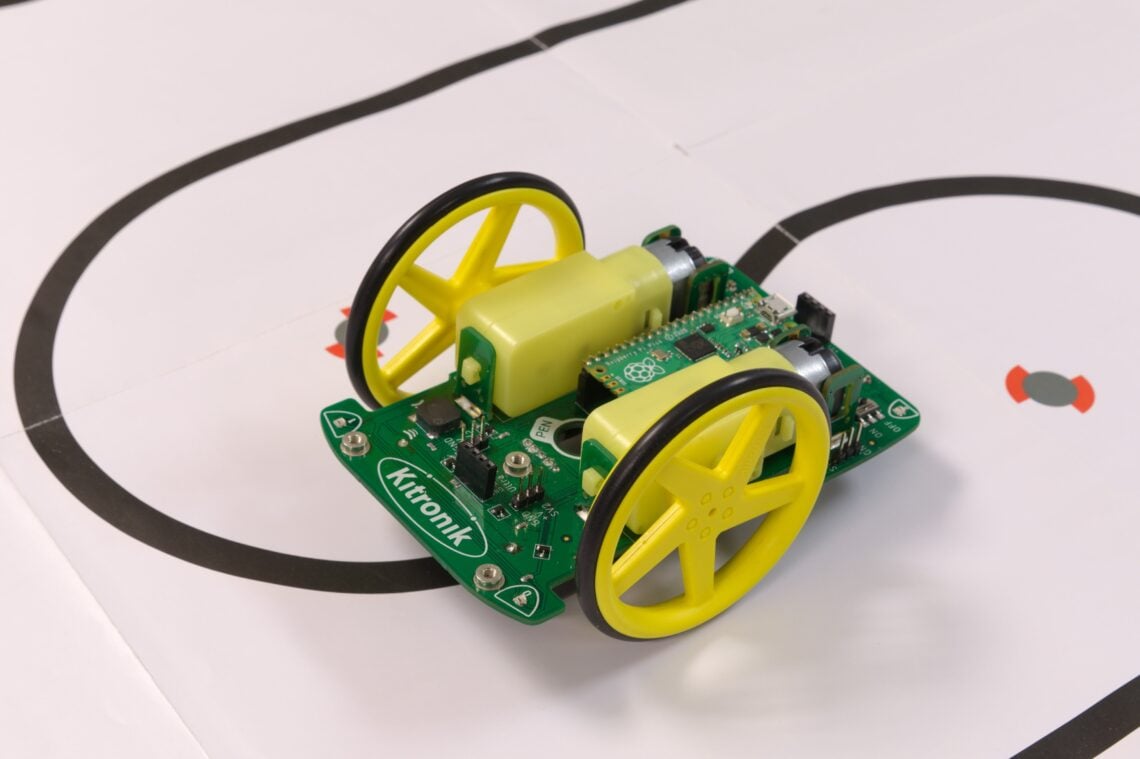
The Sensors
The Autonomous Robotics Platform (ARP) provides 3 line following sensors on a plug in board.
These are infrared LED and phototransistor pairs. These give a signal depending on how much of the emitted light is reflected back. Dark surfaces tend to absorb light, whereas light ones reflect it. On the ARP the sensors report a large value for dark surfaces, and a small value for light ones.
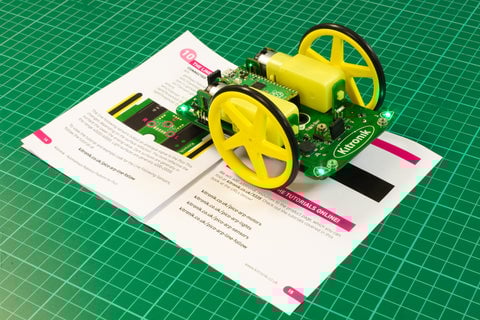
This tutorial uses the sample line on page 15 in the ARP Booklet.
Ensure that the line following board is plugged in and then create the following code:
from PicoAutonomousRobotics import KitronikPicoRobotBuggy
from time import sleep
buggy = KitronikPicoRobotBuggy()
while True:
    centreVal = buggy.getRawLFValue("c")
    leftVal = buggy.getRawLFValue("l")
    rightVal = buggy.getRawLFValue("r")
    print("Centre:", centreVal, " Left:",leftVal," Right:",rightVal)
    sleep(1)
This code prints out the values of the 3 line following sensors to the Thonny shell. When the sensor is over a light, reflective surface it will output a small number, and when over a dark surface it will output a large number
These readings are with the central sensor over the white part of the page and the left and right sensors over the dark test line:
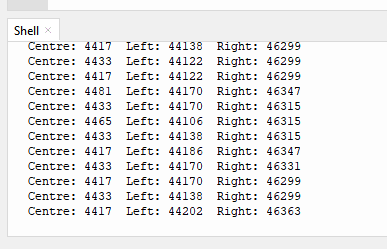
Try the ARP over some solid colours, such as your desk/worktop, a piece of paper or other things. You will notice that generally the readings for the central sensor are lower than the edge sensors. This is because the LEDs which illuminate the edge sensors also partially illuminate the central sensor, so it receives more light.
You may also notice that some colours which appear to be a dark colour give readings as though they are light. Blue and green tapes are often ‘lighter’ than might be thought. This is because the sensors operate in the infrared region of light, which is different to what human eyes can see. Some ‘white’ papers are surprisingly infrared absorbent, and so appear ‘dark’ to the sensors.
When you are creating a line to follow on a background, it is a good idea to check and see that there is a good difference in the readings for the line and the background, so your ARP can detect where the line is to follow it.
Following a Line
Now the sensors are reporting values we can use them to follow a line.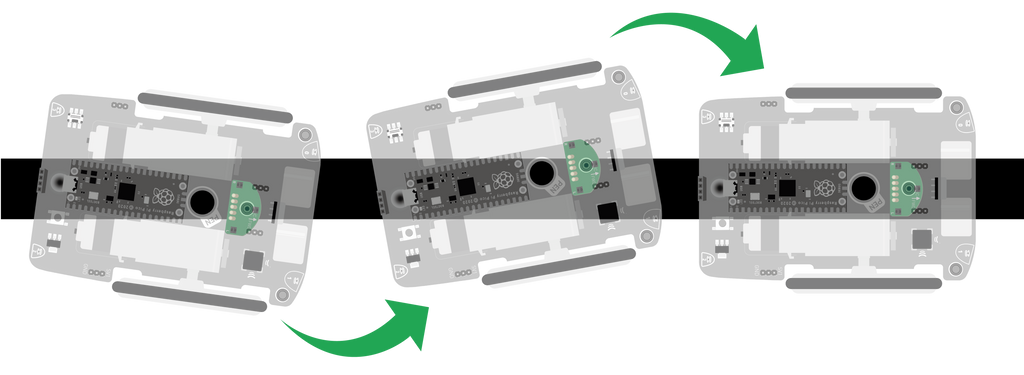
When the ARP is over the line the centre sensor (and possibly the edge ones as well – depending on the line width) can detect it. In this case the motors can drive forward. If the line moves from under the centre then the sensor on that side, and eventually the centre one as well will detect this.
To turn back to the line we need to stop, or reverse, the motor that is on the same side as the sensor that is still over the line. We can simulate this with the ZIP LEDs – turn them green for motor driving, and red for stopped.
Create and run the following code:
from PicoAutonomousRobotics import KitronikPicoRobotBuggy
from time import sleep
buggy = KitronikPicoRobotBuggy()
buggy.setLED(0,buggy.GREEN)
buggy.setLED(1,buggy.GREEN)
buggy.setLED(2,buggy.GREEN)
buggy.setLED(3,buggy.GREEN)
buggy.show()
while True:
    centreVal = buggy.getRawLFValue("c")
    leftVal = buggy.getRawLFValue("l")
    rightVal = buggy.getRawLFValue("r")
    print("Centre:", centreVal, " Left:",leftVal," Right:",rightVal)
    #black line means centre should be high value, so if its not we are off the line.
    if(centreVal < 30000):
        #figure out which side we went
        if(leftVal < (rightVal)): #turn right
            buggy.setLED(0,buggy.GREEN)
            buggy.setLED(1,buggy.RED)
            buggy.setLED(2,buggy.RED)
            buggy.setLED(3,buggy.GREEN)
        elif (rightVal <  (leftVal)): #turn left
            buggy.setLED(0,buggy.RED)
            buggy.setLED(1,buggy.GREEN)
            buggy.setLED(2,buggy.GREEN)
            buggy.setLED(3,buggy.RED)
    else: #buggy should drive forward
        buggy.setLED(0,buggy.GREEN)
        buggy.setLED(1,buggy.GREEN)
        buggy.setLED(2,buggy.GREEN)
        buggy.setLED(3,buggy.GREEN)
    buggy.show()
    sleep(0.01)
Place the ARP over the line in the booklet, as though it was going to follow it.
Slowly move it to either side of the line, and notice how the ZIP LEDs change colour to indicate which way the ARP should move to re-centre over the line.
Making the ARP move along a line is now simply a case of adding in the motor control as indicated by the ZIP LEDs. If you have a :MOVE Mat then that makes the ideal test course. If you don’t have a :MOVE Mat then you can make a course from dark insulating tape on a light background. Don’t forget to check the values the sensors report for ‘dark’ and ‘light’ for your chosen surfaces.
The line following code should look like this:
from PicoAutonomousRobotics import KitronikPicoRobotBuggy
from time import sleep
buggy = KitronikPicoRobotBuggy()
while True:
    leftVal = buggy.getRawLFValue("l")
    rightVal = buggy.getRawLFValue("r")
    centreVal = buggy.getRawLFValue("c")
    #black line means centre should be high value, so if its not we are off the line.
    if(centreVal < 30000):
        #figure out which side we went
        if(leftVal < (rightVal)): #turn right
            buggy.setLED(0,buggy.GREEN)
            buggy.setLED(1,buggy.RED)
            buggy.setLED(2,buggy.RED)
            buggy.setLED(3,buggy.GREEN)
            buggy.motorOn("l","f",75)
            buggy.motorOn("r","r",75)
        elif (rightVal <  (leftVal)): #turn left
            buggy.setLED(0,buggy.RED)
            buggy.setLED(1,buggy.GREEN)
            buggy.setLED(2,buggy.GREEN)
            buggy.setLED(3,buggy.RED)
            buggy.motorOn("l","r",75)
            buggy.motorOn("r","f",75)
    else: #buggy should drive forward
        buggy.setLED(0,buggy.GREEN)
        buggy.setLED(1,buggy.GREEN)
        buggy.setLED(2,buggy.GREEN)
        buggy.setLED(3,buggy.GREEN)
        buggy.motorOn("l","f",75)
        buggy.motorOn("r","f",75)
    buggy.show()
    sleep(0.01)
This code follows a dark line on a light background.
Can you make it follow a light line on a dark background?
Coding Resources for Pico-ARP:
| Online Tutorials – Pico ARP. |
|---|
| Using the Motors. |
| Using the Buzzer, Button and Lights. |
| Using the Line Following Sensors. |
| Using the Ultrasonic Sensor. |
| Using the Servo connections. |