If you are new to the Pico, and Python development, check out Raspberry Pi’s guide to get you started
Kitronik have also written a First Steps Tutorial to get you started using the Pico with the Thonny Editor.
Getting the Autonomous Robotics Code
Kitronik have written a module to use with the Autonomous Robotics Platform which is available, along with sample programs, in the Kitronik GitHub.
If the words “Clone the repo” mean nothing then check out our guide to git
If you are new to using modules with the Pico, there is a helpful guide providing practical examples and explanations on how to do so.
Clone or download the repository and then copy / save the PicoAutonomousRobotics.py file to your Pico.
User Input: Button
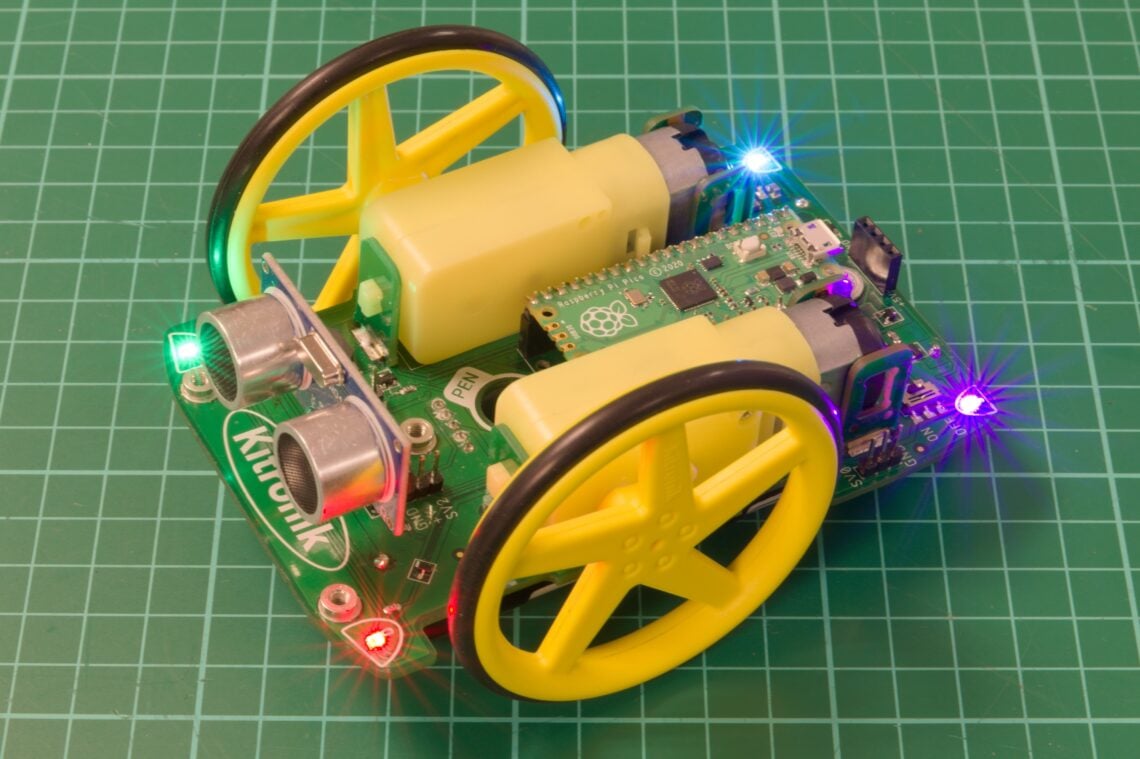
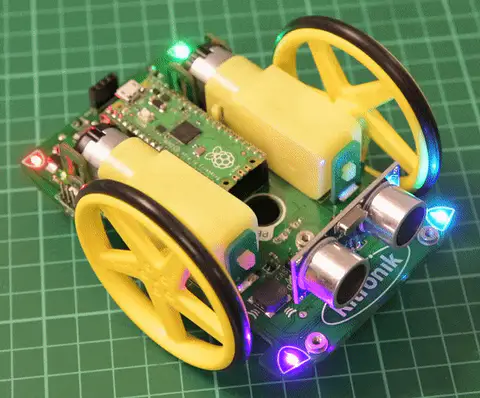
The Autonomous Robotics Platform (ARP) has a button.

Eventually this will be used to control the buzzer and ZIP LEDs in this tutorial, but first we will use the button to trigger the Pico’s onboard LED – this helps to prove the setup is good.
Ensure that your Pico is mounted on your ARP, and it is switched on.
Connect Thonny to the Pico. Plug the Pico in with a USB lead. In bottom right corner of Thonny click and select MicroPython (Raspberry Pi Pico)
In Thonny create the following Code:
from PicoAutonomousRobotics import KitronikPicoRobotBuggy
from time import sleep
buggy = KitronikPicoRobotBuggy()
import machine
LED = machine.Pin(25,machine.Pin.OUT) #Setup the onboard LED Pin as an output
while True:
    LED.value(buggy.button.value())
    sleep(0.05)
Download and run the code.
Press the button and the Pico’s onboard LED should light up. This is very similar to the Pico Discovery Kit first experiment.
Beep the Horn
Now we know how the button works we can use it to beep the ARP horn.

Create and run the following code:
from PicoAutonomousRobotics import KitronikPicoRobotBuggy
buggy = KitronikPicoRobotBuggy()
while True:
    if(buggy.button.value() == True):
        buggy.beepHorn()
This code uses the value of the button to beep the horn, looping forever to read it.
Interrupts
Instead of looping fast to read the value of the button, microcontrollers can also be notified of a change. We can do this with an interrupt, also known as an IRQ (Interrupt ReQuest). An IRQ lets the processor be interrupted from its main loop to do a thing – such as deal with a button press – before then returning to the code it was doing before.
Create and run the following code which makes use of an IRQ:
from PicoAutonomousRobotics import KitronikPicoRobotBuggy
buggy = KitronikPicoRobotBuggy()
def ButtonIRQHandler(pin):
    buggy.beepHorn()
buggy.button.irq(trigger=machine.Pin.IRQ_RISING, handler =  ButtonIRQHandler)
while True:
   pass
In the IRQ routine we call the beepHorn() function, which sounds the onboard buzzer.
Generally IRQ functions should be kept as short as possible to handle the request. When the processor is interrupted the main loop is stopped whilst the request is handled. If your IRQ function takes a long time, or worst case never completes, then the performance of the system can become erratic.
You might notice that sometimes the button seems to make more than one horn beep. If you do, then you are hearing a phenomenon called ‘switch bounce’.
Debouncing
Mechanical switches do not change state instantly. Because they are usually a moving piece of springy metal then they can exhibit ‘bounce’.
As an example, when a switch is closed, and so the input connected to it goes from a ‘0’ to a ‘1’, there is a period of time when the input sees ‘1’ then ‘0’ then ‘1’ then ‘0’ until the switch settles into the new ‘1’ value.
If the input is connected to a rising edge triggered interrupt then the microcontroller may well assume it has had several IRQ triggers.
To overcome this, switches are usually ‘de-bounced’. This can be done in 2 ways – in hardware with a small filtering circuit, or in software, where the input is read over several iterations, and the trigger on raised when the state has been the same for a defined period.
The ARP button has no hardware de-bouncing, so we can see the bounce.
Create and run the following code which shows a de-bouncing algorithm:
from PicoAutonomousRobotics import KitronikPicoRobotBuggy
from utime import sleep
from machine import Timer
buggy = KitronikPicoRobotBuggy()
def checkButton(callBackParam):
    global buttonState
    global startStop
    buttonState = buttonState <<1 | buggy.button.value() |0xE000
    buttonState &=0xFFFF
    if buttonState == 0xEFFF: #button has been pressed and passes the debouncing test
       if startStop == True:
            startStop = False
       else:
            startStop = True

debounceTimer = Timer()
debounceTimer.init(period=2, mode=Timer.PERIODIC, callback=checkButton)
buttonState = 0
LED = machine.Pin(25,machine.Pin.OUT)
startStop = False
while True:
    if startStop == True:
       LED.value(1)
       sleep(0.5)
       LED.value(0)
       sleep(0.5)
    else:
        sleep(0.1)
This algorithm uses a timer to periodically sample the value of the button. Once every 2ms the current value of the button is recorded in the variable ‘buttonState’. After 12 ‘1’s have been recorded the button is considered to be ‘pressed’ and will change the state of the ‘startStop’ variable.
Lights
The ARP has 4 ZIP LEDs onboard. These are addressable, colour controllable LEDs.
Create and run the following code:
from PicoAutonomousRobotics import KitronikPicoRobotBuggy
buggy = KitronikPicoRobotBuggy()
buggy.setLED(0, buggy.WHITE)
buggy.setLED(1, buggy.WHITE)
buggy.setLED(2, buggy.RED)
buggy.setLED(3, buggy.RED)
buggy.show()
This will turn on the front LEDs (headlights) white, and the rear LEDs (tail lights) red.
We can also dim the ZIP LEDs, as well as control their colour.
Create and run the following code:
from PicoAutonomousRobotics import KitronikPicoRobotBuggy
from time import sleep
buggy = KitronikPicoRobotBuggy()
brightness =10
countUp = True
def ButtonIRQHandler(pin):
    global countUp
    global brightness
    if(countUp):
        brightness +=5
        if(brightness>99):
            countUp = False
    else:
        brightness -=5
        if(brightness<1):
            countUp = True
    buggy.setBrightness(brightness)
    buggy.show()
def rotateColours():
    # temporarily  store the first one, then overwrite it, shifting by 1 LED at a time
    first = buggy.getLED(0)
    buggy.setLED(0,buggy.getLED(1))
    buggy.setLED(1,buggy.getLED(2))
    buggy.setLED(2,buggy.getLED(3))
    buggy.setLED(3,first) # push the colour that was at 0 back in at this end.
buggy.button.irq(trigger=machine.Pin.IRQ_RISING, handler =  ButtonIRQHandler)
#set the LEDs initial pattern
buggy.setLED(0, buggy.RED)
buggy.setLED(1, buggy.GREEN)
buggy.setLED(2, buggy.BLUE)
buggy.setLED(3, buggy.PURPLE)
buggy.setBrightness(brightness)
buggy.show()
while True:
    rotateColours()
    buggy.show()
    sleep(0.5)
This code has a simple ‘Rotate’ function for the ZIP LEDs, so that the colours move around the 4 ZIP LEDs. On each button press the brightness is changed by 5, counting up to 100 – full brightness – and once there counting back to 0.
Coding Resources for Pico-ARP:
| Online Tutorials – Pico ARP. |
|---|
| Using the Motors. |
| Using the Buzzer, Button and Lights. |
| Using the Line Following Sensors. |
| Using the Ultrasonic Sensor. |
| Using the Servo connections. |