This guide is part of a three‑lesson sequence: Arrays → Radio → Emoji Catch. Each guide builds on the last and prepares students for the final two‑player game. It serves as an introduction/primer to arrays, and how to use them in MakeCode for micro:bit. It covers the differences between variables and arrays and then works towards a practical example.
We recommend this guide as suitable for young coders aged 11+ that already have some basic coding under their belts, including the use of variables. We suggest that this activity should be very ‘hands-on’ for the teacher. Once the class has worked through this activity, pick one of the extensions task suggestions at the foot of this guide and take a step back and see how they get on.
What is a variable?
When you’re coding, a variable is like a little box that holds something for you; maybe a number, a word, or even an emoji. You give the box a name (like score or playerName) so you can use it later in your program. A variable can be changed, or reset to its starting value at any time within the program, or always stay the same, depending on what you need to do. If you only need to store one thing, like a score that changes, a single variable is perfect. But what if you want to store several things that are related, like the names of four players, or the directions on a compass? That’s where an array comes in handy.
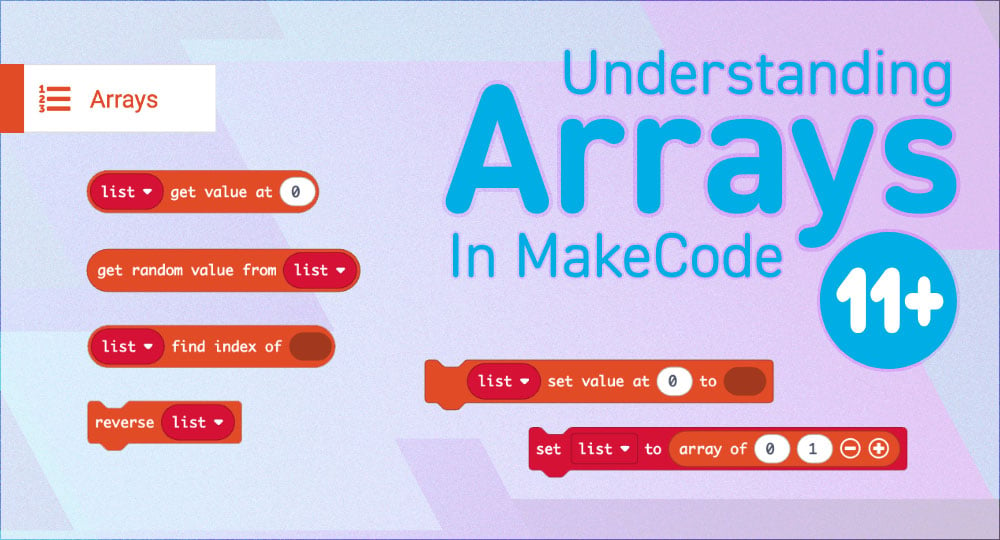
What is an array?
An array is like a big box that contains a number of smaller boxes. Each smaller box can hold a word or a number, just like a normal variable. These smaller boxes are called elements, and you can have as many elements in your array as you need. You can also add new elements, remove old ones, or even change their order while your program is running.
What is an index?
Remember: Indexes always start at 0, not 1.
In a variable, the variable has a name and contents. In an array, the array has a name and each of the contained elements has an index. The first box in an array is index 0, the next is 1, then 2, and so on. So if you had an array called Heading = [“N”, “S”, “E”, “W”], you could grab “N” by asking for Heading[0], or “W” by asking for Heading[3]. Arrays are super useful when you want to do the same thing to a group of items, like picking one at random, checking them in a loop, or showing them one by one. If you only have a few items and each one needs its own special job, you might use separate variables instead. But if they’re part of a set and you want to treat them the same way, arrays make your code cleaner and easier to manage.
Imagine you’re storing your favourite snacks in a list; chips, cookies, apples, pizza. That’s an array! Each snack has its own index number, so you can grab one quickly, or even pick a random snack to eat. Arrays make coding feel a bit like organising your backpack; everything has its place, and you can find it fast.
Practical example: Arrays with compass directions
This entire example can be completed in MakeCode for micro:bit, no hardware required, other than a computer with access to the MakeCode editor. We are going to create a program that will pick a random compass heading for us when the A button on the micro:bit is pressed. You and your young learners may find it more enjoyable and engaging to use actual micro:bits, once the code has been tested and is working as expected.
We used
- A Computer with internet connection
- A browser and MakeCode for microbit
- Optional
Step 1: Create a variable
First, create a variable to hold our list of compass directions.
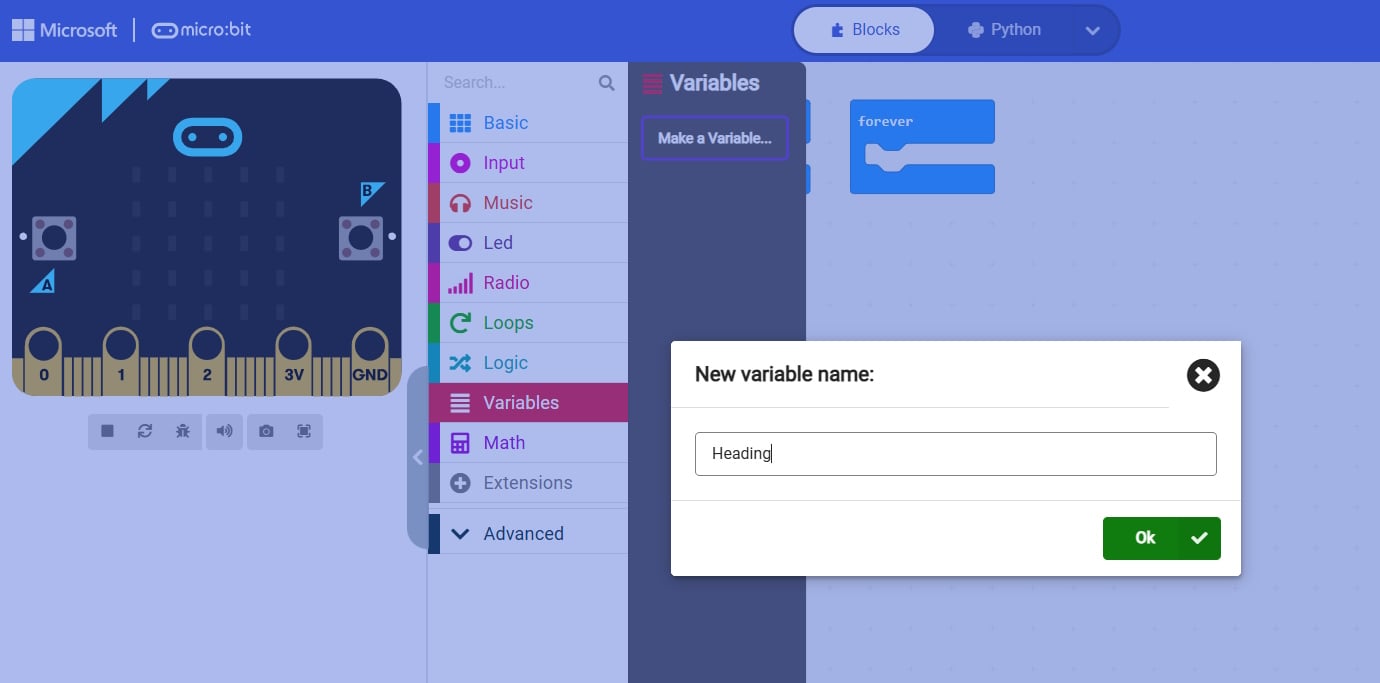
- Action: In MakeCode, click Variables → Make a Variable.
- Name: Set the variable name to
Heading. - Purpose: This variable will store our array (list).
Step 2: Build the array
Now add the four compass points to the array.
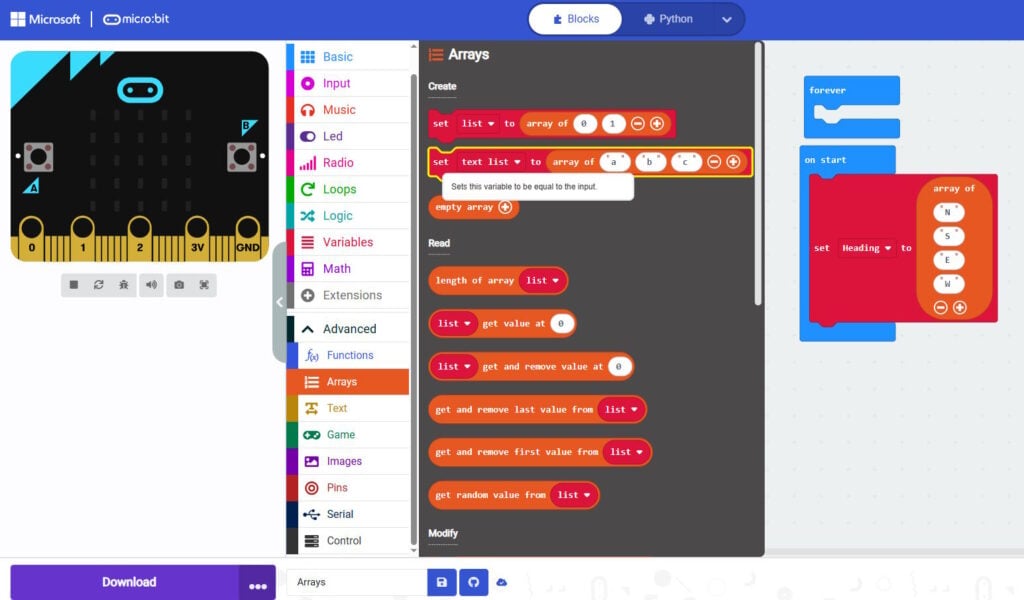
- Action: Go to Advanced → Arrays → Set variable to array of text values.
- Items: Add
"N","S","E","W"into the list. You will need to select the + symbol to be able to add the final W to the array.
Step 3: Understand indexes
Arrays store items in the order that you add them. Each item has a position number called an index. Indexes start at 0.
| Index | Value |
|---|---|
| 0 | N |
| 1 | S |
| 2 | E |
| 3 | W |
That means:
- Heading[0]:
"N" - Heading[1]:
"S" - Heading[2]:
"E" - Heading[3]:
"W"
Step 4: Use random to pick an index
We want the micro:bit to show a random direction when the A button is pressed.

- Action 1 : Go to Input → on button A pressed.
- Action 2 : Go to Variables and create a variable called randomIndex, Also get the set index to block, change to randomIndex
- Action 3 : Go to Math → pick random
- Action 3 : Go to Basic → show string
- Action 4 : Go to Arrays → get value at
- Action 5 : Go to Variables and get Heading and randomIndex and place them in the above get value at block.
- Random index: Inside the random event, pick a random number between
0and3. - Use the index: Select the item from
Headingat that index.
Step 5: Show the result
The completed code: Displays the chosen random direction on the micro:bit’s LED screen after the A key is pressed.
Explanation of the code
- Heading = [“N”, “S”, “E”, “W”]: Creates an array with four items.
- pick random(0, 3): Picks a random number from 0 to 3 (matching the indexes).
- Heading[randomIndex]: Uses that number to select the corresponding item from the array.
- basic → showString(…): Displays the chosen direction on the micro:bits LED matrix.
What students learn
- Arrays are lists: A simple way to store related items.
- Indexes start at 0: Positions are numbered 0, 1, 2, 3 for four items.
- Interactivity: Button press triggers a random choice and immediate feedback.
Extension suggestions
Once the class has been introduced to arrays and worked through and completed the above example with the teacher, take a step back and give them another programming task to complete. Below are some possible challenges you can set that use all of the techniques that they have learned.
- Challenge 1 – Create a variable called snacks. Create an array of 6 favourite snacks. Use the random function to pick a snack when a key is pressed.
- Challenge 2 – Create a variable called saturday. Create an array of 6 activities you might do on a Saturday. Use the random function to pick an activity when a key is pressed.
- Challenge 3 – Create a variable called playlist. Create an array of favourite songs to listen to…
- Challenge 4 – Create a variable called game. Create an array of favourite games to play…
- Final Boss – Create a game of emoji catch, a two player game that students will create. There’s a teachers guide to this activity here.
| Follow the full series below: Emoji Catch | |
|---|---|
| ▶ Primer 1: Arrays | 📍 You are here |
| ▶ Primer 2: Radio | 🔗 Intro to Radio |
| ▶ Main Guide | 🔗 Emoji Catch Game |