Concrete is an amazing material that can be used in many applications (in addition to your garden path!). One great application that we came across in the last few weeks is a speaker enclosure that is being produced by students studying Product Design at Nottingham Trent University. An example of a finished speaker is shown below. We thought these looked really cool and decided that we would have to go along and see what was involved in creating them.

The casing is made by casting concrete in a mould to create the housing. A laser cut insert allow the speaker to be neatly mounted. The design is based around our Mono Amplifier Kit which the students soldered together themselves. The project was developed by Kerry Truman (@kerry_truman on Twitter) and Julian Robinson (@NTU_Concrete). These guys seem to be doing some great work and it is definitely worth following their Twitter accounts.
Creating the Concrete speaker housing
To make the housing a concrete mix was cast in a mould. Julian explained to the students how this is done. He started by explaining what goes into a typical basic concrete mix. To help with this he has produced a great hand-out which you can download here.

The mix that the students were going to make was referred to as a ‘1-2-4’ mix. This meant they wound be mixing one part cement with two parts fine aggregate (sand) and four parts course aggregate. These materials were all neatly organised ready for the students.

Before the students started their mixes Julian also highlighted any health and safety issues. All of the students wore face masks (for the dust) and safety glasses. Julian also explained that concreate is a caustic substance. This meant that if it got splashed on the skin it should be washed off. The caustic nature of concrete means that if it is left on the skin for long periods of time chemical burns can occur.
Scales were used to measure out the required amounts of each material.

Water was then added to the mixture and all the parts were mixed together. Julian informed the students that the more water that is added to the mix the ‘weaker’ the finished concrete will be.

The completed concrete mix is then ready to add to a mould. The mould is made up of the outer mould and a ‘laser cut’ collapsible insert.

The students have the choice of two types of outer mould. A metal mould that gives a smooth finish to the concrete.

Or a Polystyrene mould that gives the final product a slightly more textured look. The Polystyrene moulds are much cheaper but can’t be reused.

The students decided which type they preferred and then added their concrete mixture.

A vibration plate was used to make sure the concrete mixture entirely filled the mould without any voids.

Once the concrete has set the parts can be removed from their moulds.
 Building the amplifier circuits

As a separate task (in a slightly cleaner room) the students built one of our Mono Amplifier Kits. All of the students appeared to be competent at soldering and managed to build the kit in under an hour.


They used the step by step instructions (available online) to guide them through the assembly process.

Once they had finished building their amplifiers they gave them a quick test to make sure they were working.
Finishing off
All that is left is to mount the amplifier into the concrete housing. Unfortunately we didn’t get to see this as the students moulds were still in the process of setting. There were some examples that Kerry showed off.
A laser cut Perspex insert was used to house the speaker in the front of the housing. These could be cut in any colour that you want.

The rear of the speaker housing has plenty of space for the PCB and a 9V PP3 battery.

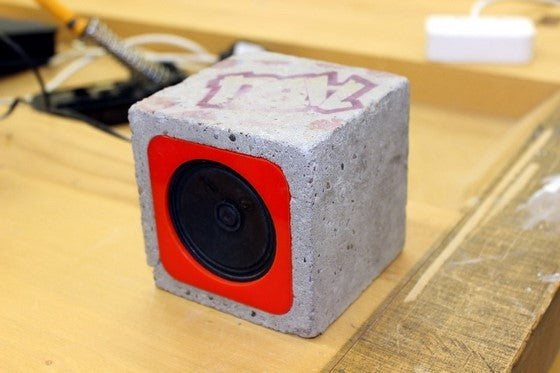
There were also some other examples shapes that had been tried out. One of these is shown below (with the orange front).


They appeared to have been moulded using a small Tupperware tub (or something similar).
We certainly found the visit very interesting. The people over at Nottingham Trent University were very welcoming (for which we send our thanks) and hopefully we will get to see some of the other things they get up to.
It is very interesting to see concrete used in this way. Maybe it will inspire you to try using it on one of your own projects.
Kerry sent us a few completed project pictures below:


See more pictures on this Flickr page.