Description
Make a funky light up collar for a dog with this easy to follow tutorial!
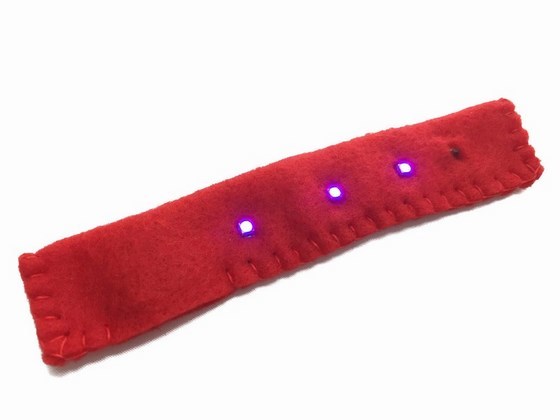
The collar is made from felt and uses three easy sew LEDs and a sewable slide switch.

Learn how to:
- Create a basic circuit using 3 easy sew LEDs.
- Use a miniature coin cell holder.
- Add a separate switch to a circuit (slide switch).
Level of difficulty:
- Beginner.
Parts List:
In order to make your light up collar you will need:
- 1 x Sewable Miniature Coin Cell Holder.
- 1 x CR1220 3V Coin Cell.
- 3 x Blue Easy Sew LEDs.
- 1 x Slide Switch.
- Conductive thread.
- 1 x Piece of felt 13cm x 5cm.
- 1 x Press stud.
- Embroidery thread.
Please note that the all of the Electro-Fashion components needed for this project are also supplied in retail pack form: Electro Fashion Starter Pack, Miniature Cell Holder.
Step by step guide to making a funky light up collar.
Step One

Cut a piece of felt 13cm x 5cm. Position the cell holder about 1cm from the short edge and 0.5cm away from the longer edge. Make sure the open edge of the cell holder is facing towards the edge of the fabric.
Over-sew the positive side of the cell holder into position using conductive thread. Make sure the stitches are tight and close together.

Using the same piece of conductive thread, stitch running stitches in a straight line to reach the opposite end of the collar, where the switch will go. Over-sew one of the sides of the switch onto the fabric.

Use a new piece of conductive thread and over-sew the second side of the switch into position. Stitch running stitches up to the position of the first LED and over-sew the positive side of the LED to the fabric. Make sure your stitches don’t touch the previous row of running stitches.

Use running stitches to get to the position of the second LED and over-sew into position.

Stitch down to the position of the remaining LED and over-sew into place. Make sure none of the stitches touch the running stitches above. The positive side of the circuit is now complete.
Step Two

Use a new piece of conductive thread and over-sew the negative side of the cell holder onto the fabric.

Use running stitches to reach the negative side of the LED next to the cell holder. Over-sew the negative side of the LED onto the fabric, make sure the stitches don’t touch or cross over the positive side of the stitches.

Repeat this process stitching down the remaining positive sides of the LEDs. The negative side of the circuit is now complete.
Step Three

Check the circuit works by sliding a cell battery into the cell holder with the positive side of the cell facing upwards.

Slide the black slider on the switch to the on position, and the LEDs will light up.
Step Four

Use ordinary sewing thread to over-sew the remaining positive and negative holes in the cell holder onto the fabric. These holes are not needed for this circuit and the stitches act as stabilising stitches.
Step Five

Stitch a popper onto the back of the fabric on the opposite side to the LEDs and cell holder. One side of the popper is stitched to each end of the fabric.
Step Six

Fold the fabric to match up the long edges, hiding the circuit inside the fabric. Mark on the position of the LEDs and the slider switch.

Cut holes in the fabric the size of the LED and slider switch.

Fold the fabric so the LEDs and slider switch poke through the holes. A small amount of fabric glue can be used to make sure the LEDs don’t come out of the holes. Stitch around the 3 edges of the collar to hold it together leaving a gap where the cell holder is, so that the cell can be changed. A blanket stitch and embroidery thread has been used in the image but the collar could be machine stitched or hand stitched using an alternative stitch.
Step Seven

Enjoy using your new light up collar!
https://www.textileshotline.co.uk/
This tutorial was produced for Kitronik by Julie Boyd who is a specialist in e-textiles design.
Download a pdf version of this page here. ![]()