Customer Notice:
This Page is now for reference only. We have discontinued maintaining the Kitronik bluetooth App and we have removed it as a download in the Playstore, we apologise for any inconvenience that this may cause. We have left this page up as a resource for those that already have the app installed.
Code your micro:bit
Let’s get started by coding our micro:bit to control it from the Kitronik Bluetooth Control app. The full code can be found below using the embedded MakeCode project, or at the end of this blog. To code your micro:bit you need to open the project in MakeCode, connect your micro:bit to the MakeCode project using a USB cable, and click the Download button.
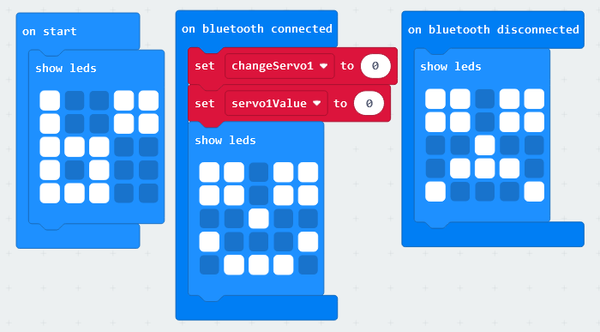
Now let’s take a look at how the code for the :MOVE mini buggy works. The micro:bit starts out by displaying a b* symbol on its LEDs to show that it is waiting for a Bluetooth connection. When the micro:bit has received a Bluetooth connection it will then set two variables to zero and show a smiley face symbol on its LEDs. When the Bluetooth is disconnected, the micro:bit will display a sad face symbol on its LEDs.
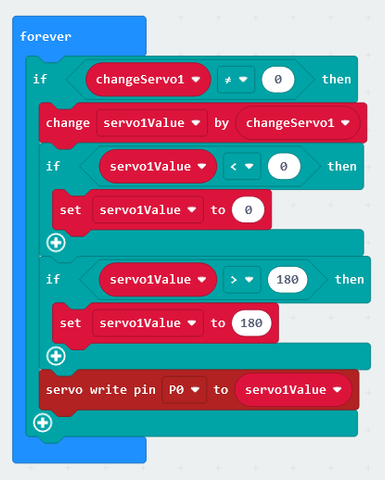
The code then contains a forever loop which will continue to repeat for the entire time the micro:bit is turned on. Inside the forever loop the micro:bit will check and modify two variables called changeServo1 *and *servo1Value. These variables are used to control the :MOVE mini attachment connected to the buggy. The changeServo1 variable is used to tell the micro:bit which direction to move the servo’s value, either increasing or decreasing. The *servo1Value *then stores the current value of this servo. When *changeServo1 *is set to 1, the *servo1Value *variable is increased by 1 each time the forever loop repeats. When *changeServo1 *is set to -1, the *servo1Value *variable is decreased by 1 each time the forever loop repeats. Then when *changeServo1 *is set to 0, the *servo1Value *variable is not changed. At the end of the forever loop the *servo1Value *variable is written to pin 0 to set the buggy servo attachment to that position.
The final part of the code is an event handler. The code inside the event handler is used to react to the Bluetooth messages sent to the micro:bit from the Kitronik Bluetooth Control app. When the micro:bit receives a Bluetooth message this code will check to see if the event value matches one we have setup. When the event value does match with one of in the if statements we have setup, then the code inside that block will be run. The four of the first eight event values in our event handler are used to move the buggy forward, backward, left and right when a button on the app is pressed down. The other four of these eight are used to stop the buggy from move when a button on the app is released. The last four event values are used to control the buggy servo attachment by changing the value stored in the changeServo1 variable.
Connect to your micro:bit using Bluetooth
To connect to your micro:bit using Bluetooth we are going to need to put the micro:bit in Bluetooth pairing mode. We can do this in two different ways. First you can do this by pressing and holding the A+B buttons and then turning on the micro:bit. Second you can do this by pressing and holding the A+B buttons while the micro:bit is already turned on, and then pressing the reset button on the back of the micro:bit. In either case we need to hold the A+B buttons down until the Bluetooth symbol is displayed on the micro:bit’s LEDs.
Once in Bluetooth pairing mode, go to the Bluetooth settings on your Android phone. With Bluetooth turned on, selected to pair a new device. Your phone will begin to search for Bluetooth devices nearby and should show you a BBC micro:bit in the list of available devices. When you can see your BBC micro:bit in the Bluetooth devices list, click on it and follow the instructions to connect to your micro:bit. When this is successful you micro:bit will display a tick symbol on its LEDs.
Using the Kitronik Bluetooth Control App
With the Kitronik Bluetooth Control app downloaded from the Google Play Store we can now start using the app to control the :MOVE mini buggy. Let’s start by opening the app and allowing it access to the Location and Nearby devices permissions.
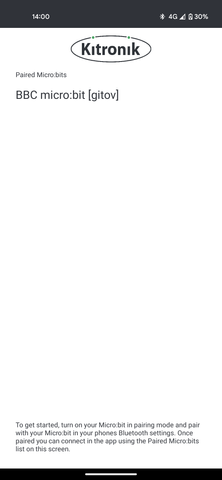
With this done and the micro:bit connected over Bluetooth, we can now see the micro:bit in the paired devices list on the app. From here you can click on your paired micro:bit from the list and the app will connect to it. Once connected you will see a smiley face displayed on your micro:bit’s LEDs.
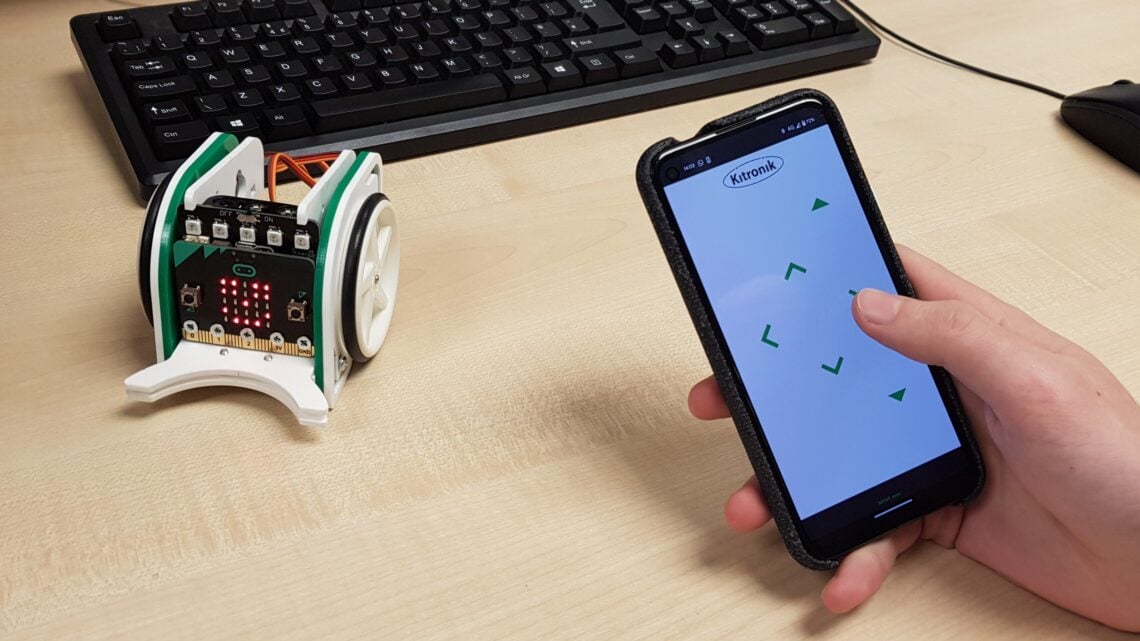
On the next screen of the app you will see six arrows. The four arrows shaped like a diamond in the middle of the screen are used to control the movement of the Kitronik :MOVE mini buggy. These are to move the buggy forwards and backwards, then to spin the buggy left and right. The two bold arrows on the right side of the screen are used to control the third attachment servo that can be connected to the :MOVE mini. These allow you to control any attachments you have connected to your buggy.

Full Code
let servo1Value = 0
let changeServo1 = 0
basic.showLeds(`
    # . . # #
    # . . # #
    # # # . .
    # . # . .
    # # # . .
    `)
basic.forever(function () {
    if (changeServo1 != 0) {
        servo1Value += changeServo1
        if (servo1Value  180) {
            servo1Value = 180
        }
        pins.servoWritePin(AnalogPin.P0, servo1Value)
    }
})
bluetooth.onBluetoothConnected(function () {
    changeServo1 = 0
    servo1Value = 0
    basic.showLeds(`
        # # . # #
        # # . # #
        . . # . .
        # . . . #
        . # # # .
        `)
})
bluetooth.onBluetoothDisconnected(function () {
    basic.showLeds(`
        # # . # #
        # # . # #
        . . # . .
        . # # # .
        # . . . #
        `)
})
control.onEvent(EventBusSource.MES_DPAD_CONTROLLER_ID, EventBusValue.MICROBIT_EVT_ANY, function () {
    if (control.eventValue() == EventBusValue.MES_DPAD_BUTTON_1_DOWN) {
        pins.servoWritePin(AnalogPin.P1, 0)
        pins.servoWritePin(AnalogPin.P2, 180)
    } else if (control.eventValue() == EventBusValue.MES_DPAD_BUTTON_1_UP) {
        pins.servoWritePin(AnalogPin.P1, 90)
        pins.servoWritePin(AnalogPin.P2, 90)
    } else if (control.eventValue() == EventBusValue.MES_DPAD_BUTTON_2_DOWN) {
        pins.servoWritePin(AnalogPin.P1, 180)
        pins.servoWritePin(AnalogPin.P2, 0)
    } else if (control.eventValue() == EventBusValue.MES_DPAD_BUTTON_2_UP) {
        pins.servoWritePin(AnalogPin.P1, 90)
        pins.servoWritePin(AnalogPin.P2, 90)
    } else if (control.eventValue() == EventBusValue.MES_DPAD_BUTTON_3_DOWN) {
        pins.servoWritePin(AnalogPin.P1, 0)
        pins.servoWritePin(AnalogPin.P2, 0)
    } else if (control.eventValue() == EventBusValue.MES_DPAD_BUTTON_3_UP) {
        pins.servoWritePin(AnalogPin.P1, 90)
        pins.servoWritePin(AnalogPin.P2, 90)
    } else if (control.eventValue() == EventBusValue.MES_DPAD_BUTTON_4_DOWN) {
        pins.servoWritePin(AnalogPin.P1, 180)
        pins.servoWritePin(AnalogPin.P2, 180)
    } else if (control.eventValue() == EventBusValue.MES_DPAD_BUTTON_4_UP) {
        pins.servoWritePin(AnalogPin.P1, 90)
        pins.servoWritePin(AnalogPin.P2, 90)
    } else if (control.eventValue() == EventBusValue.MES_DPAD_BUTTON_A_DOWN) {
        changeServo1 = -1
    } else if (control.eventValue() == EventBusValue.MES_DPAD_BUTTON_A_UP) {
        changeServo1 = 0
    } else if (control.eventValue() == EventBusValue.MES_DPAD_BUTTON_B_DOWN) {
        changeServo1 = 1
    } else if (control.eventValue() == EventBusValue.MES_DPAD_BUTTON_B_UP) {
        changeServo1 = 0
    }
})