Get festive this October with some easy Halloween makes! We love quick wins as much as the next person. We got three excellent resources, from the ultra low tech to the more involved. We’ve got some easy printable bunting, three fun edge lit signs and an extremely polite servo-powered hat-tipping skeleton!
Emma guides you through how she made each of the following projects, and we’ve provided you with all of the necessary DXFs, PDFs, Illustrator Files, and HEX files. Read on to find out more.
Make SpOoOoky Bunting:

An easy printable project that you can assemble anywhere! After printing, there’s just a couple of simple steps to follow and then you’re done.
We Used:
- This PDF.
- String.
- A Glue Stick.
Step 1 – Printing: Using the PDF, print out as much bunting as you need (use a colour printer for best results). Once they’ve all printed, cut them all out.
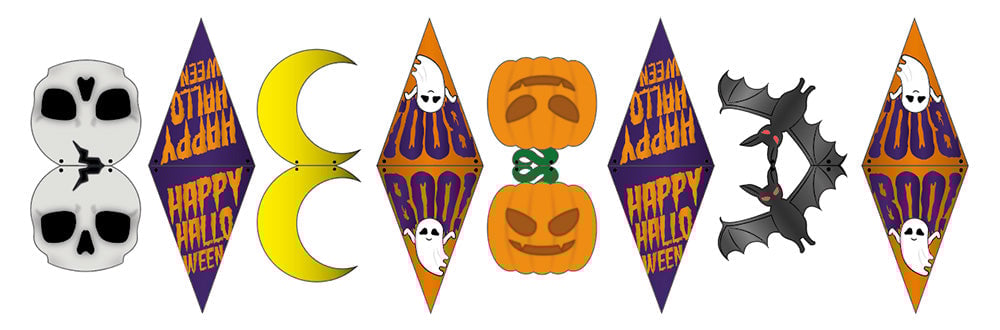
Step 2 – Gluing: Fold each piece of bunting along the line and then glue the two sides together.
Step 3 – Final Assembly: Once that’s done, punch the marked holes and thread them onto a string. Hang your bunting up and enjoy!
![]()
Make Eerie Edge-Lit Signs:

These illustrative Halloween designs will light up any desk, window sill or mantelpiece in spooky style. Built around our RGB LED Strip with Pattern Selector, you can choose the colour of your light display, shift through the colours or even use a chaser sequence!
We Used:
- This DXF/This Illustrator File. (zipped)
- RGB LED Strip with Pattern Selector.
- 5mm Clear Acrylic.
- 3mm Black Acrylic.
- 4 x 16mm M3 Pan Head Screws.
- 1 x 6mm M3 Pan Head Screw.
- 4 x M3 Hex Nuts.
Step 1 – The Base: First of all, check out the DXF. It contains the base that houses our RGB LED Strip, which should be cut from 3mm acrylic of your choice.
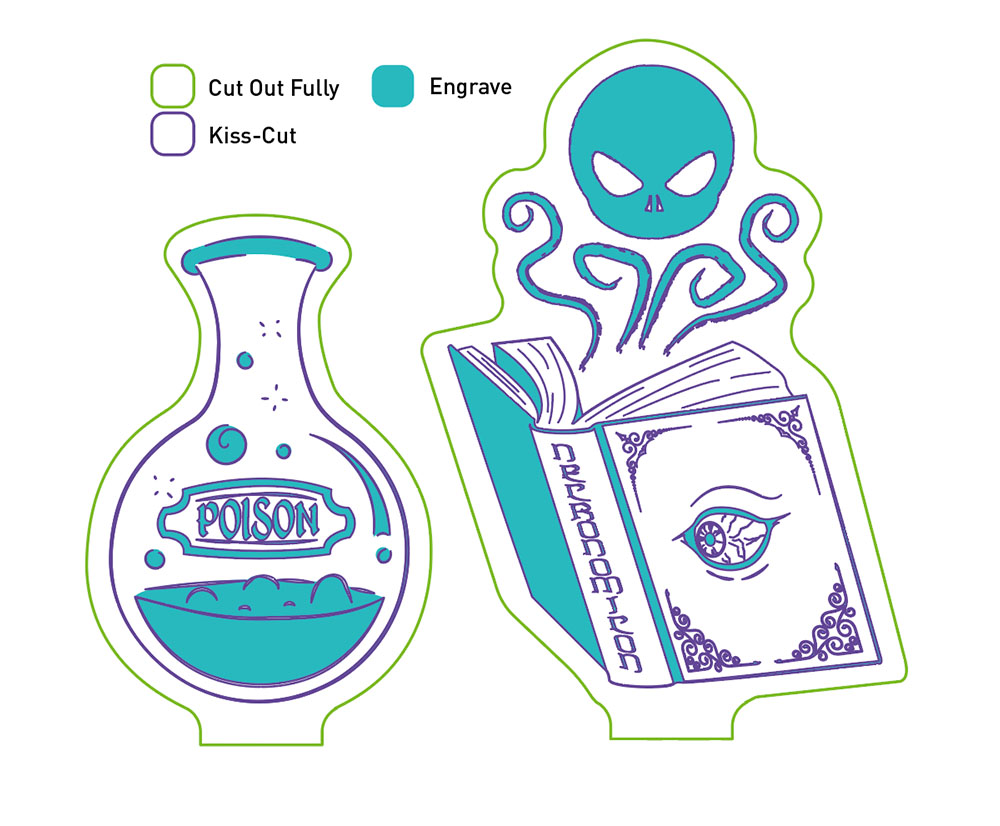
Step 2 – The Designs: The designs on the DXF are two of the most complex we’ve ever provided. There are a lot of small parts so making sure that bits aren’t duplicated is crucial. For this reason, we have also provided this design as an illustrator file, so you can benefit from the layers grouping the small parts together.
Step 3 – Cutting The Parts: After that it’s as simple as following the instructions in the diagram above – engrave the design, outline with a kiss-cut and then cut the sign outline fully.
Step 4 – Final Assembly & Test: Now you’re ready to pop it in the base and light up your Halloween!
![]()
Make A Polite Skeleton Decoration:

This extremely dapper haunt is a great way to learn the basics of using Servos! Just one servo and a little bit of code is all you need to get your own skeleton to greet all your visitors this October!
DISCLAIMER: We made ours from 3mm acrylic, if you don’t want to have to strengthen the legs, we would suggest going for 5mm acrylic instead.
We Used:
- This DXF.
- BBC micro:bit.
- Simple Servo Board or Simple Servo Starter Pack.
- 1 x Servo extension cable.
- 1 x 180 Degree Servo and included screws.
- We would recommend 5mm Black Acrylic for structure
- We would recommend 5mm Fluorescent Orange Acrylic for structure).
- 1 x M2 6mm Pan Head Screw.
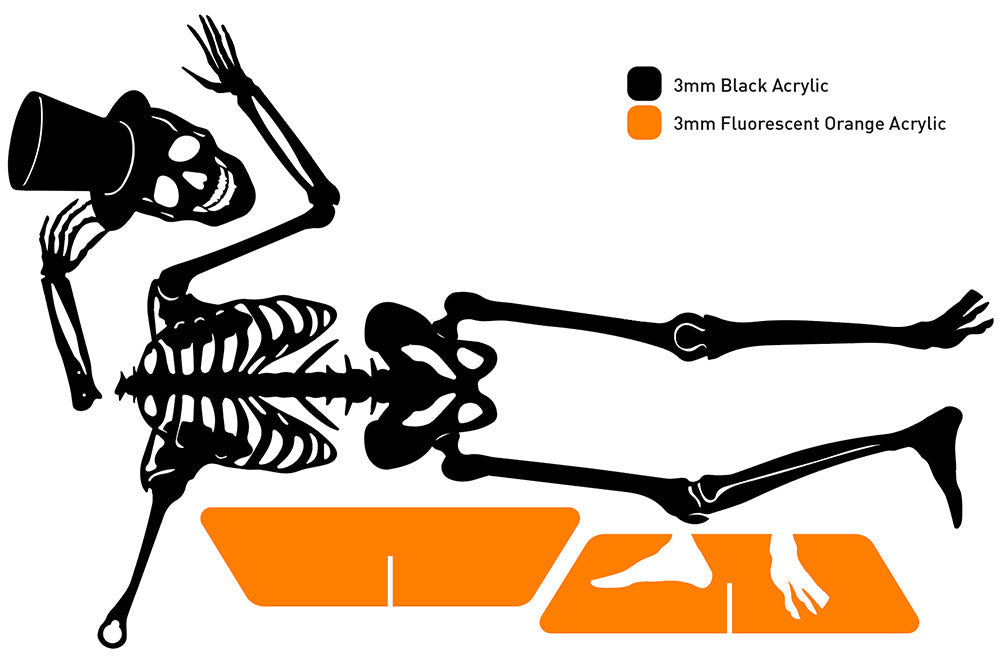
Step 1 – Cutting The Parts: Firstly cut out the dxf as stated above. We recommend 5mm thick acrylic for support, as we cut ours from 3mm and had to cut a second version of the legs from 5mm acrylic and glue them to the back of the skeleton to stop it from bending forward.
Step 2 – Glue & Test: Glue the feet into the base and make sure it stands and holds its own weight well.
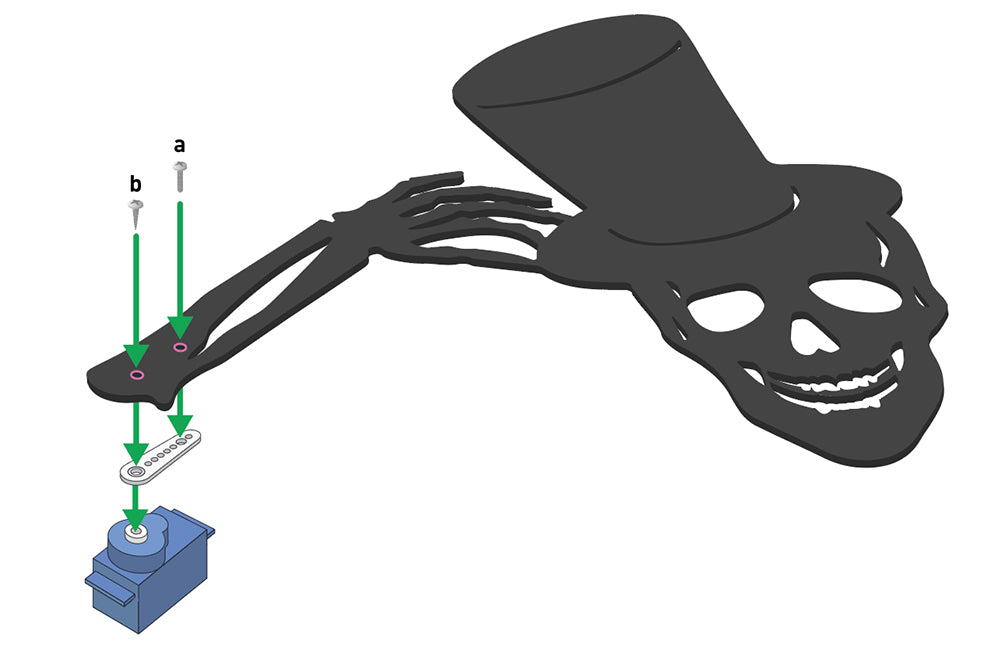
Step 3 – Assembly & Adding A Servo: The left arm of the skeleton has a hole in it for a servo to friction fit into. Push a 180-degree servo into the hole before using the servo arm to turn the servo all the way to the right (towards the skeleton). Now take the servo arm off and use the M2 6mm Screw (a) and one of the screws included with the servo (b) to secure the skeleton arm to the servo arm and to the servo. Orient as shown in the diagram below and make sure your skeleton is holding his head at what you want 0 degrees to be in your code.
Step 4 – Plug In & Preparation: Plug your servo into a servo extension cable (this can help make it easier to conceal the wire and board later) and then plug the extension cable into the Servo 1 headers on the Simple Servo Board. Make sure you put batteries in!
Step 5 – Coding: Now we code the micro:bit which will go into your Simple Servo Board. The code we have used is as below:
As you can see this very simple code displays a ghost icon on the micro:bit, and runs a loop that repeats every 5000 milliseconds. The loop will set the servo to move in five-degree increments with 100 milliseconds delay in between, except when it reaches 45 degrees at which point it waits for a second to make the skeleton stop at the top of his hat-tip briefly.
Step 6 – Test & Play: Now plug in your micro:bit and you’re ready to add him to your Halloween decor!
For more spooky makes, check out our Halloween makes archive.