This resource has been designed to show how you can use our Mono and stereo amplifier module kits as the basis for a 3D printing project. Speaker cases are a great size to still print relatively quickly, but also allow for more detailed exploration in the design and assembly of multiple parts. Below is a selection of pictures showing some of the example designs that we have created. 
 The main thing that we have focused on is demonstrating a variety of ways of fixing cases together as well as experimenting with form and mixing materials (laser cutting and 3D printing). The designs have been kept relatively simple consisting of just a few parts each. Some cases are more experimental with electronics, using mechanical aspects of the design to control volume and even the brightness of LEDs.
Design Resource Files
Below are the design files that we have used to create all of the designs shown in this resource. The files include the CAD model of the amplifier kits themselves as well as the case designs. Please feel free to download these files for use in your own designs and lessons (if you are a teacher).
- STL files (All cases).
- STEP files (All cases).
- Stereo laser cutting file.
- Mono amplifier Autodesk inventor files.
- Mono amplifier STL files.
- Stereo amplifier Autodesk inventor files.
- Stereo amplifier STL files.
 All of the designs have been test printed on a Robox 3D Printer. Depending on the type of 3D printer or filament you decide to use you may need to alter the designs slightly to get the best result from your particular setup. If a design requires a certain type of printer filament we have mentioned this below. Although we have made these designs specifically for 3D printing, you could cut some parts from a perspex sheet instead, if you wanted to add some colour via the faceplate.
Working In CAD
All the images and graphics shown on the page were created using Autodesk Inventor and Autodesk 3DS Max. This is available free to education establishments and students. Lots of other CAD packages are also available. One of the other advantages of working in CAD is that you can create awesome looking animations like the one shown below. 
Case Styles:
Square mono case
 This case makes use of a long flexible friction clipping mechanism which holds together all parts and allows for easy assembly. It’s compact, smart design explores form in a more aesthetically pleasing way. It is still quite small in size which allows it to be printed quickly.
  Key things that we took into consideration when modelling this case were:
- Making sure the clips were thick enough and supported at the base to avoid snapping during assembly.
- Keeping the case small and symmetrical while leaving enough space for the amplifier PCB and speaker cone.
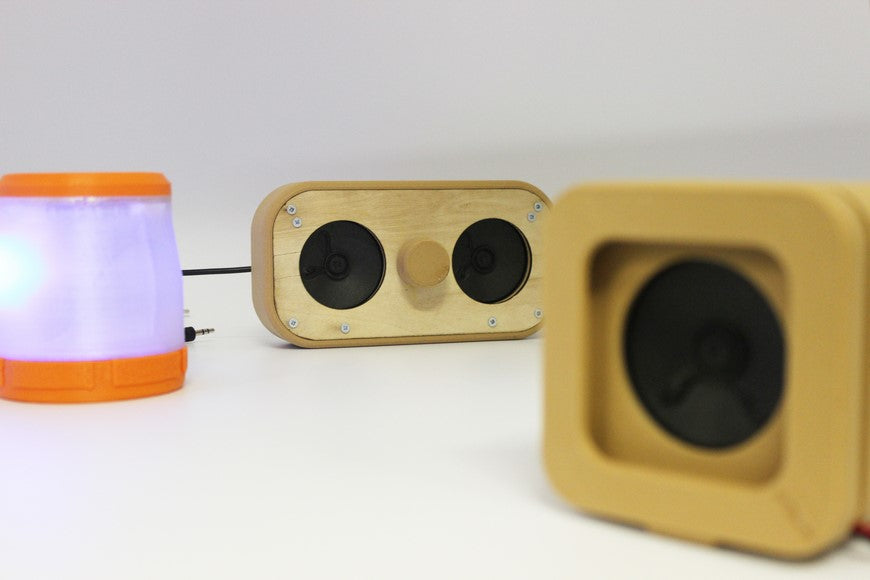
Stereo speaker case
 The stereo amplifier case takes a different approach, mixing 3D printing with laser cutting and using a screw together fixing method throughout the design. Mixing 3D printing with laser cutting allows for the back and front faces to be cut very quickly so that more time can be spent printing a high quality, intricate main piece for the design to revolve around.
  Key things that we took into consideration when modelling this case were:
- Leaving enough space around any laser cut parts to allow parts to slide together easily.
- Modifying the speaker holder component to hold both speaker and leave space for all other components.
- The main 3D printed component has many overhangs and requires support material. It was required to design this part so that support material could be easily removed and didn’t interfere with any screw holes or fixings.
Cylindrical mono case
The push together case slots and holds together with friction. This means there are no difficult to model clips or fastenings.  Key things that we took into consideration when modelling this case were:
- To make sure all parts had enough space to fit together with friction.
- This case uses extra electronics to control volume and LED brightness, we had to think about how to integrate these into the cylindrical design.
Speaker cone holder
This is a part designed to hold the speaker cone for the mono and stereo amp kits. The base part can be altered and edited to fit the needs of your case designs. It has been used in all three example cases above, the image below shows how it was integrated into the designs; 
Other useful tutorials and resources
- 3D printed memory stick resource – click here to view this page.
- How to customize a USB case design using Autodesk Inventor. In this example we will show you how to write your name on one of the cases. Click here to download our guide.
