Maria Hadjiantoniou from Loughborough University joined us in July on her internship to learn more about Electro-Fashion and E-Textiles. Having made these Electro-Fashion LED curtains, she is here to tell you a little bit about this E-Textiles project.

‘My name is Maria Hadjiantoniou and I am 22 years old, studying Textiles: Innovation and Design at Loughborough University. During my internship at Kitronik, I have had the opportunity to combine my basic understanding and knowledge of electronics with my creative arts and design skills.’
What is Needed to Recreate this Electro-Fashion Curtain Project
The aim of this project was to use E-Textile Kits, BBC micro:bits and a Klip Halo for BBC microbit, to create a modern curtain design that lights up when the curtains are closed and it is dark, and switches off the LED lights when the curtains are open and there is brightness.
Component List:
- 2x BBC micro:bits (Board Only)
- Electro-Fashion, Sewable 5mm LED Holder, pack of 10
- 2x 2xAAA Battery Box with Switch and JST Connector
- 2x Klip Halo V2.0 for BBC micro:bit with 2xAA Battery Holder
- Electro-Fashion, Conductive Thread, 250m
- Needle Set
- Electro-Fashion, Magnetic Switch V2.0
- A Piece of Fabric
Things to consider:
- Each cable represents a complete stitch from one end to another.
- When sewing, avoid circuits (stitching) cross, otherwise electricity will not flow and thread might be cut off.
- Fabric will not be washable once the electronics are applied.
- Electronics should be stitched from inside of the fabric to avoid visibility, except the micro:bit as this is needed for light sensing and the LED bulbs. However, if you do not stitch inside the fabric, they can still be coloured by a permanent marker.
How I Coded the micro:bit
This design incorporates a BBC micro:bit, which is essentially a fully programmable computer which you can learn to code with. The micro:bit was coded using a website called Microsoft MakeCode which is simple to use as you can use a block form format rather than JavaScript.
- On the page, there will be an ‘on start’ function and a ‘forever’ function, we will use the ‘forever’ function
- Go to the ‘Variables’ section and click ‘Make a Variable’, and type in ‘Light’ then press ‘OK’
- Then go back into ‘Variables’ and select ‘Set Light to 0’ and drag this into the ‘Forever’ function
- Go to the ‘Input’ section and select ‘Light Level’ and drag and drop this in place of ‘0’
- Go to the ‘Logic’ section and select ‘If True then Else’ and drag into the ‘Forever’ function underneath ‘Set Light to Light Level’
- Go back into ‘Logic’ and select ‘If True Then Else’ and drag and drop this into the top half of the existing ‘If True then Else’ section
- Now go to ‘Logic’ and under ‘Comparison’, select 0 = 0 and drag this in place of the first ‘true’ part of the code
- Go to the ‘Advanced’ section and then ‘Pins’ and select ‘Digital read pin P0’ and replace the first ‘0’ part of the coding with this
- Change PO of ‘Digital read pin PO’ to P2 and change the second ‘0’ to 1
- Go to ‘Logic’ and under comparison select ‘0 < 0’ and drag this in place of ‘If True Then’
- Go to the ‘Variables’ section and select ‘Light’ and drag this in place of the first ‘0’ and type in 50 in place of the second ‘0’
- Go to the ‘Pins’ section and select ‘digital write pin P0 to 0’ and drag the same item into the ‘if light < 50 then’ section 5 times then change P0 to P15, P14, P13, P12 and P11 consecutively and change all 5 ‘0’s to 1
- Do the same under both of the ‘else’ sections, except leave the 5 ‘0’s as they are

Checking the Code and Connecting it up
After the micro:bit has been programmed with MakeCode, place it into the Klip Halo and connect the pins with cables to see if the coding is correct before starting to sew. The connections are as follows, you can also use the images for guidance:
- GND with – LEDs
- 3V with P2 on Klip Halo
- P15/P14/P13/P12/P11 with + LEDs

Incorporating the Fabric
To make this an E-Textiles project, after the coding is checked and correct, you can now move on to the fabric you are using to make your project. Start by making marks on your fabric to indicate where your LEDs will be placed so that you can follow the stitching pattern and LED design you created. Then, simply attach your magnet onto your fabric using PVA glue and then stitch the magnet and LEDs on to ensure a secure fixing. The images below show how I stitched the magnet and LEDs onto the fabric. You can also colour the LEDs after they have been stitched using coloured markers to create different effects in your design.

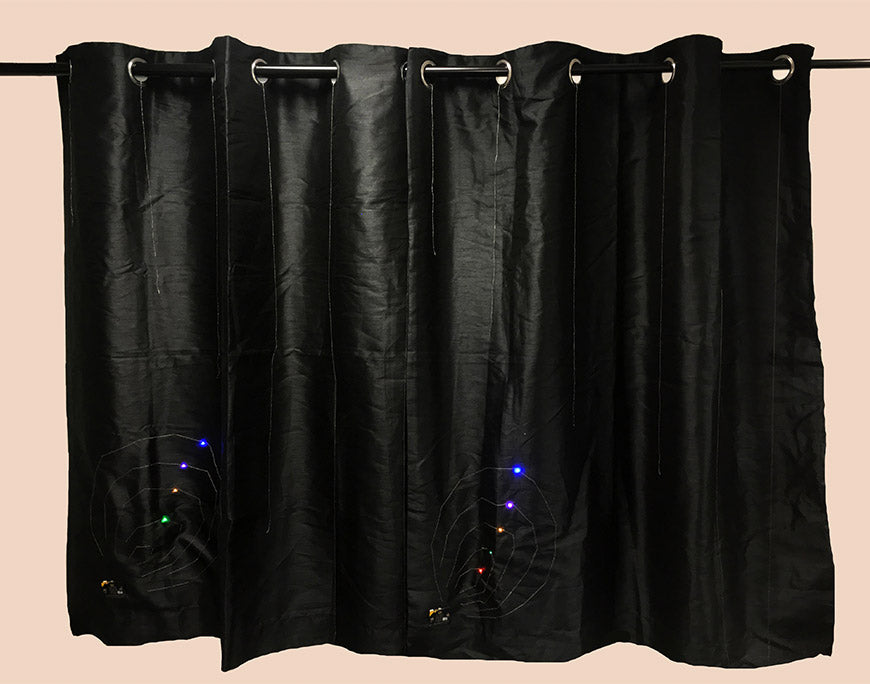
The Finished E-Textiles Project
When the curtains are open and there is light coming through from outdoors or inside, the LEDs are turned off and do not show.

When the curtains are partially closed and there is still some brightness in the room, the lights will gradually drop to 0 and the LEDs will turn on.

When the curtains are closed completely and the room is dark, the LEDs turn on.

A big ‘Thank You’ to Maria for creating this project and writing this blog for us. If you want to be updated with all of the latest news, sign up to our newsletter here.