Overview
The Clip detector board gives the ability to add sensory inputs to the BBC micro:bit. Within this blog, the Clippable Detector board will be used with the simple robotics kit to make it more versatile. Using phototransistor detectors it is possible to detect a line, light and objects. This guide will take you through setting up the simple robotics kit with the clip detector board to detect each of these.
What you’ll need:
Adding MakeCode Extensions
We have custom blocks created for MakeCode to help make the coding easier. To add these blocks, go to MakeCode. Create a new project. Click on extensions. Search for “Kitronik clip detector”. This will bring the blocks into the code. Since we are going to be using this board with the simple robotics kit, we also need to add the Klip Motor extension. To add this extension search for “Kitronik klip motor” and add these blocks to the project.
Line Following
Prepare
To have the kit follow a line, a track is required. The Kitronik :MOVE mat is ideal, or you could create a track for buggy to follow. A black line (10mm to 20mm thick) on a light surface (table top or white paper) will give the best results.
Build
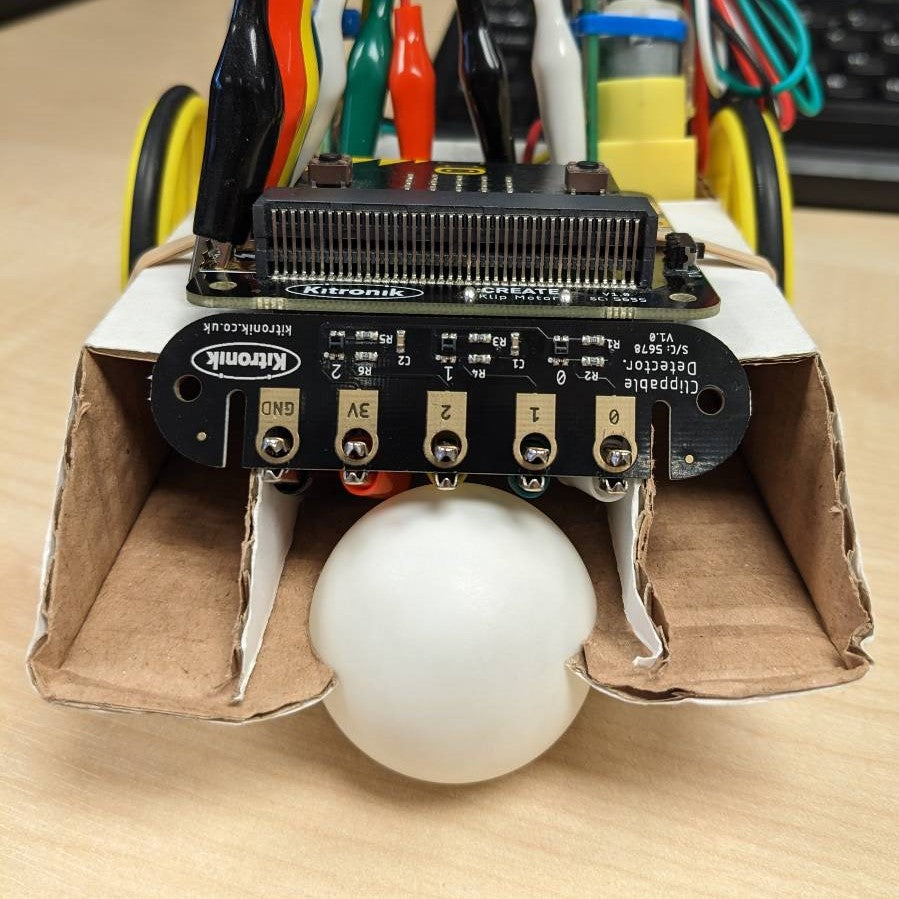
Place the clip detector board on the bottom of the simple robotics kit, just below the hole for the ping pong ball with it sat on top of the cardboard tags. Use the rubber band to secure the clip detector onto the simple robotics kit.
Connect the croc-clip to each of the pads on the Clippable detector board. Feed the cables down and around the back of the cardboard buggy. Connect the other ends of the croc-clip cables to Klip motor board IO pads. Make sure that the connections match up to each board.

Code
To follow a line we need to check the sensors to see if we are on the line, or off the line. Because the line runs between the 2 outer sensors we can say that if neither sees the line we must be following it. Then if one of the sensors sees the line then we should turn away from the line until it cannot see it anymore.
It is possible to also use just the central sensor to detect the line and if we fail to see it to turn towards the line. A combination of both these approaches can also be used.
In the example we will use the 2 outer sensors, and assume that the line is darker than the background.
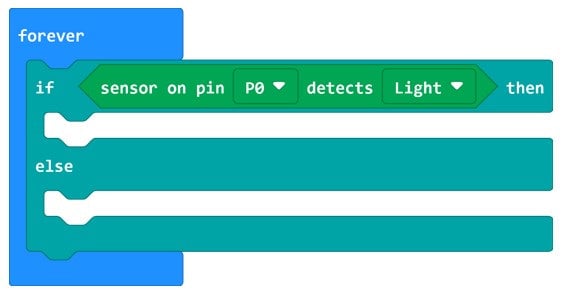
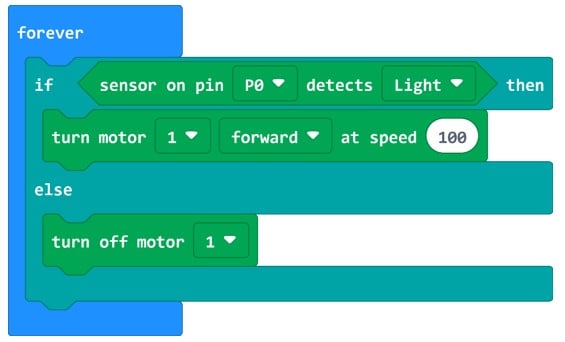
In the forever loop the code uses a simple Boolean (two state) detection for each motor. For this an if-else statement is required. If the sensor has detected a light surface the motor needs to move, otherwise the motor should stop.
Within the Clip Detector blocks there is a sensor detected block which is used to give a true or false response to if the sensor has detected or not. From this block you can select which pin the sensor is on and if it is using light or dark detection.
This block should be placed inside the condition for the if-else statement.
Next we need the buggy to respond with an action. From the Klip Motor blocks, add in a turn motor on block and a turn off motor block. The buggy should be moving when it detects a light surface and stop when it detects the line.
The clip detector board is mounted with the sensor connected to P0 on the same side as motor 1 on the Klip Motor board. Stopping Motor 1 will make the buggy turn away from the line on that side, so we’ll use sensor P0 to control motor 1.
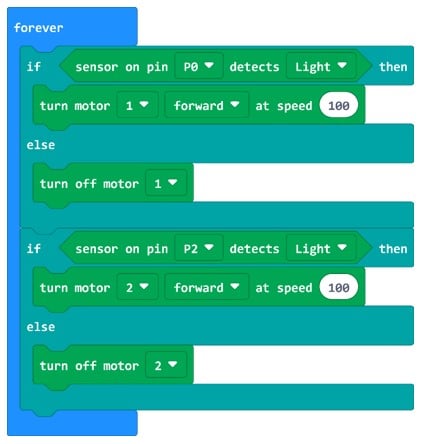
Now one motor has been done, we can duplicate the code for motor 2, using sensor on P2 to control it.
Download the code onto your BBC micro:bit and place it into the Klip Motor board.
Place your buggy on the track over the line and turn on the Klip Motor board.
If your buggy does not detect corners well, you could be going too fast. Try changing the speed of the motors. For tighter corners instead of stopping the motor, try having the motor turning in reverse to give a sharper turn.
Try coding line following using just the central sensor, and a combination of all three sensors. This should allow the buggy to move faster and follow the line more accurately.
Light Following
Prepare
To create a light to follow use a battery torch or the torch setting on a mobile phone. Because the sensors are more sensitive to infra red light, an old filament bulb torch works best.
Build
We again want to have the croc-clips connected from the clip detector to the Klip Motor board. For this, it may be neater to feed the cables under the Klip motor board and out of the back of the cardboard.

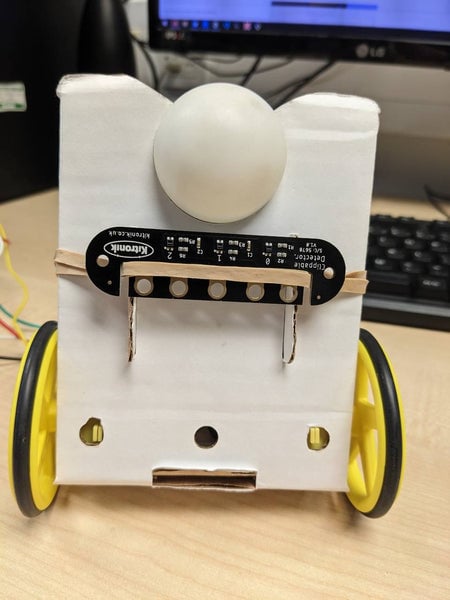
Place the clip detector board on to the buggy with the slots on the angled front of the cardboard buggy.
Code
First we will have the buggy drive forwards if it sees light. We will then expand on this code so the buggy turns towards the light, and will follow it.
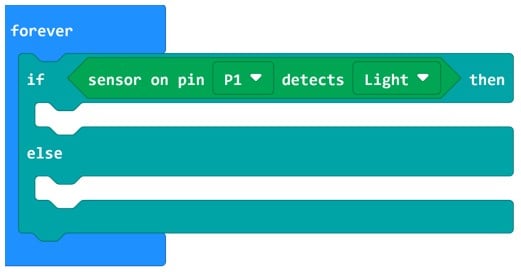
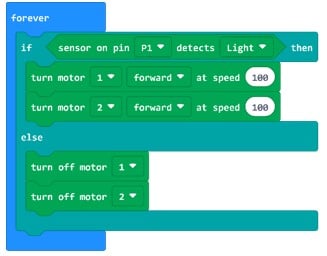
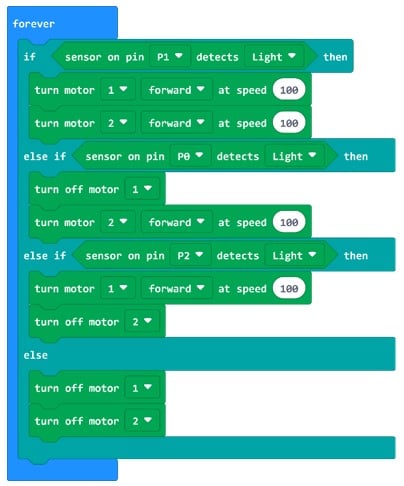
In the forever loop the code uses a simple Boolean (two state) detection for light. For this an if-else statement is required. If the sensor has detected light, the robot needs to move, else the motor should stop. The sensor connected to P1 is in the middle of the board, so we will use that initially.
If the sensor has detected light, then move both motors forward, else stop both motors. The motor blocks are in the Klip Motor extension.
Program this code into the BBC micro:bit and try it. Your robot should drive forwards when a light is shone on the central sensor.
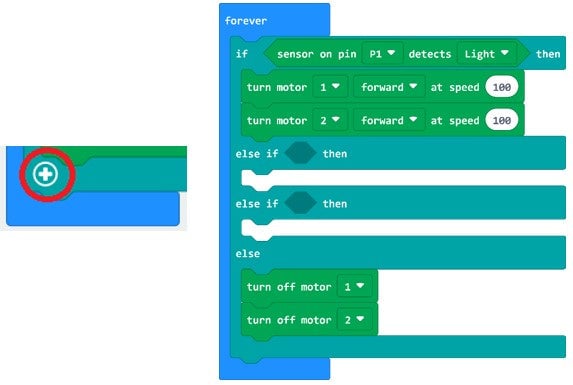
The next step is to make the robot turn to follow a light. For this we need to add two else-if statements into the code. This can be done by clicking the ‘+’ symbol on the bottom of the if block in our code.
If the sensor on P0 detects light then the robot needs to turn left. To do this motor 1 needs to be turn off and motor 2 needs to be moving forward.
Duplicate this sensor P0 code for sensor P2. Don’t forget to change which motor stops and which drives.
Download your code onto the BBC micro:bit and it a try.
The buggy should now follow a light.
Object Detection
Prepare
Find a range of objects/ boxes with a flat side that are taller than the buggy. These will used as objects for the buggy to avoid.
Build
Connect the croc-clips to the IO pins on the Klip Motor board. Place the Clip Detector board on the rear flat side of the buggy. The croc-clip will go onto the board and the cardboard. Make sure the leads match up with pin numbers between the two boards. For this the back of the buggy will now become the front.

Code
In this example only the two outside sensors will be used (P0 and P2). It is possible to make more accurate detection with more code using all three sensors.
First will make a simple object detection by coding with the buggy driving forwards and stopping at an object.
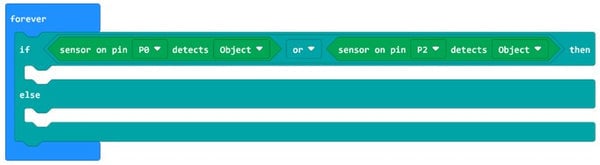
In the forever loop we will determine what to do if we detect an object.
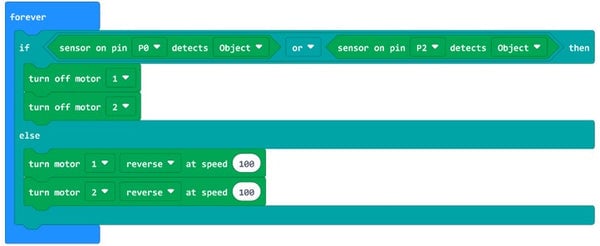
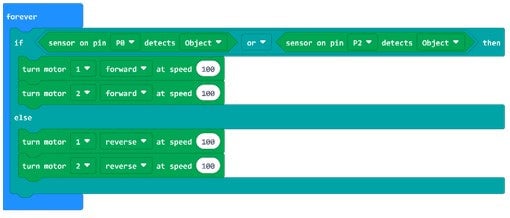
Because we are using 2 sensors (P0 and P2) in the if section we want a logic ‘OR’, so that if either sensor detects an obstacle we take action. Place a sensor detects for P0 and P2 in each part of the OR block. Set the sensors to detect ‘Object’.
Once an obstacle is detected the robot must take action. To prevent crashing into the object, the motors need to stop. When the sensors have detected, the motors need to stop, else we can drive. Don’t forget the sensors clipped are on the back, so the motors need to drive in reverse to move forward.
Download this to the BBC micro:bit and try out the code.
Just stopping at an obstacle means that the robot will drive and stop. We want to try driving in a different direction, and maybe find a way around.
So instead of just stopping set the motors to drive in the opposite direction.
This code will drive towards an obstacle and then drive away. But once the detectors no longer see the obstacle the robot will drive straight back towards it. We need to also include a turn. To give space for the turn to happen we should drive a short distance away, and then turn.
We can do this by using a pause block so the motors run for a set time.
To turn the robot we can reverse the direction of one motor, which will cause it to spin on the spot. Again by using a pause block we can control how long the motor runs for and how far we turn.

By changing the length of the pauses, will make the buggy turn and drive away for longer.
Download your code onto the BBC micro:bit and it a try.
The buggy should be able to avoid obstacles we place in its path.
Troubleshooting
Clip Connections
One of the problems people have when using the Clip Detector board is not having the clips connected to the right pins. When the clip connections are not aligned properly then the sensors may seem to detect light and objects in ways which you were not expecting.
It is important to make sure the clip cables are lined up in the correct order from the detector board pins to the motor board pins. This means that one cable should connect the GND pin on the detector board to the GND pin on the motor board. The same applies to all the pins, so the 3V pins are connected, etc.
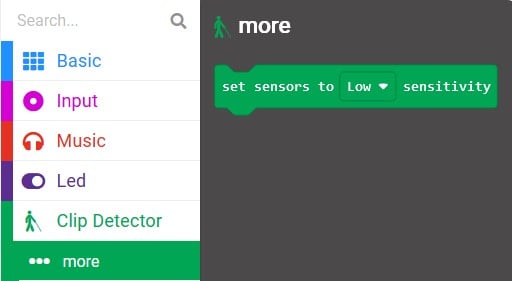
Detector Sensitivity
Another issue that people have when using the Clip Detector board is the sensors not detecting light and objects as easily as they would expect. To solve this we can use the ‘set sensor sensitivity’ block. This will adjust how easily the sensors detect light and objects. If you want the sensors to detect slight changes in light then you can use this block in the ‘on start’ block and set the sensitivity to ‘High’.