The :KLEF Piano for the BBC microbit features all you need to both unlock your inner Bach and to provide you with some fun coding challenges. The first step in fully realising your micro:symphony is an inspiring instrument to play it on!

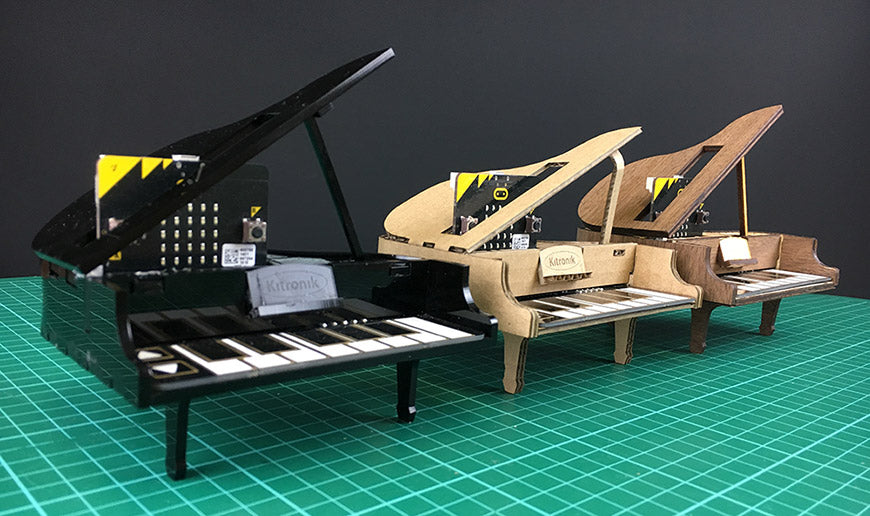
With that in mind, we’ve developed a fun case design and produced an assembly guide to help you put it together. We’ve also built three separate versions, each from a different material, because we like options! We have; Cardboard, Perspex, and Wood versions.
:KLEF Piano For BBC microbit Cardboard Case Resources:

For Cardboard We used:
- :KLEF Piano for the BBC micro:bit.
- BBC micro:bit.
- Cardboard.
You will also need:
- Laser cutter.
- PVA Glue.
- Our DXF design files.
- Our Piano Code.
- Micro-USB Cable for powering the board.
Download the appropriate file and cut it out using a lasercutter.
Assemble the panels together in two sections as shown below. Use PVA glue to bond panels together and leave to dry.
Section 1:
There should be six legs cut out in total. Bond the legs together such that you have three double width legs.

Take the underside panel and glue the bendy section to it as shown below. Apply PVA to inside of the piano case and leave to dry (this will help the cardboard maintain its shape).
If you want to hide the kerf bend lines and joints, you can glue a second outer panel on to the curved section.

Attach the feet and place assembly to one side.

Section 2:
Take the engraved panel and push it into the slots on the front panel. Glue this together and add the music stand.

Take the section you just built, the lid and arm. Glue them together such that the arm holds the lid open as shown below.

Place your KLEF Piano board into the shell and slot Section 2 onto the top of your piano.
- Create your own code or download ours here and transfer it to your micro:bit.
- Dock your programmed microbit into the top of the piano and then all you have to do is learn to play the piano!
- Plug in the micro-usb cable & play away!
:KLEF Piano For BBC microbit Perspex Case Resources:

We used:
- :KLEF Piano for the BBC micro:bit.
- BBC micro:bit.
- Cardboard.
- 3mm perspex or 3mm plywood.
You will also need:
- Laser cutter.
- Heatgun.
- Polycement or similar.
- Our DXF design files.
- Our Piano Code.
- Micro-USB Cable for powering the board.
Download the appropriate file and cut it out on your laser cutter.
Using a heatgun, slowly warm up the kerf cut perspex to help bend the side panel round the base.

Assemble the panels together in three sections as shown below, bonding panels together using polycement.
Section 1:
Attach the bendy panel to the base, and add the legs.

Section 2:
Take the engraved panel, and slot it into the front panel. Assemble the music stand and attach it to the assembly.

Take the panels below and slot an M3 x 12mm screw through, then secure it with a nut on the other side. Slot it through the gap shown.


Section 3:
Bond the two panels onto the underside of the top lid such that they line up with the two holes on the top of section two.

Insert the KLEF Piano board into section 1, followed by section 2 and 3.

Now create your own code or download ours here and transfer it to your micro:bit.

Dock your programmed microbit into the top of the piano and then all you have to do is learn to play!
:KLEF Piano For BBC microbit Wooden Case Resources:

Finally, for a more vintage look, try cutting it out of wood, we cut out veneer and glued it to the outer panels of the piano to hide the joints and kerf cuts.
Now, just drop our piano code onto your micro:bit and you are good to go. Alternatively, you can head over to the MakeCode Editor with our code and tweak it to taste!