Are you locked down in a different location to your micro:bit? Do you normally only use one at school? Or, maybe you haven’t got around to getting one yet. Good news! You can learn without one! This guide is aimed at the beginner that wants to learn but who doesn’t have access to a micro:bit. The intermediate user may also find a few useful tips too!
The Microsoft MakeCode editor for micro:bit is the perfect editor for learning with a micro:bit. You can learn to code with Blocks, JavaScript, and Python, and it has a built-in simulator. Write your code and test it with the simulator as you go. No micro:bit required.
You Will Need:
- A computer with an internet connection.
That’s our set up for today. Simple. You can even do away with the internet connection if you have the offline MakeCode App, though it might make accessing this guide a little tricky! Lets get stuck in!
Understanding The Microsoft MakeCode Editor/Simulator:
There’s no better way to learn than to get stuck in and have a go! Head over to MakeCode and click on the New Project tile and then name your project. You can see in the above gif how easy it is to put simple programs together. You’ll also see that the simulator automatically updates itself as you go. As soon as you stop picking up blocks it will run your code.
Task 1:
See if you can create a smiley face in the same way we did above.
You now have the basic idea of how block programs are put together in MakeCode. In the next task, we’re going to make the micro:bit display smiley faces when a button is pressed.
Task 2:
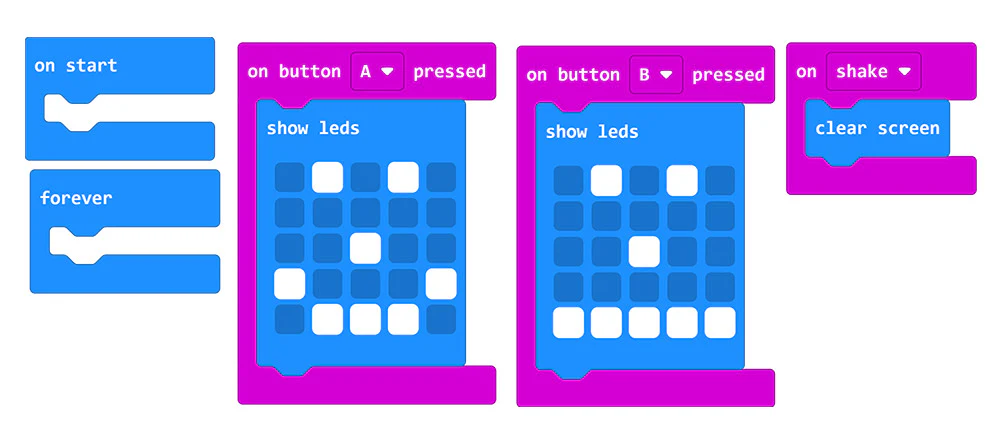
See if you can get a smiley face to appear when button A is pressed, and also a sad face when the B button on the micro:bit is pressed. Then, test your code by using the buttons on the simulator.
HINT: In the Input menu, find the ‘on button A pressed’ and drag two of them into the workspace. You’ll notice that the second one you drag in is grayed out. If you click on the A and change it to a B, it is no longer grayed out. You can now drag other blocks into these containers, any code you place here will be executed when you press a button on the microbit simulator.
Extension Task 2: See if you can work out how to clear the screen when you shake the micro:bit. HINT: Look in the basic menu for the clear screen block and in the Input menu for the on shake container.
If you struggled a bit, don’t worry it can be confusing until you get the hang of it. See the cheat below for a little help.
Digging A Little Deeper Into The MakeCode Simulator:
If you had a real micro:bit, it wouldn’t be long before you wanted to start attaching it to things, and things to it. Even without an actual micro:bit, the simulator can also simulate attaching certain things to the micro:bit. Let’s take a look at a couple.
Simulating Controlling A Servo With A micro:bit:
Let’s take a look at how we can simulate coding a servo using MakeCode blocks.
- Head back to the MakeCode editor and start a new project. Then,
- Click on the cog to the left of the Microsoft logo.
- Select Extensions.
- Type and enter servo.
We will use the tile for Servo – a micro servo library as it contains blocks that are ideal for illustrating this topic. You’ll notice that a new option has been added to the menu; Servo. If you click on it you’ll see a bunch of blocks for controlling servos. You’ll also notice that the simulator hasn’t changed, it still looks the same.
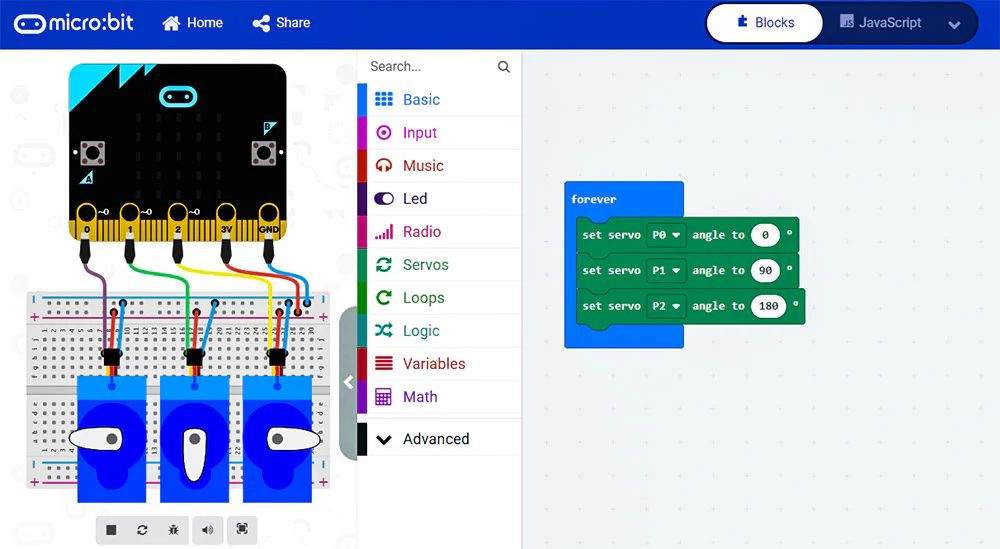
If you grab the top block from the Servo menu and then place it in the forever container, as if by magic, a servo appears. Try changing the pin assignment on the block that you used from P0 to P1. Nice!
Now, try adding 3 of the above blocks to the forever block. Set them for P0, P1, and P2 and chose a different angle setting for each.
Task 3:
Using the same block as was used above (the ‘set servo’ block at the top of the list), see if you can write code for one servo that responds to button presses.
HINT: Set a starting position and then have the servo move to another position on an A button press and another still on a B button press.
Extension Task 3: Once a button has been pressed, write code that returns the servo back to its starting position after having moved to its new position for a specified amount of time. Achievement unlocked; journeyman roboteer!
If you take a peek at the code, you can click to open it in the MakeCode editor so you can see the simulator in action. You can also click the play button in the above editor and interact with the simulator here.
Show & Tell – The Simulator Is Lit!:
In much the same way as for the servo, we can add neopixels to the MakeCode menu by clicking the cog, selecting extensions and then type and enter neopixels. Select the tile and you are good to go!
In the above code; we’ve set up two different LED strips, each with a different number of LEDs. We’ve also put an animation on the micro:bit LED matrix. If you press the play button in the above editor, or select to open the code in the editor, you will see the simulator show you everything that has been coded.
This concludes our look at the MakeCode simulator. As you can see, not having a micro:bit is not an obstacle to learning. See what other features you can add to the above code, maybe some of the new microbit V2 features in the Music menu.
For more coding tutorials for all levels, check out: Kitronik University micro:bit resources and guides.