 It is vital that your Robox 3D printer knows exactly how high the bed is. If the nozzle goes too close to the bed then the first layer is very thin and hard to adhere to. If the nozzle is too high then the lines of material may not even touch each other, leaving gaps in the layer. At the ideal height the lines that make up the base layer just meet at the edges, welding together to give a smooth solid layer. To ensure the height is correct, the printer can use its ‘Nozzle Height’ calibration. This can be accessed through the status screen by clicking the ‘Calibrate’ button, and following the step by step instructions below.
Step 1
Click the ‘Calibrate’ button highlighted in the image below. Then select the ‘Nozzle Height’ option. Click the ‘Start’ button at the bottom right of the screen to begin.


The head will then move to the centre of the printer and begin heating up to a working temperature.
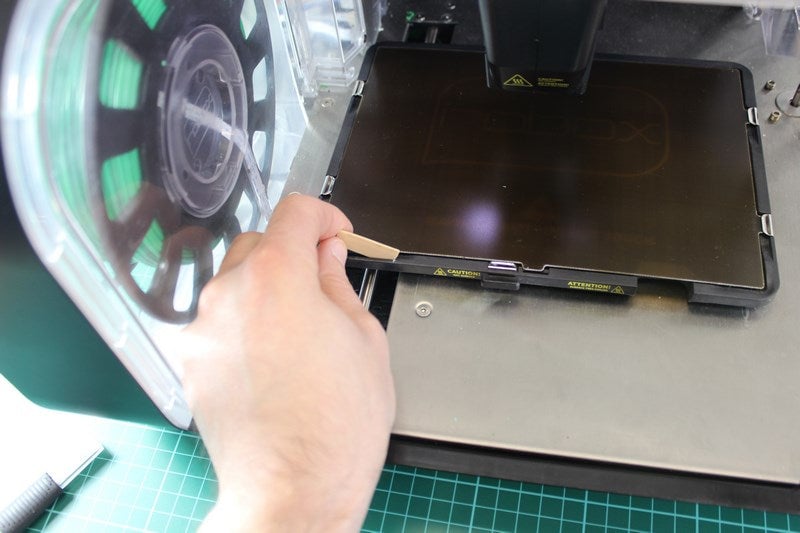
Step 2

At this point, the software will instruct you to remove the print bed. To do this safely without damaging the clips that hold it in place, first slide the clip at the front to the left as shown in the image below.

Next, remove the wiper blade from its slot. Make sure not to loose it!

Finally, hold the bed where the cut-out is and pull it towards you. Make sure to slide it and not to lift it upwards as that can stretch the metal clips that hold it in place.

After the bed has been removed, click the arrow at the bottom right of the screen to continue.
Step 3
The nozzles will now heat to a working temperature for the material installed. This is so any material on the end of the nozzles will become soft and easy to remove. Once the temperature is reached, the software will instruct you to remove any material from the nozzles using the tweezers supplied. It is crucial you do this as any material on the end of the nozzles will confuse the printer when it attempts to check the bed height in the next step.


Once you are certain the nozzle is free of any material, click the arrow in the bottom right to continue.
Step 4
For the next step, you will need a piece of paper. The exact thickness of the paper doesn’t matter, what does matter is that it is something that cannot be compressed. Thin paper works well, card does not. Put the paper under the fine nozzle of the printer and press ‘Next’. The print head will move down and trap the paper between the nozzle and the bed.

The next part is absolutely vital. Click the blue arrow that points upwards to raise the head in very small increments. You want to raise the head until the paper moves with a minimum of friction (but not without any friction at all!). If you go too far, you can use the down arrow to lower the head again. Click ‘Next’ when you are happy with the height.

Step 5
Finally, replace the bed the same way you removed it. Remember to put the wipe blade back in! Click ‘Next’ and the calibration is complete.
