Description
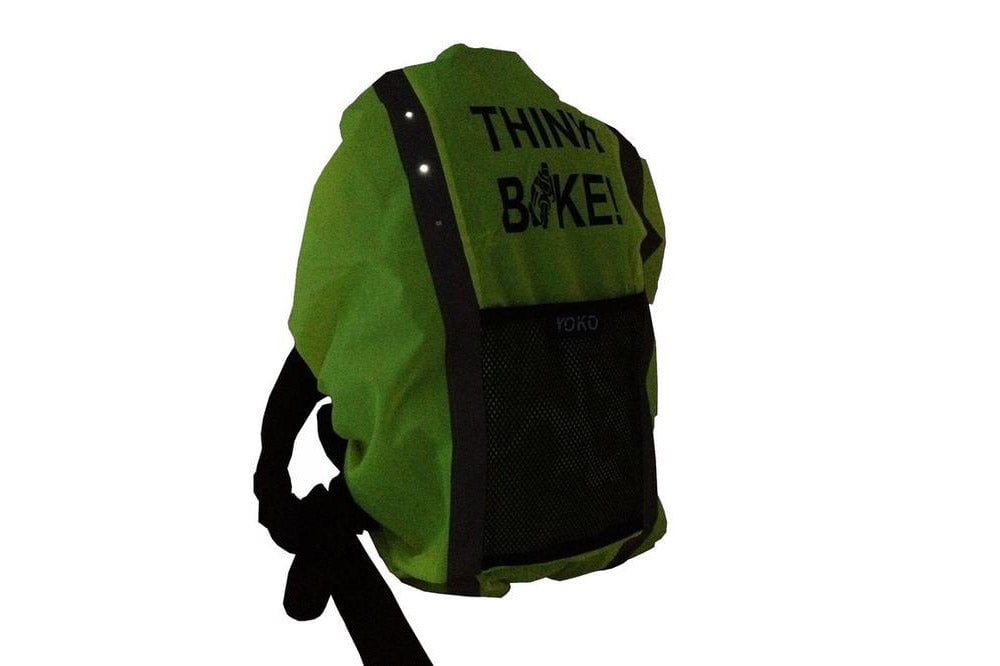
This project is a bike backpack cover with LEDs inserted along one of the reflective stripes. It uses a cell holder which has a light sensor on it which means the LEDs automatically comes on when it is dark. The cell holder also has a switch on it which means it can be switched off when not in use in order to save the battery life. The cell holder has a small phototransistor sensor on the reverse of the board and this has been poked through a hole in the bag fabric. The fabric for this backpack cover doesn’t fray so the edge of the hole can be left as is and not neatened but check your fabric first before doing the same thing. The project also uses 2 PCB LEDs which are similar in appearance to the phototransistor which means it doesn’t look out of place on the right side of the pack. The LEDs are also poked through holes cut in the fabric but could sit underneath the fabric instead without it being cut as they shine brightly and will show through the material. No stitching can be seen on the right side of the backpack cover as the circuit is placed underneath the reflective tape where there are two layers of fabric.


Learn how to:
- Use a light sensor cell holder.
- Make a circuit using 2 PCB LEDs.
Level of difficulty:
- Intermediate.
Parts list:
In order to make your backpack cover you will need:

- A bike backpack cover.
- Light sensor cell holder and cell.
- 2 white PCB LEDs.
- Conductive thread.
- Ordinary sewing thread.
You will also need the following equipment:
- Large eye e-textile needle.
- Fabric glue (optional).
Step by Step guide to making a light sensor backpack cover.
Step 1

Cut 3 square shaped holes an even distance apart in the fabric the same size as the phototransistor sensor and the LEDs.
Step 2

Lay the cell holder with the phototransistor poking through to the right side of the fabric. Use the conductive thread to stitch the negative side of the cell holder onto the fabric using tight oversewing stitches (there are two negative markings on the cell holder but you only stitch one down with the conductive thread). Take care to only go through the top layer of fabric so no stitches can be seen on the right side of the backpack cover.

Using the same thread stitch small running stitches to take the thread to the position where the first LED will be. Stitch the negative side of the LED in place using tight oversewing stitches. Take care to ensure the negative side of the cell holder is joined to the negative side of the LED.

Using the same thread, stitch small running stitches to where the next LED will be positioned. Oversew the negative side of the LED onto the fabric.
Step 3

Use a new piece of thread to oversew one of the positive connections to the backing fabric. Note there are two positive connections but you only stitch into one with the conductive thread. Choose the one that gives you the shortest route to reach the LEDs.

Using the same thread stitch small running stitches to connet the cell holder to the positive connection on the first LED. Keep the row of stitching well away from the negative connection points and stitches.

Using the same thread oversew the positive side of the first LED in place.

And then continue small running stitches to the final LED and oversew into place. When you cut the thread after stitching take care to make sure you have no loose tails of thread.
Step 4

Use ordinary thread to oversew the unused positive and negative hole on the cell holder to the backing fabric. These don’t form part of the circuit and just stop the cell holder from moving around.
Step 5

Slide the cell into the cell holder with the positive side facing upwards. Make sure the ‘on’ switch on the cell holder has been switched on before use and remember the lights will only work when it is dark. If the holes in the fabric are cut accurately the LEDs and phototransistor will stay in place but if they don’t use a small amount of fabric glue to hold the board to the fabric to keep it from moving. The area where the circuit is on the inside of the bag could be covered with a layer of fabric to protect the circuit from getting damaged by it rubbing up against the backpack. Download a pdf version of this page here ![]() This tutorial was produced for Kitronik by Julie Boyd who is a specialist in e-textiles design.
This tutorial was produced for Kitronik by Julie Boyd who is a specialist in e-textiles design.