 In this two part Kitronik University resource we’re going to explain how to remove solder. Read on for a written guide or skip to the video.
De-Soldering in 5 steps.
- To de-solder a joint, for instance if the wrong component has been placed in the PCB, use a solder extractor, also known as a solder sucker.
 2. Prime the solder sucker by pushing the plunger down against the spring. Pick up the soldering iron in one hand and the solder sucker in the other.
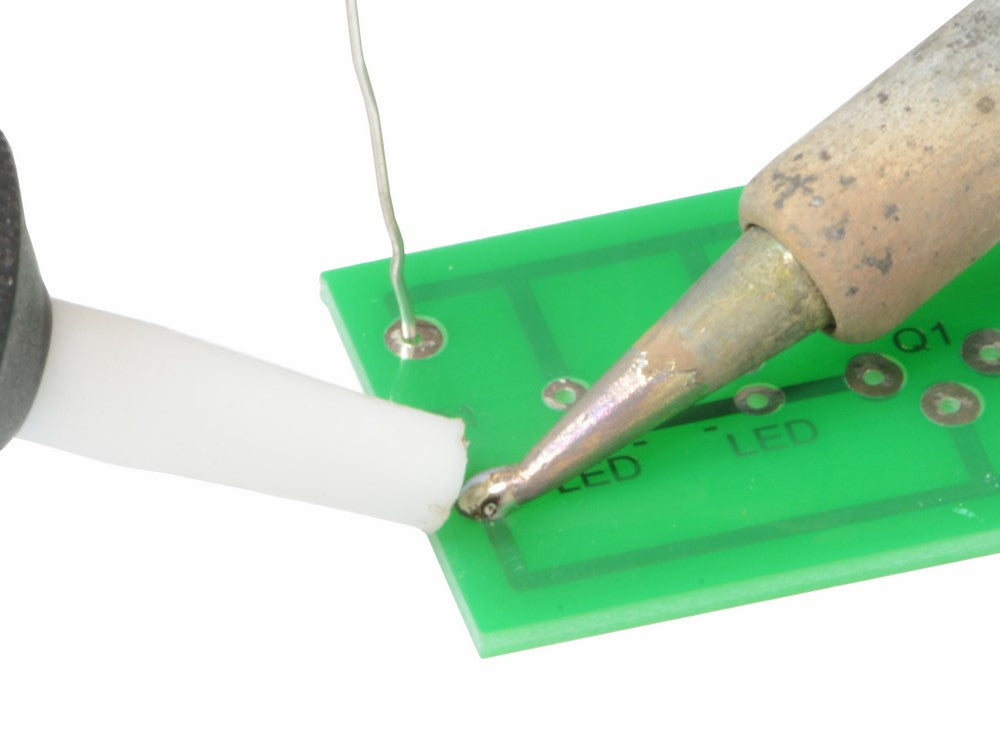
  3. Heat the joint to be desoldered with the soldering iron. Keep the tip of the solder sucker close to the joint, ready to use.
  4. When the solder melts press the button on the solder sucker to suck up the molten solder. Sometimes it is useful to remove the soldering iron to allow better access with the solder sucker to the joint.
  5. If all the solder is not removed then repeat the process of heating and sucking. Allow the board to cool for a little while, then remove the de-soldered component.


Video:
Join Kevin as he shows you how to remove solder in the video below, or see lower down for a text version of the resource.

Video transcript
Hello. I’m Kevin from Kitronik and in this video I’m going to show you some of the most commonly used tools and techniques for reworking solder joints. We’re going to use solder wick, and we’re also going to use solder suckers. So let’s look at these in more detail. So here we have some solder wick. It’s normally supplied in these handy little dispensers. It’s a woven copper braid. Now what that woven copper can do is it can mop up molten solder. So let me show you how we use this. You first place it across the joint, and then apply heat across the top of the solder wick, down onto the solder joint. We can see here the solder that’s been wicked away from this joint and into this solder wick. It leaves the component joint nice and clean and you should be able to remove this part. So this is a solder sucker and it’s a very commonly used tool for removing excess solder from joints. Here we have a nozzle, and here we have a plunger. This depresses, and squashes a spring on the inside. We can then release it by pressing the button here. When it’s released it quickly sucks solder up the nozzle inside removing it from the solder joint. See that there. Depress and release. Here’s a joint where we’ve applied too much solder so we’re going to use the solder sucker to remove it we first depress the plunger on the solder sucker so it’s ready to go. we then heat the solder with a soldering iron, and place the solder sucker across the top of the solder and then depress the button so the plunger pops up and removes the solder. So let’s give that a go. You can see it’s removed some of the solder but not all of it. We can give that another go. There we go, we’ve now removed all of that solder from that joint. So here we have a very handy little tool. What it is is a heated solder sucker. Normally when you’re removing solder using a solder sucker you have a separate solder sucker and a separate soldering iron. This can make it difficult to use when you’re also trying to hold a PCB. This tool combines the soldering iron and the solder sucker into a single part. We can see we have a heated end and a nozzle, the solder sucker element that pulls the solder up the nozzle and that’s controlled the same way a normal one would be where you have a plunger and a release. So let me show you this in action. I’ve depressed the plunger. You can see we have a row of joints. Heat, suck and done. Depress the plunger. Next one, heat, suck, done. Again depress the plunger. Heat, suck, finished. Press the plunger for the last time. Heat, suck, finished. And the part has fallen out. We can see here the solder that’s been wicked away from this joint and into this solder wick. It leaves the component joint nice and clean and you should be able to remove this part.
| Lesson No#. | Lesson Name. | Description. |
|---|---|---|
| Introduction. | If you’re new to soldering our Soldering School will have you up and running in no time. | |
| 1 | Soldering Equipment Explained. | A quick guide to the basic tools you’ll need before you start. Includes a video explanation of some tools. |
| 2 | How to Clean your Soldering Iron (Tinning). | An explanation of why we need to clean the tips and a step by step guide. Includes a video guide to tinning. |
| 3 | How to Solder in Ten Easy Steps. | A practical guide to getting started soldering. Includes a troubleshooting guide and examples of good and bad solder joints. |
| 4 | De-Soldering Demystified. | A guide to removing solder. Includes a video demonstration. |
| 5 | Simple circuit board repair. | Sometimes a pad might get damaged on your board. We show you how to fix it in this simple to follow guide. |