Technical Director Dave Sanderson can often be found taking to twitter and sharing the goings on in development at Kitronik. Whilst testing an upcoming product called the Klaw, he’s tweeted progress a number of times and each time the response has been positive.

The tweeting has prompted a good number of requests for a tutorial on how to make the tank. Dave did a new build and recorded the process. There are also downloads for the DXF file and code that Dave produced. Over to you Dave…
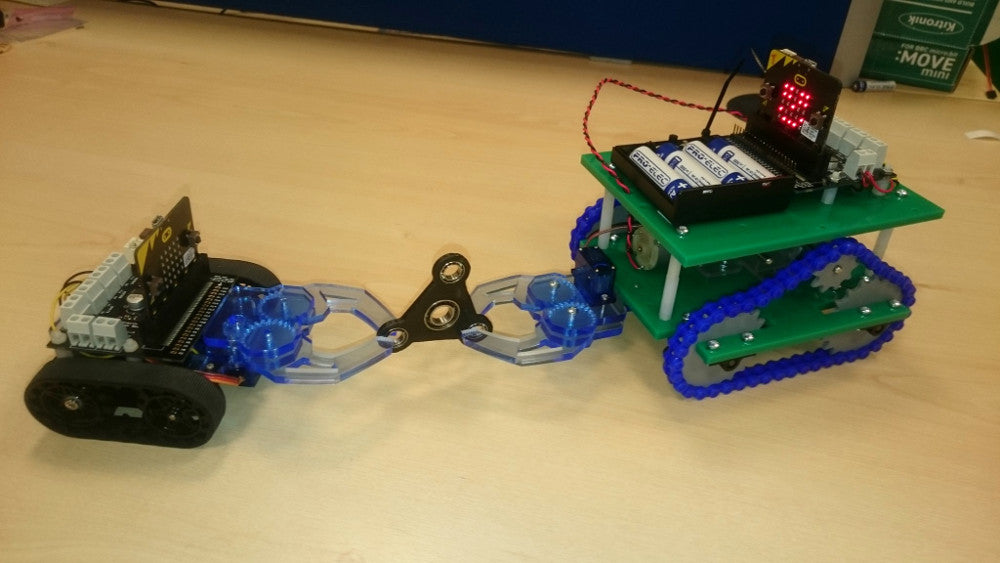
Build A Klawsome microbit Controlled Tank:
You Will Need:
- Laser Cut it yourself tank kit.
- Motor Driver board for BBC microbit.
- 1 x 4xAA battery box.
- BBC microbit.
- Klaw.
- A computer and an internet connection.
How to Build:
First I needed to laser cut the tank chassis. I added 4 holes to the DXF (Download the DXF here.) to mount the motor driver board, and a couple to allow the KLAW to bolt on.
Amending The Design:

Cutting it out of a perspex sheet on the laser cutter:

Once the parts were cut it was a case of following the tank building resource instructions from here.
Mechanical Assembly:
Starting with the bag of bits:

I then retrieved all of the track parts from the bag of bits and assembled the tracks.
 |
 |
 |
Once I’d assembled the tracks, I then built the chassis. Still following the instructions from here.
 |
 |
 |
The Klaw has a premade set of mounting holes. I screwed it into the 2 additional holes I added to the bottom chassis plate.

Wiring:
That’s the basic mechanical build done, now onto the wiring.

Note that the mechanical kit doesn’t come with a battery box, which comes with the older motor driver that the tank was originally designed for. I used a 4xAA box instead.

This box has an on-off switch. I’m using the switch mounted on the Tank chassis, so I made sure this one was set to on before sticking the box down with Foam Pads.

Each motor has a + marking on it. So I made sure the coloured wire was soldered to that terminal.

Then I twisted the wires for neatness and routed them to the motor driver board.

The Battery box is connected to the power input of the motor driver board. With the positive lead going via the switch that is mounted on the chassis.
I cut the servo plug on the Klaw servo off, so it could then be wired into the motor driver board. You could also make it plug in using a servo extension lead to wire to the motor driver board. The servo power and ground go to the power connection Then the signal (orange on this servo) goes to the P1 breakout terminal on the motor driver board.
Notice that I have the motors wires with the black leads in the middle (yellow, black, black, red). The “Yellow” motor is at the “Rear” of my tank, and the “Red” motor is at the “Front”. Where the Klaw is mounted. Because the motors are mounted on opposite sides of the tank to drive ‘Forwards’ one motor spins clockwise, and one anti-clockwise.
Coding:
With the wiring in place its time to write some test code.
Kitronik has created some custom blocks for the MakeCode editor. These can be added to the editor using the following steps.
- Click on the cog in the top right of the editor.
- Then select ‘Extensions’ from the menu.
- Once the extensions window opens, type Kitronik into the search bar and then hit enter.
The extensions window should now show all of the available Kitronik custom code libraries. If you now select Kitronik motor driver, the blocks will be added to the editor.

The tank will stand on its rear, which is handy for developing the test code, as it stops it driving away, and allows access to the microbit buttons.

Create the following test code:
This code will drive both tracks forward when button A is pressed, and stop them when button A and B are pressed. It also opens the Klaw when button B is pressed and closes it when button A and B are pressed.
Use this code to make sure that your tank is built correctly – for instance, I had to loosen the track slightly as it was too tight.
Bluetooth:
With a little code, it is possible to control the tank over Bluetooth using the Kitronik Android App gamepad on an Android mobile device.