We looked at a few different ways of achieving our Robot Wars inspired buggy but quickly settled on keeping the buggy completely intact and cutting a top plate from a perspex sheet. We wanted it to be functional, aesthetically pleasing and also easy to produce. We had six buggies to design and build and only a few days to get them done.

Using the laser cutter to cut out our top plate was preferable because it meant that we could fix it to the buggy without any buggy modifications, easily design an interesting shape for the buggy and it also made it easy to attach 3D printed parts. Also, we decided to cut it from the exact same material that the base plate of the line following buggies is cut from so that it looked like it belonged.
Creating The Perspex Top Plate:
Below you will find an outline of our process and the tools and materials that we used. Towards the end we also take a look at how you might create a top plate like ours even if you don’t have access to the tools that we have at our disposal. We have also included download links to our files, which you can find at the foot of the article.
Step 1 – Starting the design:

The first step was to measure the distances between the points in the base plate that would be used to attach the top plate to and also for the possible mounting points which could be used for the printed modifications. Once we had these dimensions we could begin to draw the shape such that it fit around the line following buggy. We chose a laser cut top panel as this is quick and simple to replicate even if the shape is complicated.
We used Autodesk’s AutoCad to draw the shape, however, any 2D design software can be used.
Step 2 – Finalising The Design:

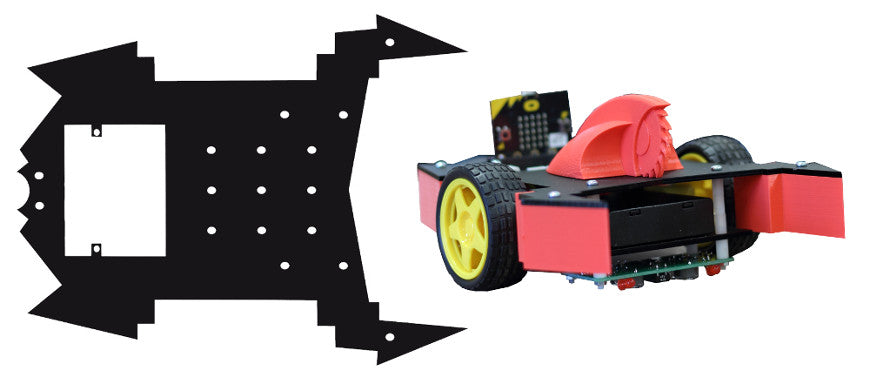
The design inspiration for this product is a scarab beetle, of which we took the general shape and adjusted it to be more aggressive by using sharp angles, this helped it to maintain the robot wars theme. We also designed the shape so it fit around the wheels and the Motor Driver board, whilst keeping the wires hidden from view. Some of the design features include the front pincers, which are designed to guide a football, and the various holes throughout which allow 3D printed parts to be mounted such as a magnet holder for the rear, which would allow a game of capture the flag to be played.
Step 3 – Exporting The Design To The Laser Cutter Software:

Once you are happy with your shape, you will need to export it to a file type suitable for your laser cutter, usually DXF is suitable. This can be done in Autocad by simply saving the file, and selecting DXF as the filetype.
Import the file into your laser cutter software, ours is Laser System 5.3.
Step 4 – Cutting Out The Top Plate:

Once you have your top plate design imported into your laser cutter software you can then cut the design from your material of choice. We chose to make ours out of the same material that is used for the line following buggy, this was to make it look as if it belonged as part of the original buggy. We used Midnight Black Perspex Sheet.
Step 5 Fixing The Top Plate To The Buggy:

As you can see from the above image, we chose to fix the top plate to the buggy using M/F Spacers; six at the front and another 6 at the back. We’d positioned the holes in such a way that we could fix the front of the top plate to the holes that the line following board uses and the back of the plate to the holes that the Motor Driver board uses.
Alternative Design And Manufacturing Info:
When designing these Robot Wars inspired buggies we had a number of resources at our disposal that some of you may not have access to. Here are some hints and tips for how you might approach the job even if you don’t have access to a laser cutter or 2D design software.
The Design: If you don’t have access to a laser cutter you will need to create a to scale stencil. To do this you can either print off your 2D CAD design or create a design by hand on paper. If like me you lack the necessary draughtsman’s skills, drawing your design on graph paper can help you keep everything perfectly symmetrical.
Preparing The Perspex Sheet: You can cut out your paper design and place it on the perspex sheet, draw around it with dry wipe marker and also mark off where the holes should be. Before cutting, check that your stencil has the holes in the right place by laying it over the top of your Line Following Buggy.
Manufacturing: Using a saw, cut out your design and then drill your holes. Before moving onto tidying up the edges, check it once again against the buggy. You can tidy up the edges of your top plate by sanding them flat.
Downloads:
Most of you will be using the original motor driver boards but if you happen to have one of the new V2 Motor Driver Boards we have also designed a top plate to accommodate its larger size.
- Perspex Top Plate for the original Motor Driver Board.
- Perspex Top Plate for the V2 Motor Driver Board.
For more information on working with perspex sheets, check out our resource for working with materials.
| Build A Robot Wars Buggy Learning Resources. | |
|---|---|
| Part 1 – Intro. | What we did, why we did it and what we used. |
| Part 2 – The Buggy. | It’s all about the line following buggy, We used the buggy as is and attached custom parts. |
| Part 3 – The Perspex Top Plate. | How we designed and cut the top plate, with alternative methods for those without laser cutters. |
| Part 4 – The 3D printed Add-ons. | How we designed and 3D printed the add-ons, with alternative methods for those without 3D printers. |
| Part 5 – Making The Flag. | Our design process for making the self righting flag. |
| Part 6 – Coding with the Microsoft PXT Editor. | Beyond line following. Martin Woolley gives a very thorough breakdown of how he wrote the code for the Robot Buggies. Learn how! |
| Part 7 – Bluetooth Buggy Control. | How to turn your Android device into a remote control for the buggy, including pairing instructions, Again, over to Martin Wooley. |