When designing the 3D printed add-ons we had two main aims; that they maintained our Robot Wars theme and that they could be printed easily. Our additional goals were to create two team colour schemes and that each buggy had it’s own personality.

As time was a major factor in our design decisions we decided that creating six individual designs was unrealistic, so we opted instead for a single design, two colour schemes and an identifying numbering system.
Creating The 3D Printed Add-Ons:

Below you will find an outline of our process and the tools and materials that we used. Towards the end we also take a look at how you might create add-ons if you don’t have access to a 3D printer. We have also included download links to our files, which you can find at the foot of the article.
Step 1 Importing The 2D Top Plate Design Into Our 3D Design Software:

To create the 3D model, we imported the DXF file into Autodesk that was just created in the laser cutting process and extruded it by 3mm. Then we were quickly able to create the parts to be 3D printed. In the image above you can see that the 2D Top Plate is now 3D and has a thickness of 3mm and you can see how we can attach the add-on designs to the plate, so we can keep a track of how it looks.
Step 2 Designing The 3D Add-Ons:

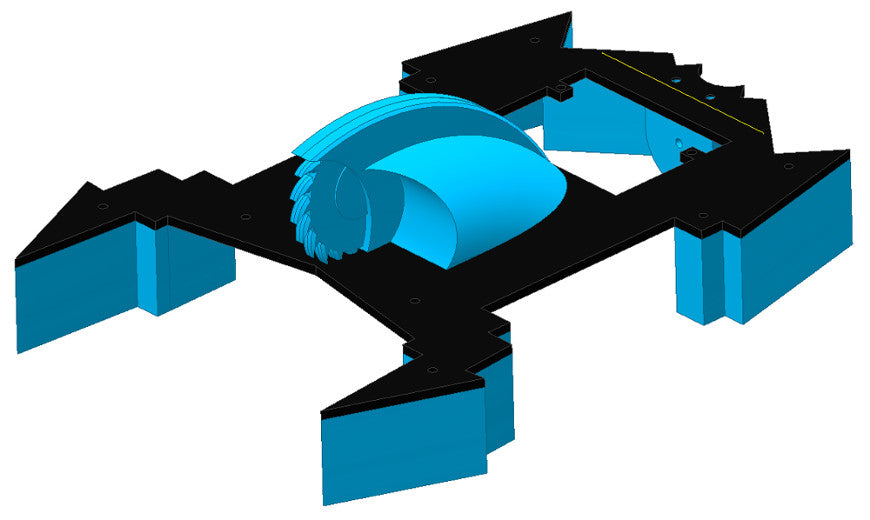
Design inspiration can strike at any point in the process, sometimes you may have a clear picture in your head before you start working and sometimes it strikes once you start designing shapes. However it’s working for you it’s always good to keep in mind what you need from your designs. They have to fit, they have to look the part, they need to combine to create the effect you are going for and you also need to keep in mind printing considerations.  As you can see, what looks like a large and difficult shape can often be made up of smaller more manageable shapes. Most tasks become easier if you break them down into bitesize chunks and creating things from nothing is no different, many songs start with just a kick sample.

After adding a few more shapes and manipulating them we pretty much had the overall look we were going for, our fake saw might not be real but it certainly looked the part. A little trimming of the saw’s teeth and it should sit on the top plate properly.

Now that we have the part design taken care of, we need to do a bit of dimension tweaking to both ensure that the design is as we want it and that it’s the correct size to fit to the plate.

The majority of the remaining 3D designs were to accentuate the shape of perspex top plate and to hide the inner workings of the buggy, so they were easy to extrude out from the shape of the top plate. We also had to design something to hold the magnet in place and some way of telling the buggies apart, we opted for a number on the back.
 Come in number five, your time is up!
Step 3 Printing The Designs:
Next job is to import the files into Automaker or your 3D printer software of choice. The 3D Printer Filament and the print quality setting you choose will impact on the print outcome. The higher the quality setting the slower the print. We tend to use draft quality as the print times are manageable and the result is of a decent quality.

Our 3D parts were designed to print very easily with no overhangs, this eliminates the need to print support materials. For this reason the saw is to be printed in two parts, split down the middle. Although some printers might be able to print it in one go, the blades would not be as sharp as if they were printed in two half’s and you would need to spend time removing the support material and working on the finish.
Alternative Design And Manufacturing Info:
If you don’t have access to a 3D printer there are still ways in which you can produce add-ons much like ours. Method one: Styrofoam Craft Foam is a great material for creating shapes from. It is easy to shape and can be fully worked by hand. Once you’re happy with your shape you can coat it with resin to give it an even finish and paint it the colour of your choice.

Method two: Another option for manufacturing these shapes are laser cutting them out and attaching them together. There is a fantastic program that is free for schools, 123D Make. It allows you to import your 3D CAD design, and then you select your material thickness, the application then will automatically create the laser cut plans ready for you to export into a format suitable for your laser cutter.

Tips:
- Use the dowel function on the right hand side to select placement of holes and diameter of dowels. This will allow you to line up and join the components together easily.
- The material thickness selection area is at the bottom of the screen and not with the rest of the measurements. We spent a few minutes scratching our heads whilst looking for it.
- Double check your design dimensions after importing them into 123DMake, under some circumstances it can double the size of your object on import. It’s a job of seconds to half the dimensions but if you miss this step you could find yourself with giant add-ons.
Downloads:

| Build A Robot Wars Buggy Learning Resources. | |
|---|---|
| Part 1 – Intro. | What we did, why we did it and what we used. |
| Part 2 – The Buggy. | It’s all about the line following buggy, We used the buggy as is and attached custom parts. |
| Part 3 – The Perspex Top Plate. | How we designed and cut the top plate, with alternative methods for those without laser cutters. |
| Part 4 – The 3D printed Add-ons. | How we designed and 3D printed the add-ons, with alternative methods for those without 3D printers. |
| Part 5 – Making The Flag. | Our design process for making the self righting flag. |
| Part 6 – Coding with the Microsoft MakeCode Editor. | Beyond line following. Martin Woolley gives a very thorough breakdown of how he wrote the code for the Robot Buggies. Learn how! |
| Part 7 – Bluetooth Buggy Control. | How to turn your Android device into a remote control for the buggy, including pairing instructions, Again, over to Martin Wooley. |