We’ve revisited our original Vanity Mirror project to create a more affordable version that’s easier for schools to use. Emma’s updated design is smaller, uses lower‑cost materials, and still offers the same hands‑on learning experience.
Like the first mirror, it involves simple soldering and ample scope for students to personalise the enclosure. With fewer LEDs, it can now be powered directly from a computer’s USB port, making it even more classroom‑friendly.
*Price per student is based on ex‑VAT costs for a class of 30, following the instructions and design files provided in this blog. Background image by Rinck Content Studio on Unsplash.
This Make Covers:

What did we use?
- Mirrored Value Acrylic (600mm x 400mm) (43339)
- Black Value Acrylic (600mm x 400mm) (43186)
- USB Cables and LED Strip Light (Kit of 50) (35171)
- White Flexible LED Strip 5m Reel (35165)
- 1 x Ultra Miniature SPDT Slide Switch (3442)
- 2 x 6mm M2 Pan-Head Screws (2316)
- 2 x M2 Hex Nuts (2325)
- Superglue
- Soldering Equipment.
- This design DXF.

Step 1 – Check out the design files:
This DXF contains the design for this project. The diagram below shows you how to work with the file.
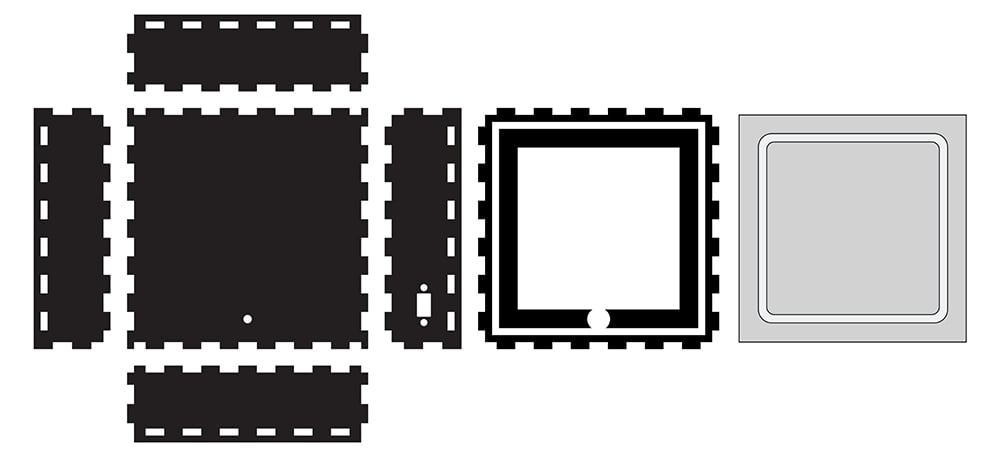
This design is in two parts. The box panels with finger joints will form the back of the mirror. We cut this from our Black Value Acrylic, which fits five makes per 600mm x 400mm sheet. The grey square with the engraved rectangle is the mirror panel, which we cut from Silver Mirrored Value Acrylic. Each 600mm x 400mm sheet fits 24 of these.
The rounded rectangle should be engraved onto the back of the mirror panel so the reflective coating is removed. The rest should be cut through fully.

The above image shows the file as it will appear when you download it, featuring the multiples of each part of the design on 600mm x 400mm sheets.
Step 2 – Laser cut the design!
You don’t have to use Value Black and Value Silver Mirrored acrylics – you could cut it from any 3mm thick materials you liked!
When cutting the mirror panel, leave the protective film on, and leave it on until you’ve attached it to the make at the end. This ensures it doesn’t get scratched during cutting or assembly. Also, remember to cut with the mirror face down on your laser, so the engraving will remove the mirror coating on the back.

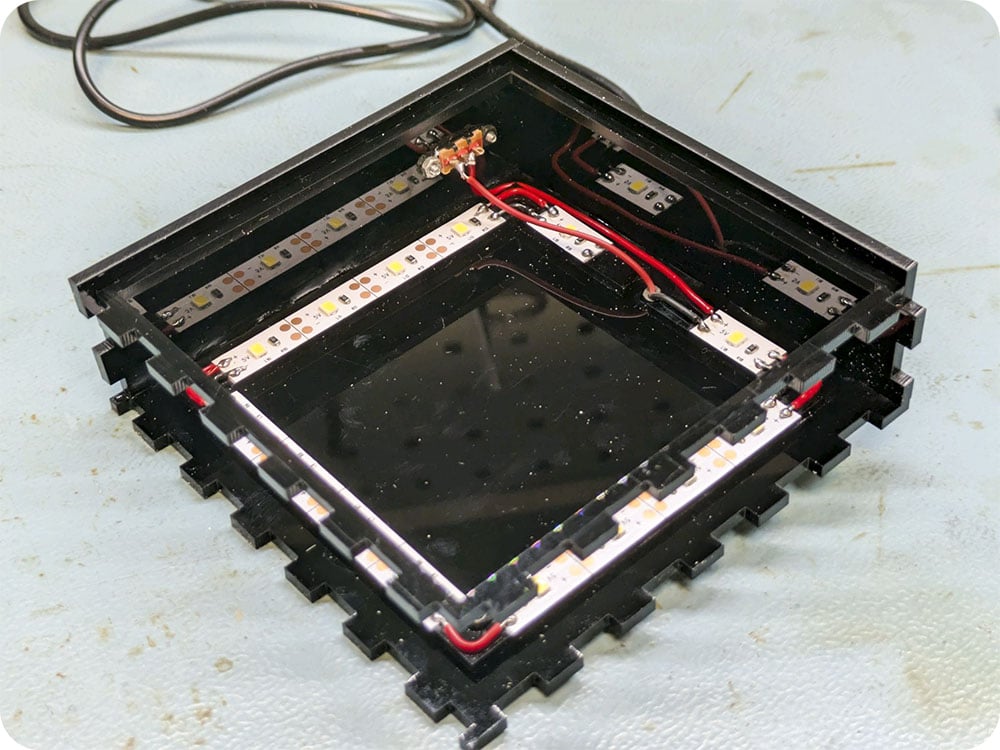
Step 3 – Assemble the LEDs on the riser.
Assembling the LEDs on the riser before sticking it into the enclosure makes soldering a lot easier. Use the adhesive backing on the LEDs to stick them down to the riser, and then solder the corners together, making sure to attach positive to positive and negative to negative, using small pieces of wire.
Then, use superglue to attach the riser onto the inside face of the back panel, with the gap in the riser centred over the hole at the bottom of the back panel.

Step 4 – Begin to attach the USB cable.
Push the USB cable through the hole in the back panel, and solder the negative wire to the negative pad on one side of the LED strip.

Step 5 – Add the switch.
Using two 6mm M2 pan-head screws and two M2 hex nuts, attach the switch to the right panel of the enclosure and glue the panel in place with superglue, perpendicular to the base panel as shown.
Then, using a length of wire, you will be inserting the switch between the red (positive) wire from the USB cable and the positive side of the LED strip. Solder the USB cable wire and the new length of wire as shown, soldering the wires so that one is attached to the middle contact on the switch, and one is attached to either the leftmost or rightmost contact.

Note that you’ll want to make sure the wires do not pass over the LEDs – this will cause shadows when the light is turned on!
Step 6 – Add a second side and the lip.
Slot the lip into the holes on the side panel, then add a second side perpendicular to the first, using superglue to affix it in place.
Step 7 – Complete the box and add double-sided tape to the lip.
Add the final two sides to the black box, affixing with superglue, before adding strips of double-sided tape (or another solvent-free adhesive) to the lip.

Step 8 – Attach the mirror surface.
Add the final two sides to the black box, affixing with superglue, before adding strips of double-sided tape (or another solvent-free adhesive) to the lip.

Step 9 – You’re Finished!
You now have a fully functional LED vanity mirror! If you want to give this make a go, why not consider using alternative materials, resizing it, or changing the shape?

How can I request a sample of the mini LED strip vanity mirror? I am not seeing it in the drop down list. Please can you help.
Hi,
Thank you for getting in touch.
Unfortunately, we don’t offer samples of the projects featured on our website, including the mini LED strip vanity mirror. These are provided as project guides, and we instead list all the materials, kits, and components used so they can be purchased individually.
However, we do offer sample packs for our materials and kits. You can request these using the links below:
Materials sample pack: https://kitronik.co.uk/pages/request-a-materials-sample-pack
Kit sample pack: https://kitronik.co.uk/pages/request-a-kit-sample