Overview
In this blog we will explore the general design that can be used to create a wireless two player game, like Run Along, Jump & Jump. We will start with the basic game design, focusing on how the core game functionality works in both single player and two player versions.
Then we will move onto how the wireless communication in the two player version works from a high level design view. Hopefully, by the end of this blog you will be able to design your own wireless two player games using the Pico W and ZIP96 Retro Gamer.
The full code for this blog is available in our GitHub repo.
What is Run Along, Jump & Jump?
Run Along, Jump & Jump is a basic platformer game where the player or players have to move through a course of obstacles, to collect coins and reach the house at the end of the level. Along the way they must avoid or jump on enemies called Walkers, which repeatedly walk left and right across the ground. They must also avoid enemies called Floaters, which repeatedly float up and down through the air.
When a player is in single player, they have to collect all of the coins by themselves before reaching the house to complete the level. When players are in two player, they have to collect all of the coins between them before reaching the house to complete the level.
Basic Game Design
Before starting the design of the two player game, we want to get the basic single player game designed first. By doing this we can then better understand how to integrate the wireless networking into the game. Before starting this game design, I created a ZIP96Pico.c library to provide access to all of the ZIP96 Retro Gamer controls. This made it easier to create the basic game, as the library functions are available to easily interface with the gamer's buttons, vibration motor, buzzer and screen.
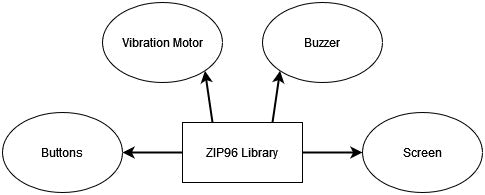
Next, lets think about how we could break down the game into several smaller pieces that could then be used to build up the game. These parts of the game could be the Player, Coin, Walker and Floater. To break up the code we might want to store the functionality for these parts outside of main.c, for example in another file called RAJAJ.c (from the games initials - Run Along Jump And Jump).
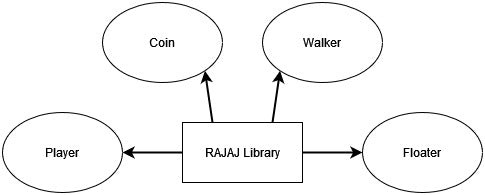
As we will need to store a number of variables for each of these parts it makes sense to create structs for each of the Player, Coin, Walker, and Floater. These structs will contain data about their position in the game and current configuration. We may also want to add functions into RAJAJ.c that would allow us to easily manipulate the several structs we're going to create. These functions can provide movement and collision checking on the several different parts of the game.
For instance a Player might need:
typedef struct Player {
    uint8_t x, y, coins;
    int8_t jump;
    bool falling, dead;
} Player;
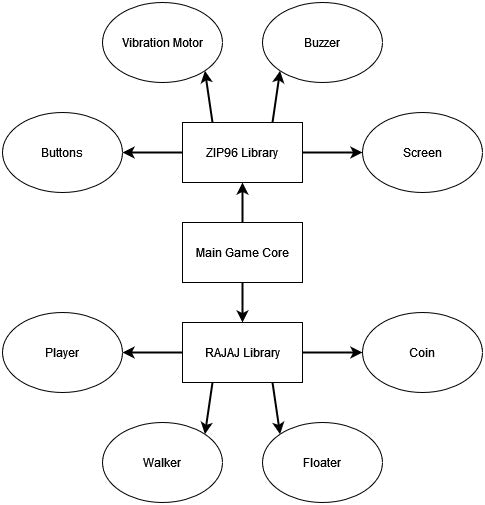
With the libraries set out, we can then figure out how to connect the functionality from ZIP96Pico.c and RAJAJ.c together inside main.c to get a basic game. Let's start this by planning out how we are going to display the game on the screen. For this we could decide to add a function to main.c that will update the screen with the positions for all instances of the Player, Coin, Walker, and Floater structs.
Finally, inside of main we can connect all of the different pieces together inside of a loop that runs until the game is over. This will include assigning each of the retro gamer controller buttons to a set of functionality, such as making a Player jump when the A button is pressed. Next we will want all instances of the Walker and Floater structs move around the game automatically. At the end of the game loop we then want to update the screen with the new positions of everything that has moved by calling the function we planned out earlier.
Two Player Wireless Game Design
With the basic game design done we can move on to figuring out how to incorporate the Pico W's networking capability into the game to make a wireless two player game. Before starting this game design, I created a PicoWNetworking.c library to provide access to the Pico W's networking functionality. This makes it easier to access the wireless networking by providing several basic functions.
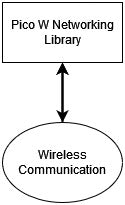
With the interface for Pico W networking setup we can then start thinking about where to add the two player communication into the game. A good place to put the networking functionality is on to the second core of the Pico. This allows for the basic game functionality to be separated from the networking. Having them separated will help to ensure the game runs smoothly on the device, even if the wireless communication is slow.

Next, to make the wireless communication useful, we need a way to communicated between the main game core and the networking core. To do this we can use two queues, one for telling the networking core to send a message, and another for telling the main core that a message had been received. Then to make this simpler we could create another struct called Config to store the messages being sent between the two cores.
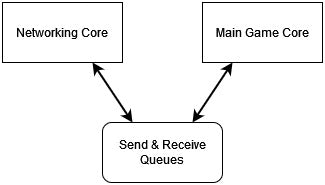
For this game the Config struct needs to contain the position of a Player, whether each of the Coin instances has been collected or not, and whether each of the Walker instances is dead or not. Setting up the Config struct like this will allow us to use this format to send this device’s current game configuration, and receive the other device’s current game configuration.
typedef struct Config {
    uint8_t x, y, coins;
    uint8_t collected[12], dead[5];
} Config;
The next thing we need to think about is how to add this device’s current game configuration to the send queue from the main core. We will want to do this inside the game loop on the main core, to send the most recent moves. Before trying to add to the queue we should check if the send queue is already full, as we only want to try adding to it if there is space. If the queue is full and we tried to add to it, then the code would sit and wait for space to be made available in the queue, blocking the main game functionality from running.
So once we know there is space in the send queue, we can create a new instance of the Config struct and add the current game configuration in to it, before adding the Config to the send queue. This will then be sent out by the networking core to the other device, and they will received this player’s position, which coins have been collected, and which walkers are dead.
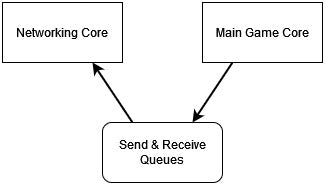
Also inside the main core we'll need to figure out how to process the other device’s configuration once it had been received by the networking core. It makes sense to do this right after adding the configuration to the send queue inside the main game loop. We'll again want to start out by checking if the received queue is not empty before trying to remove a Config from the queue. Again, if the queue was empty then the code would wait for something to be added into the queue before removing it and moving on.
Once we know there is something in the received queue we can then remove the Config and process it in the main game core. To process the new Config we'll want to update the other player’s position in this game, as well as update whether the coins have been collected or the walkers are dead.
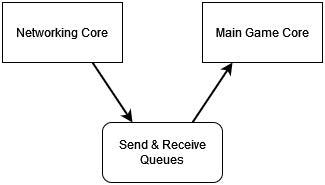
With the multi-core communication planned out for the main game core, lets then consider how to implement the networking core. When the networking core is first started, we are going to need it to setup a connect between itself and the other device. This will mean that one device acts as the server and the other acts as the client.
The server device will need to start the access point and listen for the client. While the client will need to connect to the access point and connect to the server. Once this is done, the networking core on both devices should send and receive data over the wireless connection repeatedly inside of a loop that runs until the game is over.
When the send queue isn’t empty, we will remove the Config from the queue, and process the data it stores into an array of bytes that can be sent over the wireless connection. Once the Config data has been process, the networking core should then send this data to the other device using the wireless connection they have both setup.

Next inside the networking loop, we are going to check if the Config data from the other device has been received over the wireless connection. When data has been received, we can then process the Config data. To process the data we will need to create a new instance of the Config struct and add the data received in to it. Once processed we can finally add the Config from the other device in to the received queue, when the queue isn't full.

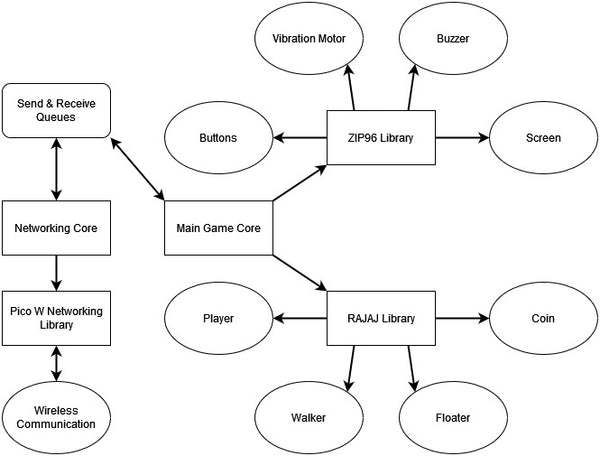
Below is an informal design diagram that shows how the game will be built up and how each part is connected.
Conclusion
We have explored the general design behind the Run Along, Jump & Jump wireless two player game.
The general process is to design a single player version of the game. Once that is done, see where you can add multi-core communication into the game loop for adding the game’s configuration to the send queue and processing the other player’s game configuration from the received queue. After this is included in your design, you can look at using the second core to handle the wireless networking communication to actually send and receive the game configuration data.
You should be able to use this as inspiration for creating your own wireless two player games on the Pico W and ZIP96 Retro Gamer.
©Kitronik Ltd – You may print this page & link to it, but must not copy the page or part thereof without Kitronik's prior written consent.


