Christmas Information: Kitronik will be closing 24th Dec December 2024, reopening on 2nd of January 2025. See our delivery schedule for more information.

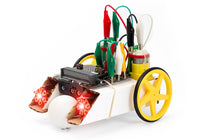
:MOVE mini buggy kit (excl micro:bit)

Stock code: 5624
filler

Pricing:Ex VATInc VAT
1+ £22.95
(excl. VAT)
£27.54
(inc. VAT)
10+ £20.95 £25.14
Stock:
Discontinued - This page is for reference for existing customers of this product. It is not possible to buy this item.

Description

Same Day Dispatch

  • Orders placed online before 3:00pm Monday - Friday (excluding public holidays and our Christmas shutdown period) are always dispatched the same day provided the goods are in stock. If the goods are not in stock we will endeavour to contact you as soon as possible to discuss a dispatch date.

UK Deliveries

  • If you live on the UK mainland and don't have any large materials or lithium batteries in your order it will cost £3.95 (£4.74 including VAT) if you spend less than £40 (£48 including VAT).
  • If you spend between £40 and £200 (£48 - £240.00 including VAT, excluding large materials or lithium batteries) delivery is free to most locations, £12 (£14.40 including VAT, excluding large materials or lithium batteries) to Northern Ireland and £15 (£18.00 including VAT, excluding large materials or lithium batteries) to UK remote locations. For a list of postcodes that will be charged the remote location rate: remote area list.
  • If you spend over £200 (£240.00 including VAT, excluding large materials or lithium batteries) delivery is free within the UK.

Rest of the world

  • These orders are sent via UPS, and the cost is dependant on the service you choose at checkout. Alternatively you can choose the free collection option and have your own courier collect it from us. International orders can only be shipped to the registered card address. Please note: International orders may be charged import duty dependant on local import laws and duty rates. These charges are usually billed to you directly from UPS.
  • Delivery times vary for international orders depending on the service selected and the destination. You can see the delivery time and cost at the shipping stage, or by using the shipping estimator from within the shipping basket.

Collection

  • If you would like to collect your order, or use your own courier then there is an option you can select during checkout. We do not charge a packaging or handling fee for this service, and you will receive an email when your order has been processed, you can collect half an hour after receipt of this email.

Further Information

Please note: Instructions for using this product (if available) can be found under the product description.
Adding ZIP Hex LEDs To The Simple Robotics Buggy Kit

A wide range of BBC micro:bit resources, what it is, the editors and using the micro:bit

Adding ZIP Hex LEDs To The Simple Robotics Buggy Kit

A wide range of BBC micro:bit resources, what it is, the editors and using the micro:bit

Q:
Is it possible to add ultrasonic sensors?
Asked by: Richard West
A:
Hi Richard,

Thank you for your question, you can do but you would need a sensor interface board like the below.

https://www.kitronik.co.uk/5628-move-sensor-interface-board-for-the-bbc-microbit.html
Answered by: Cullen Lewis
12-Dec-19

Q:
Does the servo:Lite board also power the micro:bit? It looks that way in the pictures and video, but that's not happening for me as it still needs power from the USB.
Asked by: David Wheable
A:
Hi David,

Thank you for your question, the servo:Lite board should also power the micro:bit. If it is not being powered then it is most likely one of three things.

It could be the batteries are running a little low on power leading to a voltage drop and they are no longer able to power the board through the regulator.

It could be that the screws are not making a full connection. to the board so I would check that those are fully in and making the connection.

Final thing it could be is the central battery in the battery pack could be not quite making the connection to the battery pack.

Best Regards

Cullen
Answered by: Cullen Lewis
04-Apr-19

Q:
Is there a particular type of pen that you recommend?
Asked by: Rob Coleman
A:
Hi, we have always found that the sharpies are the best for this.
Many thanks
Answered by: Rebecca Diamond
07-Jan-19

Q:
Hello! Can I access to other pins on Micro:bit using servo lite board or Line Following add-on for :MOVE mini?
Asked by: Stanislav Invanov
A:
Hi Stanislav,

Thank you for your question, the Servo Lite board itself would not allow you to access more pins but the :MOVE sensor board (Code 5628) would. This is combined with the servo lite to create three groups of Pins which can be used for input and out put.
Answered by: Cullen Lewis
26-Sep-18

Q:
Do you have any code for the robot written in python
Asked by: olivier boudou
A:
Thank you for your question

I am afraid we do not currently have any pre written python code for this kit.
Answered by: Cullen Lewis
06-Jun-18

Q:
Hey so, I have the move mini fully constructed but the servos aren't working. I tuned them but the wheels still won't turn. What should I do?
Asked by: Ben
A:
Hi Ben, It could be a couple of issues, the best option is to follow the advise in the troubleshooting section at the end of the instruction booklet. If this still doesn't resolve the issue send through some further details to support@kitronik.co.uk
Answered by: Michael Lockhart
13-Apr-18

Q:
We cannot get the ZIP LEDS on the servo:lite PCB to work at the same time as the Servo motors. If we undo the screw connecting Pin 1 we can get one of the servos to work with the LEDs. However, as soon as Pin 1 is tightened the LEDs stop working although both servos now work. We have tried installing a different Microbit but the effect is the same. Is this likely to be a fault with the servo:lite PCB?
Asked by: James Robinson
A:
Hi James, This is an issue that has got us a little stumped as it isn't something we have seen. However, after a little thought a few things to check, firstly are the batteries new? If the batteries are old and run down then you may not be able to supply all three pins. If you unscrew pin 2 can you still use the ZIP LEDs? What about if you leave pin 2 unscrewed but screw pin 1 back in? If the battries doesn't solve the issue then send through an email to support@kitronik.co.uk with the above answers and also a copy of your code and we will take a further look.
Answered by: Michael Lockhart
03-Apr-18

Q:
At the BETT2018 you have the buggy following a line. What kit needs to be purchased to allow this?
Asked by: David Harmer
A:
Hi David, The line following add on is a new product which we are about to release, so it's not available to buy just yet but in the coming weeks it will be. The details can be found here, https://www.kitronik.co.uk/5624-lf-line-following-add-on-for-move-mini.html and once we have stock you will be able to order this.
Answered by: Michael Lockhart
25-Jan-18

Q:
I have problem with Bluetooth pairing initiation,as "reset" button is not accessible once move buggy is completed ( for Bluetooth pairing you need to pres buttons A+B and then reset. Reset is between move and micro:bit board. Is there any solution to easy solve this issue?
Thank you and BR,
Nikola
Asked by: Nikola
A:
Hi Nikola, The Servo: lite board was designed so the On/Off switch replicates the reset button being pressed. As such if you turn the Servo: lite board off, then hold A & B and turn the board back on it will enter pairing mode.
Answered by: Michael Lockhart
05-Jan-18

Q:
Hi there - I'm at stage 4 of your instruction booklet and can only get one of the two wheels to rotate. Each servo is working, as when I switch pins the other servo functions well. So it looks like the issue is with the PSB - or could it be something else? I double-checked the code, but that is correct. Any ideas?
Asked by: Robert
A:
Hi Robert, The most likely cause is either that the screw connections on the micro:bit to the Servo: lite board aren't tight enough or that there could be an issue with the Servo: lite board itself. If both servos are working the first thing to check would be the screw used to mount the micro:bit which relates to the servo not working. On the Servo :lite board it will indicate servo 1 and 2, if its servo 1 then it is pin 1, servo 2 is pin 2 on the micro:bit. If that is not the issue it would be checking the pin headers on the Servo board and the connector on the servo. If this doesn't resolve it drop us an email to support@kitronik.co.uk and we will advise further.
Answered by: Michael Lockhart
04-Jan-18

Q:
I am at the point of plugging in the three servos and do not understand how to plug in servo three. Can anyone help me?
Asked by: Kiera Bewsy
A:
Hello Kiera, If the Servo: Lite board hasn't been modified you would need to follow this first, https://www.kitronik.co.uk/blog/3-servos-with-the-servolite-board/. This would then disable the ZIP LEDs and enable the 3rd servo option.
Answered by: Michael Lockhart
02-Jan-18

Q:
When I connect the micro:bit to the SERVO:LITE PCB with the supplied spacer and bolts it's not very easy to plug in any of my micro USB cables since there isn't a lot of clearance. I'm a bit worried about forcing it in and breaking something, so I'm going to cut a bit of cardboard to pad out the spacer. Am I doing something stupid? I don't really want to shave off the plastic housing around the micro USB plug.
Asked by: JOHN STOUT
A:
Hi John, It is very unlikely that you have done something wrong. Due to the design of them MOVE: mini we were limited on the amount of clearance we could give. As such if the USB cable you are using is 6mm or over then it would possibly cause an issue. Adding an additional spacer wouldn't be an issue it would however likely mean the front 'T' shaped piece that sits and holds the Servo: lite board and micro:bit in place won't fit. We have made a note of this on the Servo: lite product page, https://www.kitronik.co.uk/5623-servolite-board-for-move-mini.html
Answered by: Michael Lockhart
22-Nov-17

Q:
Hi,
I have a 3dprinter, so I would be able to print the plastic parts... Do you just sell the electronics with model files?
Cris.
Asked by: Cris
A:
Hi Chris, Unfortunately we don't have the design files available to send over, and although you could buy all the individual components such as screws (in packs of 100), servos and Servo:Lite board you wouldn't also be able to obtain an instruction booklet for building and coding the :MOVE mini.
Answered by: Michael Lockhart
19-Oct-17

Q:
how much is the weight of this mini buggy kit (with box)?
Asked by: meeri
A:
Hi Meeri, we have a weight of the product listed on our system as 240g, this will include the box and booklet along with all the parts.
Answered by: Michael Lockhart
19-Sep-17

Q:
I got the :move mini to use it to draw.
The wheels of my :move mini are a bit bobbly (in a sense that they move a bit in and out). I tried to tighten the screws evenly and put the wheels on the servo as straight as possible, but there is still a bit of a bobble which means I can't draw a straight line with the :move mini.
Also at slow speeds one of the servos doesn't move the wheel with a consistent speed (but it does at a higher speed).
Do you have any advice how I could fix these issues?
Asked by: Matthias
A:
Hi Matthias, Thank you for contacting us regarding your :MOVE mini buggy. I have doubled checked into both of your issues, the first regarding the wheels wobbling in and out can occur very slightly and this shouldn't cause an effect on the driving of the buggy. If there is a large amount of wobble then it may be there is an issue with the assembly of the buggy, if you have further issues with this drop us a video through to support@kitronik.co.uk for us to take a look at. For your second issues regarding the servos turning at different speeds there is a manufacturing tolerance on the servos as such at lower speeds you are likely to get them turning slightly different. It is possible to resolve this using the servo write pin block, the servos on connected to pins 1 and 2. Setting the value to 180 will be full speed in one direction, 0 will be full speed in the opposite direction and 90 should make them stop. So if you wanted to creep in one direction you would set one servo to maybe 20, then the quicker servo to say 15 to allow for the difference in turning speed. I hope this helps.
Answered by: Michael Lockhart
11-Aug-17

Q:
Must the micro:bit be mounted at all times? Could it be removed for other projects and reuse on the buggy?
Asked by: Leona So
A:
Hi Leona, The micro:bit would need to be mounted on the servo:lite board while you want to use the buggy. However there wouldn't be anything stopping you from removing the micro:bit from the buggy when you want to complete other projects.
Answered by: Michael Lockhart
02-Aug-17

Q:
Hi.
What material is the chassis made from?
Asked by: Tony
A:
Hi Tony,

The Chassis is made from laser cut perspex such as can be found in our materials section under Perspex and Acrylic Sheets.
Answered by: Cullen Lewis
26-Jun-17

Q:
Can another type of wheel be fitted instead of the supplied wheel?
Asked by: Tony Golinski
A:
In theory another wheel could be attached as they simply attach directly onto the servos. However there may not be sufficient clearance for the wheel to fit and none of the other wheels we stock would be suitable.
Answered by: Cullen Lewis
22-Jun-17

Q:
Is it possible to use Micro:Python with this kit? Thanks
Asked by: Mr M
A:
Hello, As the :MOVE mini is designed to be used via the micro:bit it is technically possible to use micro python to code the micro:bit and as such this kit. However we haven't tried this our self, there is a guide for using micro python which micro:bit have created themselves, https://www.microbit.co.uk/python-guide
Answered by: Michael Lockhart
16-Jun-17

Ask a question about this product


Payment & Security

American Express Apple Pay Diners Club Google Pay Maestro Mastercard PayPal Shop Pay Visa

Your payment information is processed securely. We do not store credit card details nor have access to your credit card information.

You may also like

Recently viewed