Overview
In this blog we are going to cover how to improve on our Cardboard Pico Drawing Robot Arm. This will be done in three stages. In the first section we will upgrade the servos we use to construct the robot arm, as well as make our arm sturdier using pencils. In the second section we will learn how to draw images using the robot arm. Then in the third section, we will use CAD to create our robot arm using a laser cutter, add better support for the pen mechanism and use a pen lifter attachment to control the movement of the pen.
The DrawingRobot library can be found on our GitHub repo.
The blogs in this series are:
- Making a Cardboard Pico Drawing Robot Arm
- Making an Advanced Pico Drawing Robot Arm
- Pico Drawing Robot Arm Code Explanation
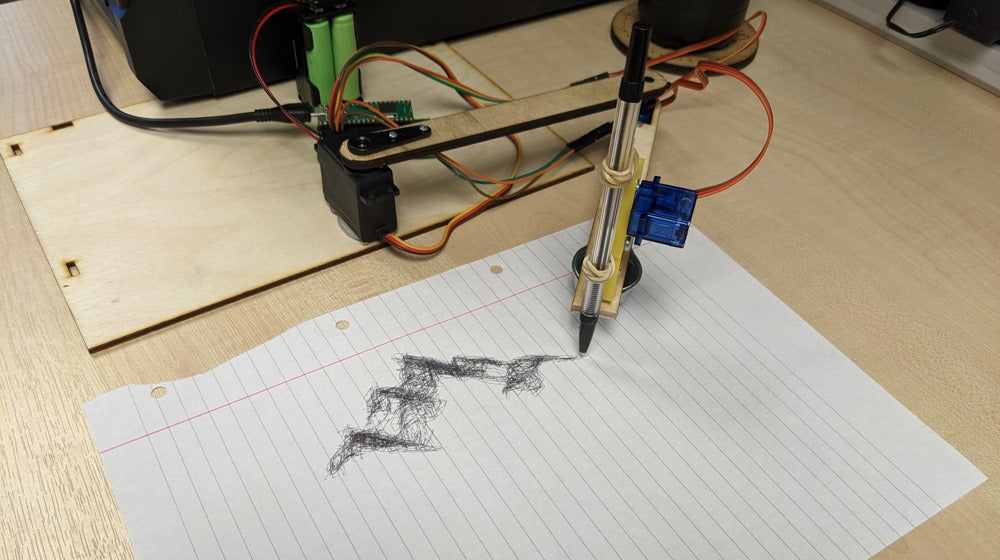
Pencil based Pico Drawing Robot Arm
What you’ll need:
- 1x 180 Degree Servo
- 1x 180 Degree Metal Gear Servo
- 1x Midi 180 Degree Servo
- 1x Raspberry Pi Pico with Pin Headers
- 1x Kitronik Simply Servos Board for Pico
- 1x 4xAA Battery Cage
- 1x PP3 Battery Clip
- 4x AA Batteries
- 1x Hot Glue Gun
- 2x Pencils
- 1x Pen
- Jump to the shopping list!
Create the Pencil Robot Arm
We can start upgrading our drawing robot by replacing two of the servos and replacing the cardboard arms for pencils. The pencils we used were cut down to about 15 cm each to keep our arm lengths the same as the cardboard robot arm. We can however use longer pencils as long as we change the arm length value when setting up the robot variable in the code.
The two servos we want to replace are the shoulder and elbow servos as having better quality servos here will improve our drawing robot’s performance. For the shoulder servo we are going to put a larger, midi servo that will better at handling the strain of our robot arm extending out from it. For the elbow servo we still want to have a mini servo here, but we can instead use a metal gear mini servo.
All three servos are still aranged in the same way as on our cardboard robot arm, but this design benefits greatly from stronger arms and improved accuracy on its two joints.
Drawing Images
From here we can start drawing images using our robot arm. To draw an image we must first convert it into lines that the DrawingRobot library can understand. To convert the image into lines we are going to vectorise the image using software from the BrachioGraph project. Vectorising turns an image into lots of simple lines and the x, y coordinates for each line in the vectorised image can be saved as a list. To do this on our computer we are going to use the command line terminal to run all of our commands. First we need to clone the BrachioGraph GitHub repository using the following command:
git clone https://github.com/evildmp/BrachioGraph.git
With the GitHub repo downloaded, we are going to move into the BrachioGraph folder. Once we are inside the BrachioGraph folder we want to install the Python packages required by the project. To do both of these we need to run the following commands:
cd BrachioGraph
pip install -r requirements.txt
Finally, we are going to install the Computer Vision library used to vectorise the image with the following command:
pip install opencv-python-headless
With this done, we can create a new file in the BrachioGraph folder called makeImage.py. Into this file we are going to add the code below. This code will use the BrachioGraph project to generate the lines used by our drawing robot arm. In the BrachioGraph folder there is another folder called images which is where we want to save the image we want to draw. Next update the code inside makeImage.py *to use the filename of the image, replacing *”image.png” **with the name of your image. Note: your image does not need to be a PNG and does not need to be named image, it could be something like “logo.jpg”.
from linedraw import *
lines = vectorise("image.png", draw_contours=2, draw_hatch=16)
f = open("lines.txt", "w")
for line in lines:
    f.write(str(line) + "n")
f.close()
Back on our command line terminal we want to run the *makeImage.py *file to vectorise the image using the following command:
python makeImage.py
Once the code has finished running a list of lines will be written to lines.txt. These will be the line coordinates to tell our Pico how to draw the image. Along with this there will be a new file in the images folder with the .svg extension that shows us how our image has been vectorised.
Now we can copy the contents of lines.txt *onto the Pico and save the file as *lines.txt. With lines.txt *on the Pico we can now draw the image we have just vectorised. To draw an image using the *DrawingRobot **library we can use the drawImage *function. The *drawImage *function takes a single value as its input which is the filename where we have store our line coordinates list. In our case this is *lines.txt so our code for drawing the image will look like the code below. We can now run this code on our Pico and our drawing robot will begin to recreate our image.
from DrawingRobot import DrawingRobot
robot = DrawingRobot(150, 150, 100, 100)
robot.drawImage("lines.txt")
Here is our Cardboard Pico Drawing Robot Arm starting to draw the Kitronik logo.
Here is our Pencils Pico Drawing Robot Arm drawing a flower.
CAD based Pico Drawing Robot Arm
What you’ll need:
- 1x 180 Degree Servo
- 1x 180 Degree Metal Gear Servo
- 1x Midi 180 Degree Servo
- 1x Raspberry Pi Pico with Pin Headers
- 1x Kitronik Simply Servos Board for Pico
- 1x 4xAA Battery Cage
- 1x PP3 Battery Clip
- 4x AA Batteries
- 1x Hot Glue Gun
- 1x Kitronik Pen Lifter for Pico
- 1x Metal Ball Caster
- 1x Pen
- Material to laser cut arms with (6mm Poplar Laser Plywood)
- Drawing Robot Arms DXF file
- Jump to the shopping list!
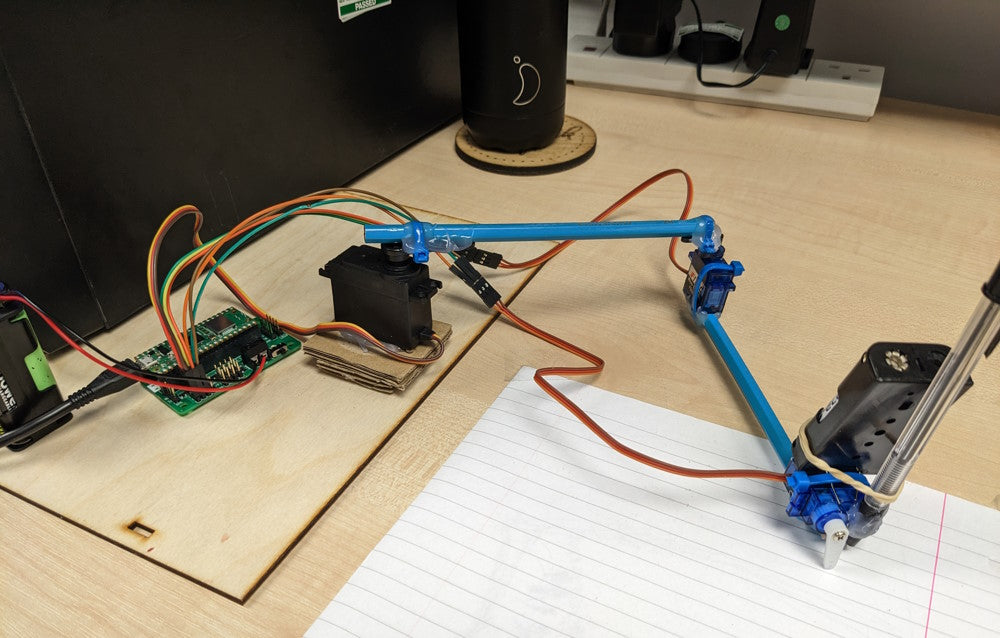
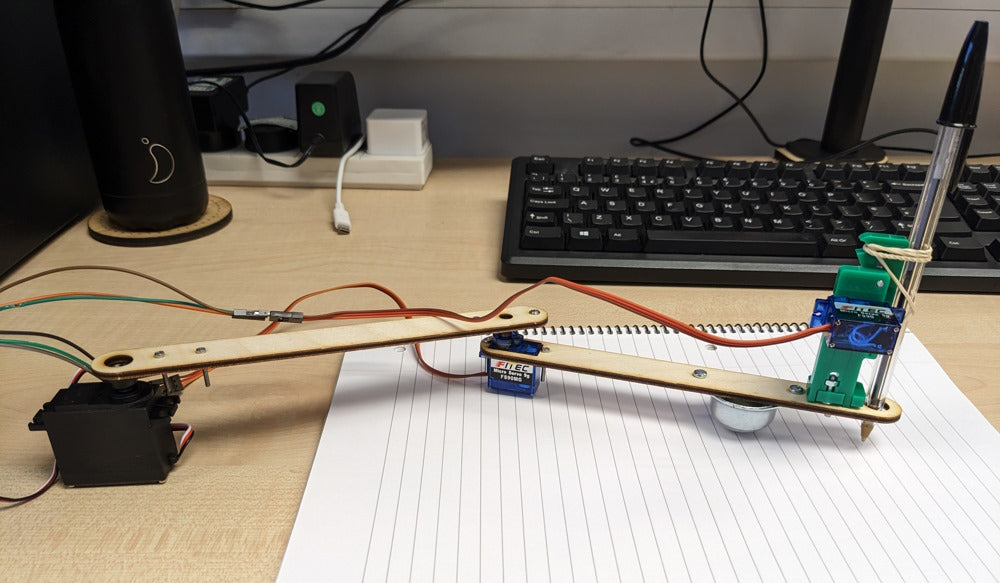
Create the CAD Robot Arm
Here is the CAD design for the laser cut version of the robot arm. This version of the drawing robot arm is quite different to the previous two versions. In this design we are goiing to laser cut each arm out of 6mm wood. Each arm has a range of holes to secure the servos, servo fixings and the pen mechanism onto the arm using screws.
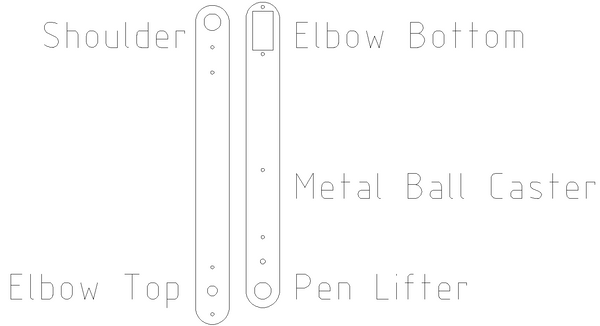
With our two arms now laser cut, on the left arm we are going to attach the midi shoulder servo fixing on one end. On the other end we’ll attach the metal gear elbow servo fixing to the holes labled as elbow top. On the right arm we are going to attach the metal gear servo directly to the elbow bottom holes. Then on the other end of the right arm we are also going to attach the metal ball caster, followed by the pen lifter. After the pen lifter attachment there is also a hole for a pen to fit through, for it to draw on our paper.
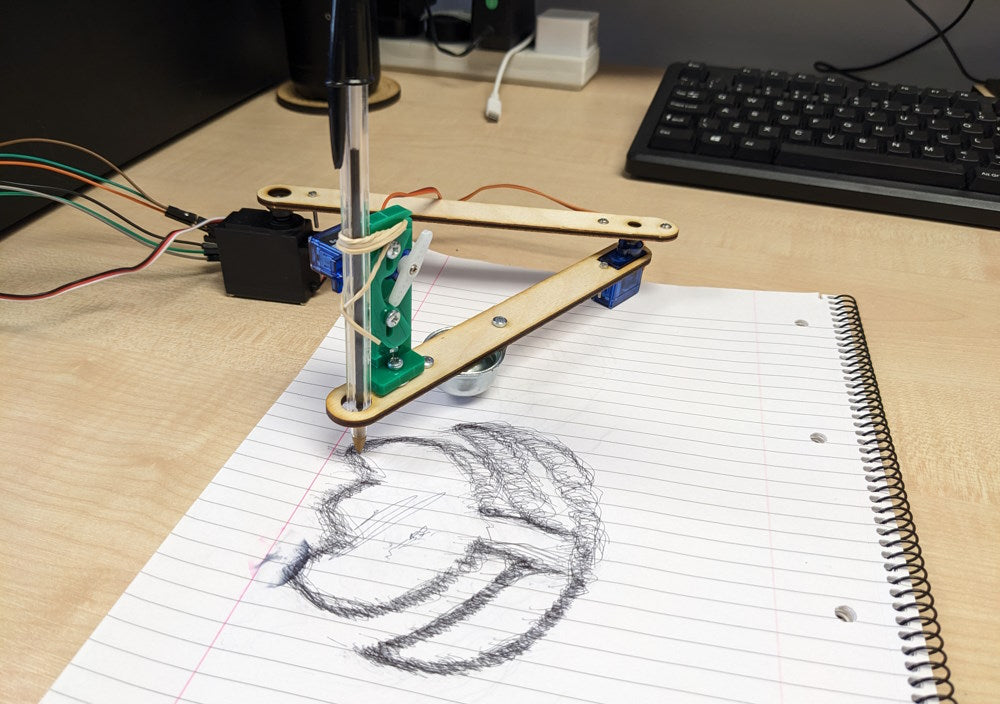
Here is our assembled CAD based drawing robot arm. The three servos will still be connected to the simply servos board with the shoulder in the first slot, the elbow in the second, and the pen lifter in the third servo slot.
The arms on the CAD based robot arm are slightly longer than before at 16cm. We need to then update the setup for our robot *variable to increase the length of our arms to *160, 160 *as the DrawingRobot *library uses millimeters for its measurements.
from DrawingRobot import DrawingRobot
robot = DrawingRobot(160, 160, 100, 100)
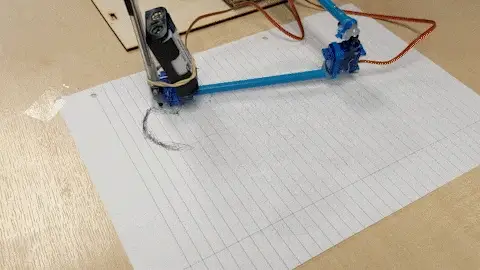
Below is a flower drawing done by our CAD Pico Drawing Robot Arm.
The next blog in this series can be found here.