With Halloween 2018 creeping up on us, we’ve made some spooky resources to give your decorations a techy twist! It’s a great time of year to test out some ideas and to dust off your making skills.  This year we have a theme, movement! Firstly, we have a moving prop, and we also have a device that detects movement to scare those that venture too close! We’ve also thrown in the odd making tip along the way, for good measure!
Halloween 2018 Project Ideas:
To mix it up even further, we chose to highlight two different manufacturing techniques, 3D Printing and Laser Cutting. At the same time, both of these projects can be handmade. For example, the spider project could be made with craft foam or Papier-mâché, and the SpookO’Matic can be hand tooled from Perspex, Plywood, or MDF. Let’s get making!
Halloween 2018 – 3D Printed Surprise Spider:
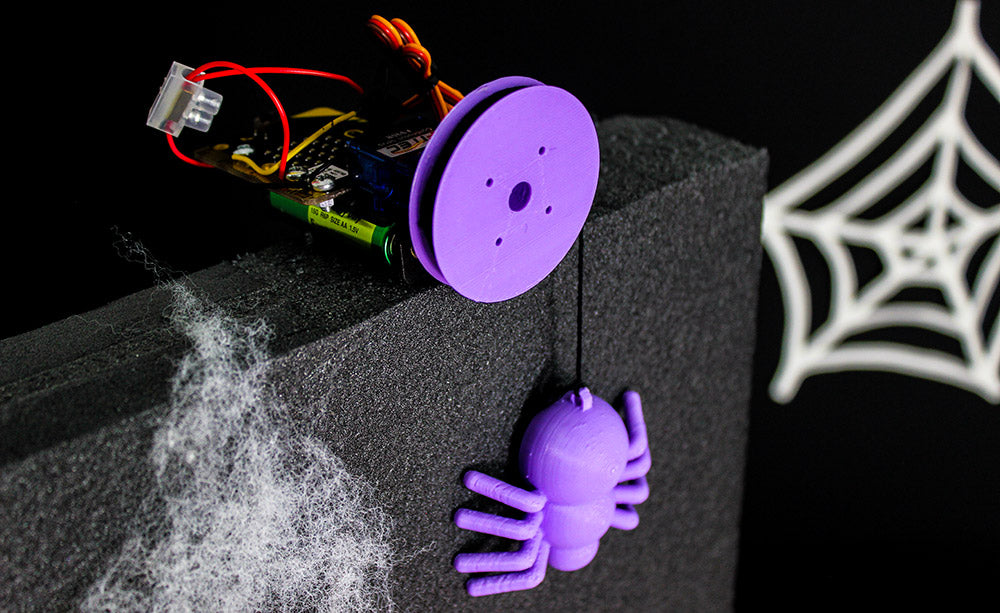
 This 3D printing project would look great in a window or hidden by a doorway. When activated, the servo turns a winch, suddenly lowering the spider onto your unsuspecting victim!
We Used:
- 360 degree servo.
- BBC microbit.
- A 2xAA battery cage and batteries.
- Terminal block.
- M3 Screws and hex nuts.
You Will Also Need:
- 3D Printer.
- Glue (superglue, hot glue or poly cement will work).
- Sticky Pads or double-sided tape.
- Thread.
- Our design files.
 When 3D printing the spider, use support material and a brim in order to avoid the legs coming loose from the print bed. The winch drum shouldn’t need any support material when printed on its side.
  We glued the winch drum to a servo horn then pressed onto the servo. For this, we used superglue although hot glue would work fine as well. As soon as the glue is dry, the spider is attached by the black thread tied and wound around the drum.
  The microbit and servo are held onto the battery cage with double sided sticky pads. Tip: The spider descends slightly faster than it ascends. Because of this, adjust your microbit code so that it always comes back to the same height. A guide on driving a servo using the BBC micro:bit can be found here.
Halloween 2018 – The Spook O’Matic:
 This build is a great example of how different project kits can be combined to make a custom control circuit. It uses our light activated switch kit to sense the shadow of someone moving past, and also our record playback kit to scare them with a spooky noise! We decided to laser cut a Perspex case for it, however, you can also design your own from our range of materials.
We Used:
- Record Playback Kit.
- Light Activated Switch Kit.
- A 2xAA Battery cage.
- 2 x AA Batteries.
- Black frosted perspex.
- M3 Screws & nuts.
- M3 Spacers (F-F and M-F).
You Will Also Need:
- Soldering Iron.
- Solder.
- Laser cutter.
- Our design files.
 The DXF of this design is free to download below. Set the text to a very light engrave setting, since frosted black Perspex engraves to a vivid white very easily.

Both kits were assembled as standard except for a few components. The LEDs of both kits, as well as the phototransistor of the light activated switch, were soldered with a length of wire to let them poke through the casing. The battery connections for both boards were soldered to the same 2xAA battery pack. Finally, the two interface wires were added. Solder one wire from the positive output of the light activated board to the “3V” hole of the playback kit, then solder the negative output to the “Ply” hole.  Before screwing on the front of the case, the potentiometer on the light activated switch needed adjusting. This will change the amount of light needed to activate the switch, so adjust it for the lighting conditions where you want to use it.
  The LEDs and phototransistor poke through the front of the case which is held on with M3 screws. All that’s left now is to record a sound into it, we used the classic evil laugh from Thriller! As an additional challenge, see if you can use the light activated switch output to trigger the 3D printed spider as well. This should make both builds motion activated, and into a spooktacular double surprise!
Bonus Tip:
The webs in the background were cut from our polyethylene foam sheets. It’s a really easy material to work with using scissors, craft knives, or even a laser cutter.
Other Spooky Links:
If our Halloween 2018 project ideas have got you in the making mood, why not check out or Halloween 2016 and 2017 project ideas.