In this tutorial you will find Experiment 7 Wind Power from the Kitronik Inventors Kit for the BBC microbit. We’ve included the entire experiment as a free example of the great practical experiments that are contained within the Inventors Kit. Learn how to build the circuit and how to code the BBC micro:bit to control the circuit.

You can complete this experiment with or without the Inventors Kit. If you do not have the Kitronik Inventors Kit you will have to source all of the required components separately, a full list of the things you will need can be found below.
This Experiment Requires:
- BBC micro:bit. x 1
- Terminal connector. x 1
- Low Inertia Solar DC Mini Motor. x 1
- 2.2kΩ Resistor. x 2
- Fan blade. x 1
- M/F Jumper Wires (if using the Prototyping System ). x 2
- M/M Jumper Wires (if using the Prototyping System ). x 1
- Crocodile Leads (if not using the Prototyping System ). x 5
The Aims Of This Experiment Are:
- To generate a voltage by blowing on a fan blade to spin a motor.
- To measure this voltage by using an analog input pin on the BBC micro:bit.
Experiment 7 Video Walk Through:

Experiment 7 Wind Power:
Wind turbines convert the kinetic energy of air into electrical power. In this experiment, the motor and fan are used in reverse to generate a voltage which can be measured and displayed by the BBC micro:bit.
Create The Following MakeCode Editor JavaScript:
Below is an example of how to write the code for the experiment in JavaScript.  If you’re having difficulty producing your own code for this experiment, we’ve created the code for you, you can find links to the code towards the end of this article.
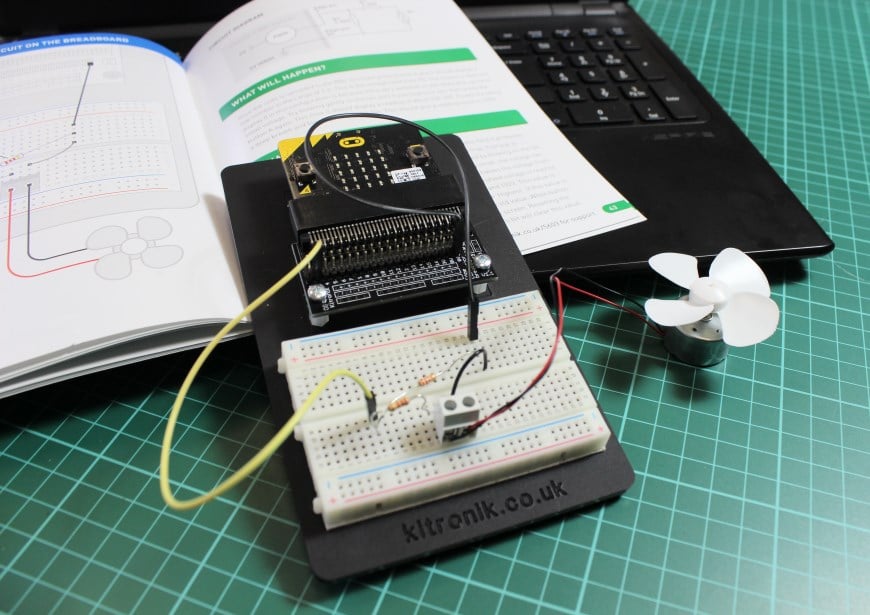
Building This Circuit On The Prototyping System:
It is possible to build this circuit using the Prototyping System for the BBC micro:bit and the components listed at the top of the page, you can follow the diagram below. 
Building This Circuit With Crocodile Leads:
If you don’t have the Kitronik Inventors Kit for the BBC micro:bit or the Prototyping System you can still build this circuit using the circuit diagram for reference and Crocodile Leads to join the components together. You can see an example of this in the picture below. 
Circuit Diagram:

What Will Happen:
Once the code is uploaded to the BBC micro:bit press button A and it should display a low number in the range of 1 – 5. This is the voltage read from P0. The reason it does not display 0 in this configuration is that P0 is very sensitive so will likely pick up some small voltage. Try blowing gently on the fan until it just begins to spin then press the A button again. This time it should display a reading of between 200 – 300. Finally try taking a deep breath and blowing hard on the fan, this should give a reading of close to 1000!
What’s Going On (How Does It work)?:
When electrical current passes through a wire inside the magnetic field it produces torque (turning force) that turns a motor. The opposite is also true if torque is applied to a motor, a current is generated. The torque is supplied by blowing the fan. Although the current generated by blowing on the fan is very small, the voltage can reach 8V, R1 and R2 together form a potential divider which halves the voltage from the motor keeping it mostly in the measurable range. This halved voltage is read by the BBC micro:bit and converted into a number between 0 and 1023. This value is then compared to the value currently stored in the variable ‘Highest’. If this value is higher than the currently stored value then it replaces the old value. When button A is pressed the highest recorded value is scrolled on the screen. Resetting the BBC micro:bit by using its reset button will clear this value.
Code Downloads:
The code examples below have been individually zipped and can be downloaded by clicking on your preferred option. Once unzipped you can either open the and edit the code in the appropriate editor or place the HEX file onto your microbit*.
MakeCode Editor & Python Code Downloads:
- This code was created with the MakeCode Editor, download the HEX file here.
- This code was created with the Python Editor, download the HEX file here.
Legacy Editors Code Downloads:
NOTE: The legacy editors will disappear at some undisclosed point in the future. The code can still be placed on a microbit and will run regardless but you won’t be able to use an editor. When that happens, switch to using one of the currently supported editors. We’ve already made the switch as the new editors are better and more fully-featured.
- This code was created with the Touch Develop Editor, download the HEX file here.
* – To place the unzipped HEX file onto your microbit, connect your microbit to your computer via USB and then open File Explorer (Windows). Your microbit should show up as a removable drive. Simply drag and drop your HEX file onto the microbit in file explorer and the file will be transferred. The power light on the back of the microbit will start to flash, once the flashing stops the microbit is ready to run your code.
Booklet Errata:
 The current version of the BBC micro:bit booklet is 1.3. If you have version 1.1 then please see below for corrections made to the current version. On page 43, the plus and minus signs on the motor on the circuit diagram are the wrong way round.
Kitronik Inventors Kit Resources:
| Exp No#. | Experiment Name. | Resource Type. |
|---|---|---|
| 1 | Say Hello to the BBC micro:bit. | Further Help. |
| 2 Pre V1.7 | Using an LDR and analog inputs. | Full Experiment + Further Help. |
| 2 V1.7 | Using a Light Sensor & analog inputs. | Full Experiment + Further Help. |
| 3 | Dimming an LED using a potentiometer. | Further Help. |
| 4 | Using a transistor to drive a motor. | Full Experiment + Further Help. |
| 5 | Using the accelerometer to control motor speed. | Further Help. |
| 6 | Setting the tone with a piezo buzzer. | Further Help. |
| 7 | Wind Power. | Full Experiment + Further Help. |
| 8 | Making a game using the compass. | Further Help. |
| 9 | Capacitor charge circuit. | Further Help. |
| 10 | Using an RGB LED. | Further Help. |
| 11 | Making a pedestrian crossing. | Full Experiment + Further Help. |
| 12 | Making a random dice. | Full Experiment + Further Help. |