If you are new to the Pico, and Python development, check out Raspberry Pi’s guide to get you started
Kitronik have also written a First Steps Tutorial to get you started using the Pico with the Thonny Editor.
Getting the Smart Air Quality Code
Kitronik have written a module to use with the Pico Smart Air Quality Board which is available, along with sample programs, in the Kitronik GitHub.
If the words “Clone the repo” mean nothing then check out our guide to git
If you are new to using modules with the Pico, there is a helpful guide providing practical examples and explanations on how to do so.
Clone or download the repository and then copy / save the PicoAirQuality.py file to your Pico.
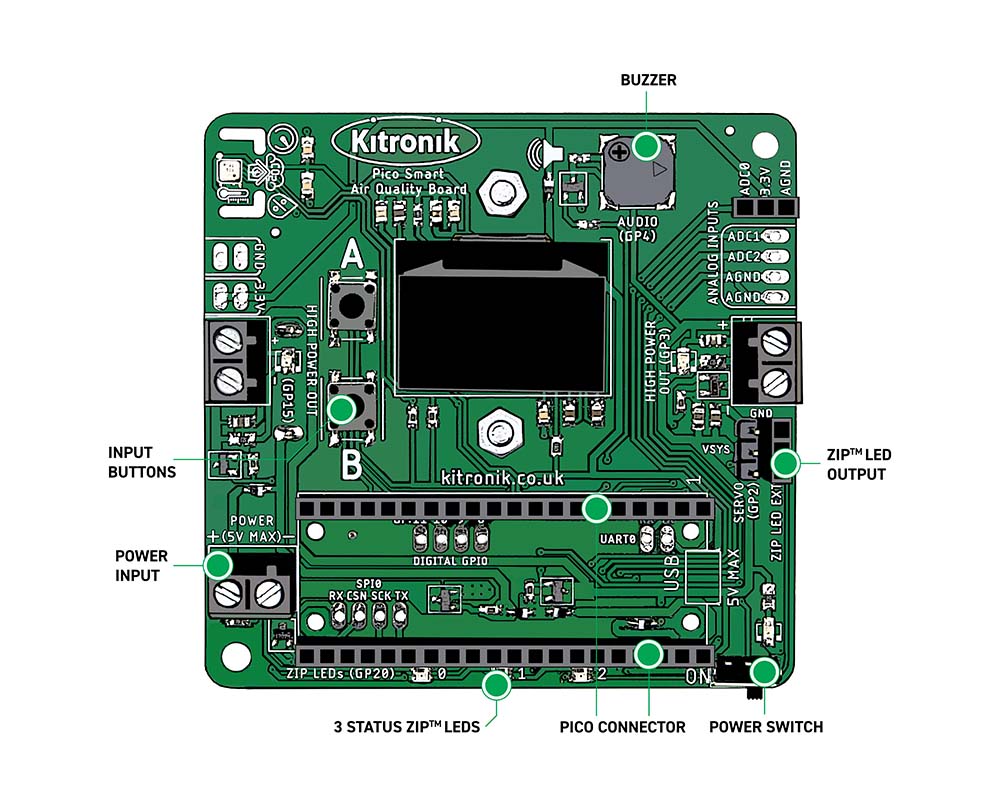
User Input Buttons and Buzzer
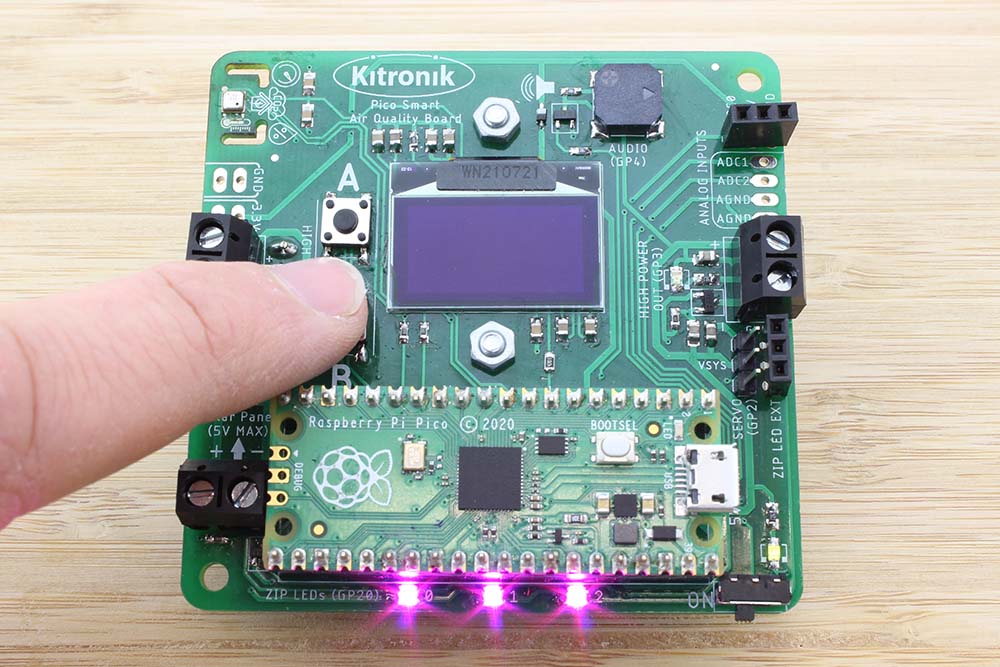
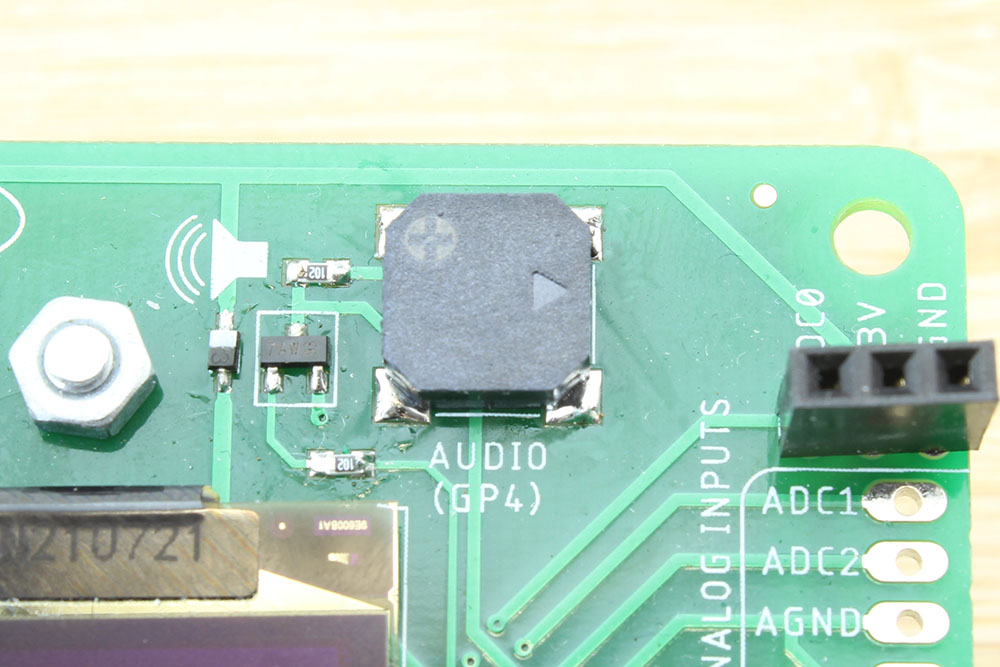
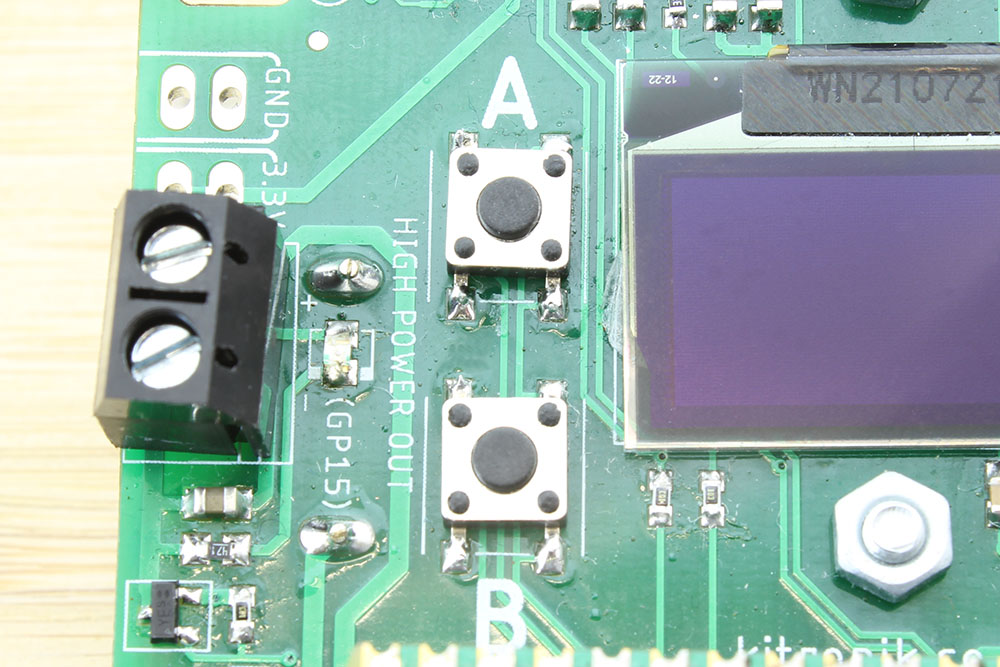
The Smart Air Quality board has two buttons which can be used as inputs to control the program which is running. There is also a buzzer, which is great for adding audio output to projects. We are going to introduce both of these in this section of the tutorial.
With the Pico correctly mounted on the board and connected to Thonny,
Create and run the following code:
from PicoAirQuality import KitronikBuzzer, KitronikButton
import time
buzzer = KitronikBuzzer()
buttons = KitronikButton()
while True:
    if (buttons.buttonA.value() == True):
        buzzer.playTone_Length(1000, 2000)
Press and release button A. You should hear the buzzer play a single tone (1kHz) for 2 seconds after you let go.
This code uses the value of the button to trigger the horn sounding, looping forever to read it.
Interrupts
Instead of looping fast to read the value of the button, microcontrollers can also be notified of a change. We can do this with an interrupt, also known as an IRQ (Interrupt ReQuest). An IRQ lets the processor be interrupted from its main loop to carry out another action – such as deal with a button press – before returning to the code it was running before.
We can also do something more interesting with the buzzer at the same time. Although it can only produce a single frequency at any one time, it is capable of outputting tones with frequencies ranging from 30Hz to 3kHz. With the two buttons, we’ve got the ideal setup for an ‘Increase Frequency’ button and a ‘Decrease Frequency’ button.
Create and run the following code which makes use of IRQs:
from PicoAirQuality import KitronikBuzzer, KitronikButton
import time
buzzer = KitronikBuzzer()
buttons = KitronikButton()
frequency = 1000
def ButtonA_IRQHandler(pin):
    global frequency
    frequency += 100
    if (frequency > 3000):
        frequency = 3000
def ButtonB_IRQHandler(pin):
    global frequency
    frequency -= 100
    if (frequency < 30):
        frequency = 30
buttons.buttonA.irq(trigger=machine.Pin.IRQ_RISING, handler=ButtonA_IRQHandler)
buttons.buttonB.irq(trigger=machine.Pin.IRQ_RISING, handler=ButtonB_IRQHandler)
while True:
    buzzer.playTone(frequency)
A lot more code has been added compared with the previous program, so let’s take a look through it all.
There are now two functions, which are IRQ handlers for the buttons. These are the functions which will be called when an interrupt is detected on the pin associated with a particular button (GP12 for button A and GP13 for button B). Both of them alter the value of a variable called ‘frequency’ – the button A handler increasing it by 100 and button B handler decreasing it by 100.
Looking at the ‘while True’ loop you can see that the ‘playTone()’ function always uses ‘frequency’ as its input parameter for determining the frequency output of the buzzer.
Note: The ‘global’ keyword is used in the IRQ functions to let MicroPython know to use the globally defined frequency variable; without this, MicroPython will create a local variable of the same name inside the functions.
The final section of the code to look at are the actual IRQs. There is one for each button and they are setup to look for an increase in voltage on the specific pin (‘IRQ_RISING’). When this condition is met the processors IRQ hardware will call the relevant IRQ handler function.
Generally, IRQ functions should be kept as short as possible to handle the request. When the processor is interrupted the main loop is stopped whilst the request is handled. If your IRQ function takes a long time, or worst case never completes, then the performance of the system can become erratic.
You might notice that sometimes the button seems to make the frequency change by much bigger jumps than expected. If you do, then you are hearing a phenomenon called ‘switch bounce’.
Debouncing
Mechanical switches do not change state instantly. Because they are usually a moving piece of springy metal then they can exhibit ‘bounce’.
As an example, when a switch is closed, and so the input connected to it goes from a ‘0’ to a ‘1’, there is a period of time when the input sees ‘1’ then ‘0’ then ‘1’ then ‘0’ until the switch settles into the new ‘1’ value.
If the input is connected to a rising edge triggered interrupt then the microcontroller may well assume it has had several IRQ triggers.
To overcome this, switches are usually ‘de-bounced’. This can be done in 2 ways – in hardware with a small filtering circuit, or in software, where the input is read over several iterations, and the trigger on raised when the state has been the same for a defined period.
These buttons have no hardware de-bouncing, so we can see the bounce.
Create and run the following code which shows a de-bouncing algorithm:
from PicoAirQuality import KitronikBuzzer, KitronikButton

from machine import Timer

import time


buzzer = KitronikBuzzer()

buttons = KitronikButton()


frequency = 1000


def checkButtonA(callBackParam):

    global buttonAState

    global frequency

    buttonAState = buttonAState <<1 | buttons.buttonA.value() |0xE000

    buttonAState &=0xFFFF

    if buttonAState == 0xEFFF:

        frequency += 100

        if (frequency > 3000):

            frequency = 3000


def checkButtonB(callBackParam):

    global buttonBState

    global frequency

    buttonBState = buttonBState <<1 | buttons.buttonB.value() |0xE000

    buttonBState &=0xFFFF

    if buttonBState == 0xEFFF:

        frequency -= 100

        if (frequency < 30):

            frequency = 30


debounceTimerA = Timer()

debounceTimerA.init(period=2, mode=Timer.PERIODIC, callback=checkButtonA)

debounceTimerB = Timer()

debounceTimerB.init(period=2, mode=Timer.PERIODIC, callback=checkButtonB)


buttonAState = 0

buttonBState = 0


while True:

    buzzer.playTone(frequency)
Rather than being interrupt driven this algorithm uses a timer to periodically sample the value of the button. Once every 2ms, the current value of the buttons is recorded in the two variables: ‘buttonAState’ and ‘buttonBState’. After 12 ‘1’s have been recorded, a button is considered to be ‘pressed’ and will then trigger its action.
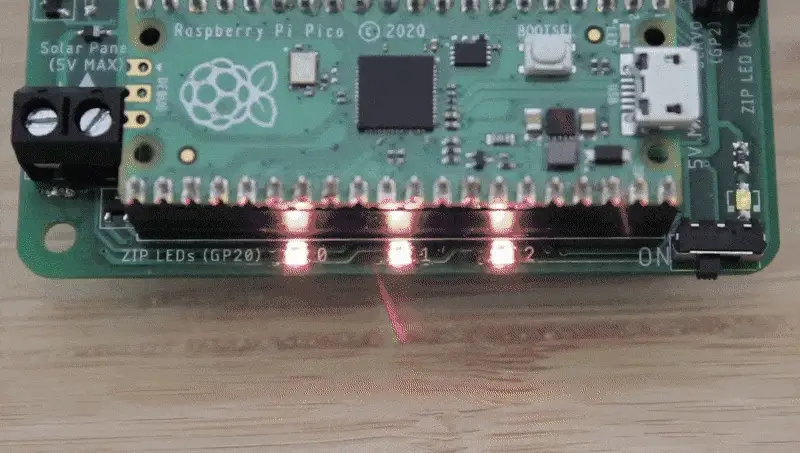
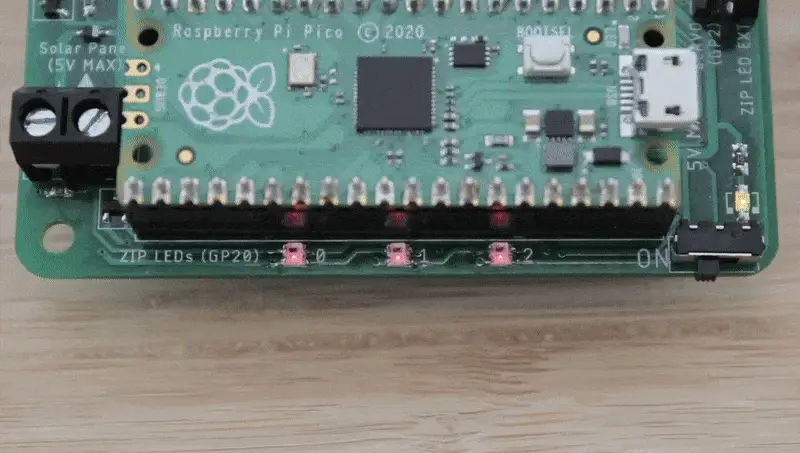
ZIP LEDs
We will leave the buzzer and the buttons for now and move on to look at the ZIP LEDs – the addressable, fully colour controllable LEDs. There are 3 ZIP LEDs on the board itself, but there is also an expansion connection where more ZIP LEDs can be attached.
Create and run the following code:
from PicoAirQuality import KitronikZIPLEDs, KitronikButton
import time
zipleds = KitronikZIPLEDs(3)
buttons = KitronikButton()
red = 255
green = 0
blue = 0
colourFade = True
while True:
    if colourFade:
        if (red > 0 and blue == 0):
            red -= 1
            green += 1
        if (green > 0 and red == 0):
            green -= 1
            blue += 1
        if (blue > 0 and green == 0):
            red += 1
            blue -= 1
    zipleds.setLED(0, (red, green, blue))
    zipleds.setLED(1, (red, green, blue))
    zipleds.setLED(2, (red, green, blue))
    zipleds.show()
    time.sleep_ms(25)
You should see the ZIP LEDs fading through all the colours of the rainbow in a continuous cycle. You can see that the colour of each ZIP LED is determined by setting values for red, green and blue, with ‘0’ being off and ‘255’ being full brightness. The section of code in the ‘if’ statement changes the different colour parameters by steps of 1 depending on current colour conditions, slowly moving through the spectrum.
**
It is not just the colour of the ZIP LEDs which can be controlled, the brightness is also adjustable, on a sliding scale from 0 to 100%. Now is the point to bring back the button code from earlier, but now we will use it to control different ZIP LED pattern settings rather than the buzzer.
Modify your program to look like this, and then click run:
from PicoAirQuality import KitronikZIPLEDs, KitronikButton

from machine import Timer
import time
zipleds = KitronikZIPLEDs(3)
buttons = KitronikButton()
red = 255
green = 0
blue = 0
brightUp = False
brightness = 100
colourFade = True
brightnessFade = False
def checkButtonA(callBackParam):

    global buttonAState

    global colourFade

    global brightnessFade

    buttonAState = buttonAState <<1 | buttons.buttonA.value() |0xE000

    buttonAState &=0xFFFF

    if buttonAState == 0xEFFF: #button A has been pressed and passes the debouncing test

        colourFade = True

        brightnessFade = False


def checkButtonB(callBackParam):

    global buttonBState

    global colourFade

    global brightnessFade

    buttonBState = buttonBState <<1 | buttons.buttonB.value() |0xE000

    buttonBState &=0xFFFF

    if buttonBState == 0xEFFF: #button B has been pressed and passes the debouncing test

        colourFade = False

        brightnessFade = True
debounceTimerA = Timer()

debounceTimerA.init(period=2, mode=Timer.PERIODIC, callback=checkButtonA)

debounceTimerB = Timer()

debounceTimerB.init(period=2, mode=Timer.PERIODIC, callback=checkButtonB)


buttonAState = 0

buttonBState = 0


while True:
    if colourFade:
        if (red > 0 and blue == 0):
            red -= 1
            green += 1
        if (green > 0 and red == 0):
            green -= 1
            blue += 1
        if (blue > 0 and green == 0):
            red += 1
            blue -= 1
    elif brightnessFade:
        if (brightness == 100):
            brightUp = False
        elif (brightness == 0):
            brightUp = True
        if brightUp:
            brightness = brightness + 1
        elif not(brightUp):
            brightness = brightness - 1
    zipleds.setLED(0, (red, green, blue))
    zipleds.setLED(1, (red, green, blue))
    zipleds.setLED(2, (red, green, blue))
    zipleds.setBrightness(brightness)
    zipleds.show()
    time.sleep_ms(25)
Initially, you should see exactly the same as the previous program – the ZIP LEDs fading through the colour of the rainbow. Try pressing button B. The colour fade should stop on the current colour, and now the brightness should be fading up and down between 0 and 100%. Pressing button A will switch the program back to the colour fade, but now it will be on whatever the brightness was last at in the brightness fade.
**
You can now use and control the buttons, buzzer and ZIP LEDs – why not try combining these inputs and outputs with BME688, OLED and RTC functionality? For example, displaying different sensor readings on the screen with different button presses, or making the buzzer sound and lights turn on when an alarm is triggered.
Coding Resources:
The list of resources in the table below have been put together to introduce you to all of the features of the board. It is best to work through them in the order that they are laid out in the table.
| Online Tutorials – Pico Smart Air Quality Board. |
|---|
| Using the BME688 Sensor. |
| Using OLED and RTC. |
| The Buzzer, Buttons & ZIP LEDs. |
| Data Logging. |
| Analogue Input & Output Control. |