If you are new to the Pico, and Python development, check out Raspberry Pi’s guide to get you started
Kitronik have also written a First Steps Tutorial to get you started using the Pico with the Thonny Editor.
Getting the Smart Air Quality Code
Kitronik have written a module to use with the Pico Smart Air Quality Board which is available, along with sample programs, in the Kitronik GitHub.
If the words “Clone the repo” mean nothing then check out our guide to git
If you are new to using modules with the Pico, there is a helpful guide providing practical examples and explanations on how to do so.
Clone or download the repository and then copy / save the PicoAirQuality.py file to your Pico.
Real-Time Clock (RTC)
The Pico has a number of built-in features beyond just having lots of pins for controlling and communicating with external devices, and one of these is the real-time clock (RTC). RTCs are very useful for accurately keeping track of time and in the Data Logging Tutorial we will make use of this to provide date and time stamps for data logging. With the PicoAirQuality module, there are functions available for setting the date and time, reading them back – including all the individual parameters; day, month, year, hours, minutes, seconds – and creating alarms.
With the Pico correctly mounted on the board and connected to Thonny,
Create and run the following code :
from PicoAirQuality import KitronikRTC
import time
rtc = KitronikRTC()
rtc.setDate(5, 11, 2021)
rtc.setTime(10, 59, 0)
while True:
    print(rtc.readDateString())
    print(rtc.readTimeString())
    time.sleep_ms(1000)
You should see the date and time displaying in the Thonny Shell, updating every second.

As you can see, it is very simple to set and read both the date and time on the Pico. Try altering your code to set the date and time to the current date and time.
setDate takes parameters in the order Day, Month, Year.
setTime takes parameters in the order Hours, Minutes, Seconds.
It is not very convenient having the Pico connected to Thonny to actually be able to see the time, so let’s combine this with another feature, the OLED display screen.
OLED Screen
The OLED display screen is a great way to add a visual output to your programs, and there are functions for displaying text, drawing lines and shapes, and even plotting live graphs.
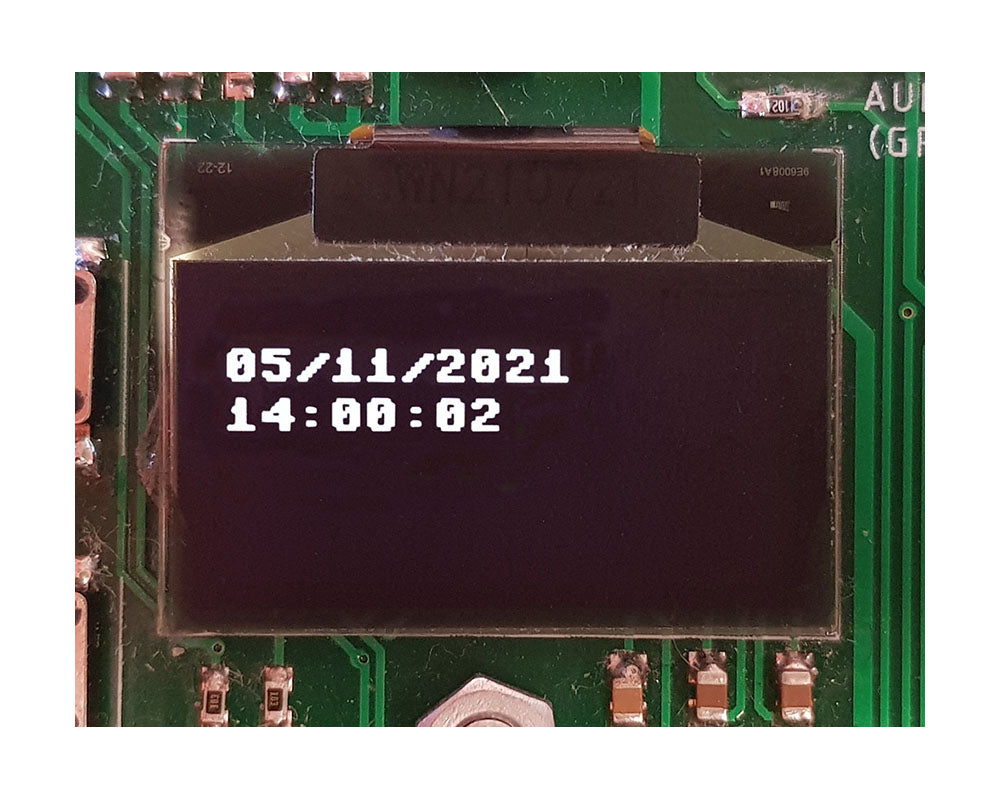
To get started, we can display the date and time from the RTC on the OLED, rather than using the Thonny Shell.
Alter your code to look like the following, and then click run:
from PicoAirQuality import KitronikOLED, KitronikRTC
import time
oled = KitronikOLED()
rtc = KitronikRTC()
rtc.setDate(5, 11, 2021)
rtc.setTime(14, 0, 0)
while True:
    oled.clear()
    oled.displayText(rtc.readDateString(), 2)
    oled.displayText(rtc.readTimeString(), 3)
    oled.show()
You should now see the date and time displaying on the board’s OLED screen on lines 2 and 3.
In the code above, the ‘displayText()’ function has 2 different parameters:
- First, the text to display (up to 16 characters on a line)
- Second, the line to display the text on (1 to 6)
By default, text will display left justified on the OLED screen, but it is possible to shift the starting point of the text to the right by a specified number of pixels – this is an optional third parameter of the function:
- Third, the number of pixels to shift the text starting point to the right (the screen is 128 pixels wide and each character has a width of 8 pixels – when setting this parameter, be careful to not shift the last characters off the end of the line)
Add the extra ‘shift by pixels’ parameter to the ‘displayText()’ functions, and then click run:
while True:
    oled.clear()
    oled.displayText(rtc.readDateString(), 2, 25)
    oled.displayText(rtc.readTimeString(), 3, 33)
    oled.show()
The date and time should now be centred on lines 2 and 3.
Note: The ‘show()’ function always needs to be called after any changes have been made to make the changes actually appear on the screen.
Shapes and lines can be used to change and improve how information is formatted on the screen. For example, adding a border around the date and time using a rectangle.
Add the ‘drawRect()’ function to the code, and then click run:
from PicoAirQuality import KitronikOLED, KitronikRTC
import time
oled = KitronikOLED()
rtc = KitronikRTC()
rtc.setDate(5, 11, 2021)
rtc.setTime(9, 29, 0)
while True:
    oled.clear()
    oled.drawRect(4, 5, 120, 35)
    oled.displayText(rtc.readDateString(), 2, 25)
    oled.displayText(rtc.readTimeString(), 3, 33)
    oled.show()
There should now be a nice box around the outside of your date and time display:
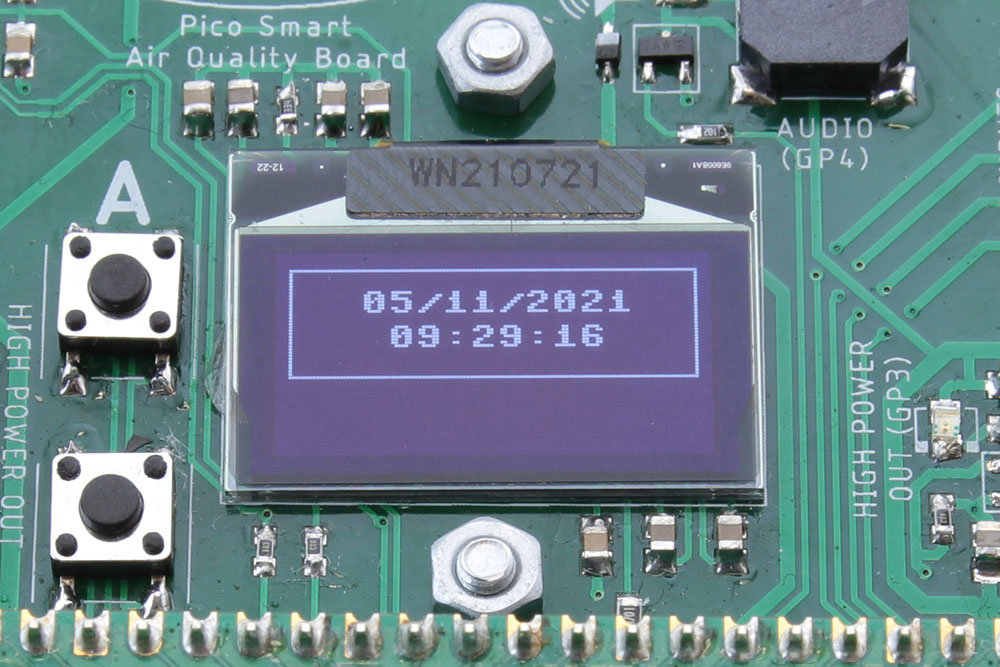
The ‘drawRect()’ function allows you to set a top left starting (x, y) coordinate, and then the width and height of the shape. There is also the optional fifth parameter to set whether the box should be completely filled (‘True’), or just an edge line (by default this is set to ‘False’).
Why not try using the knowledge from the BME688 Sensor Tutorial to add some of the climate measurements to other lines on the screen to make a little digital weather station display?
Alarms
With the RTC, it is also possible to set alarms and then trigger actions to take place when they go off. These actions are not limited to the traditional alarm outputs (buzzer sounds, lights etc), but could instead be used to trigger the BME688 sensor to take measurements periodically, for example.
Just as with setting the date and time, setting and checking for alarms is very straightforward: use the ‘setAlarm(hour, minute)’ function to set the alarm time, and then use ‘checkAlarm()’ to see whether it has triggered.
Create and run the following code (make the alarm one minute after the set time):
from PicoAirQuality import KitronikOLED, KitronikRTC
import time
oled = KitronikOLED()
rtc = KitronikRTC()
rtc.setDate(1, 11, 2021)
rtc.setTime(14, 0, 50)
rtc.setAlarm(14, 1)
while True:
    if rtc.checkAlarm():
        oled.clearLine(3)
        oled.displayText("WAKE UP!!!", 3, 20)
        oled.show()

        time.sleep(5)

        rtc.silenceAlarm()

        oled.clearLine(3)

        oled.show()
In the code, the time is initially set to 14:00, and then the alarm is set to trigger at 14:01.Once the alarm time has been reached, ‘WAKE UP!!!’ should be displayed in the centre of the OLED screen. After 5 seconds, the alarm will be ‘silenced’ and line 3 cleared – calling ‘silenceAlarm()’ is necessary to stop the alarm triggering again straight away.
Note: The alarm time is set just with hours and minutes, no seconds, and the ‘checkAlarm()’ function will return ‘True’ when the alarm is triggered.
The example program above just sets an alarm to trigger once, however, it can be useful to set alarms to trigger repeatedly with a set period inbetween (for example, when setting up a data logging schedule). To facilitate this, the ‘setAlarm()’ function has 3 additional parameters which can be set:
setAlarm(hour, minute, alarmRepeat, hourPeriod, minutePeriod)
- alarmRepeat: set this to True to setup a periodically repeating alarm (the parameter is defaulted to False)
- hourPeriod: the gap in hours between alarms (adds to minutePeriod if set)
- minutePeriod: the gap in minutes between alarms (adds to hourPeriod if set)
The following code sets a periodic alarm triggering every 2 minutes:
from PicoAirQuality import KitronikOLED, KitronikRTC
import time
oled = KitronikOLED()
rtc = KitronikRTC()
rtc.setDate(1, 11, 2021)
rtc.setTime(14, 0, 50)
rtc.setAlarm(14, 2, True, 0, 2)
while True:
    if rtc.checkAlarm():
        oled.clearLine(3)
        oled.displayText("2 MINS", 3, 25)
        oled.show()

        time.sleep(5)

        rtc.silenceAlarm()

        oled.clearLine(3)

        oled.show()
Coding Resources:
The list of resources in the table below have been put together to introduce you to all of the features of the board. It is best to work through them in the order that they are laid out in the table.
| Online Tutorials – Pico Smart Air Quality Board. |
|---|
| Using the BME688 Sensor. |
| Using OLED and RTC. |
| The Buzzer, Buttons & ZIP LEDs. |
| Data Logging. |
| Analogue Input & Output Control. |